Can't cut square on CSC 50 with miter gauge

MartyDavis

Member
Joined
May 25, 2015
Messages
12
The CSC 50 is my first table saw. I've read the manual and looked on line but can't see how to square the miter gauge with the blade. I've raised the blade, used a Woodpecker square and it looks squared up, but when I do the four (or five) cut test, the resulting piece is out of square.

I was ripping thin (72mm wide) strips yesterday and they were 72mm at the bottom and 71mm at the top. That's what started this process.

I'm in a wheelchair and operate the saw from a seated position. Any tips would be appreciated.
 
Section 13.9 in the manual titled "Aligning the sliding table with the saw
blade [25]"  Basically, it entails removing the screw caps where you'll access the cam screw 25-4, that swivels the table left right. 

Although before going through all that trouble, I'd stick a dial indicator in the miter slot, lock it, and slide the table to a marked saw tooth in the front and back positions.  If they're not reading the same, then adjust the slide table - otherwise it's somewhere else.... like the miter gauge.
 
I'm a bit confused:
You say "miter gauge" but then talk about ripping.
The saw is known for its sliding table, which isn't a "miter gauge."

Although it's all over YouTube, squaring a miter gauge/sled/sliding table to the blade is NOT the correct procedure. Think about using miter gauge on a router table - to what are you squaring? A round bit?

What makes a cross-cut square is the angle of the thingie's fence to the direction of travel. That's how aftermarket miter gauge companies can sell miter gauges that produce extremely square cuts even on mis-aligned tablesaws - they make sure the miter gauge's fence is square to the miter gauge's bar. You can do that, too, off the tablesaw.

Making the miter slot or sliding table travel parallel to the blade is done for quality of cut and kickback chance reduction reasons, it won't help with the squareness of cuts produced.

For the sliding table, you need to make the back fence perpendicular to the travel of the sliding table. I don't have this saw, so I can't instruct you on how to do that. Since you're already using the 5-cut method to test, I'd suggest using the 5-cut method to adjust the 90º point on the sliding table's fence.

 
smorgasbord said:
I'm a bit confused:
You say "miter gauge" but then talk about ripping.
The saw is known for its sliding table, which isn't a "miter gauge."

Apparently I'm confused too.  [cool]

I'm using the sliding table with the cross stop. I put a piece of wood on it and cut, rotate 90°, repeat, and so on. The resulting square isn't square. That's what I'm chasing.

Thanks for your efforts to educate me.
 
It tooks me two days to calibrate this saw out of the box ;p
You will need to go through few calibrations before acceptable 90 degree cut.
You can find calibration methods from manual or youtube. Try themand you will be satisfied right after :)
Once that's done, it is a great table saw.
 
From what I've seen of the saw, if the miter slot in the sliding table is parallel to the track on which the sliding tale runs, then all you have to do is square the miter gauge that can be clamped in the miter slot. You can do this with your Woodpeckers square - put the handle on the miter bar and the blade on the miter fence.
 
The included miter gauge isn't really the adjustable type.  It's bar uses a spring locating pin that makes it practically impossible to get any manual adjustment between -2deg to 2deg without it falling into the 0.  The aluminum extrusion fence is tightly bound to the plastic molding with a single center nut.  The molding is thread taped to the gauge that has the receiving holes.

You'll need to verify the slide is relatively parallel to the blade for this saw.  Obviously, parallel or minutely toed out.

edit: maybe you can use brass shims behind the fence but that's gonna be a pain having to reset every time to store the gauge in the park position.
 
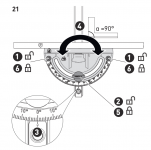
Usually miter saws allow for the angle indicator (the curved part with all the angles gradations marked) to be loosened, adjusted slightly and retightened in order to calibrate to square. The presets usually click into spots along that angle ring. I don't have a csc, but the manual in its ikea style pictures makes it look like the miter gauge would be similarly adjustable? image 21 in section 13.5 of the pdf manual looks like the sequence would be to loosen the socket head screws on left and right ends of the angle gauge, loosen clamp screw at angle indicator, then adjust and retighten? Maybe worth a call to festool customer service and see if that's correct?
 
If the two sides of the board being cut are not parallel, the error you are seeing will happen.
 
[member=52581]MartyDavis[/member] Hello.  I've not got a CSC50.
It sounds like you're doing a "five cut method" to calibrate you're saw.
I've struggled with this method, watch the youtube videos closley.
* You need to rotate the workpiece so the freshly cut edge is against the mitre fence.
* If the blade is on the right hand side of the workpiece that means turn the workpiece CLOCKWISE.
* The last cut is to remove a thin strip and measure it's length and thickness at both ends.  Then there's a formula to work out how much to adjust the mitre fence.  (which is normally a very small amount).

You're trying to make sure the mitre fence is at 90degrees to the blade.

I think the mitre fence on the CSC50 is locked into the sliding table, so you must adjust the sliding table.
I guess your question is "how do I adjust the sliding table".

I just had a look at the manualhttps://media.cdn.festool.io/productmedia/Images/attachment/9a8efe5c-98a9-11ed-8a3b-005056b3ad01.pdf

Top left hand corner of page28 shows the mitre gauge and 3 lock nuts labelled "1", that looks like it allows the fence to move independently of the measurement scale.  Maybe you can adjust the mitre gauge independently.

Section 13.9 appears to show how you adjust the sliding table.

Bob
 
bobtskutter said:
You're trying to make sure the mitre fence is at 90degrees to the blade.

Sorry for belaboring the point, but that is not the goal.
The goal is to have the miter fence perpendicular to the direction of travel, which is normally the miter bar, but on this saw is probably the track of the sliding table.

From page 28 of the manual:
[attachimg=1]

Notice the square does not reference the blade.


Attachments

  • Screenshot 2024-10-04 at 9.45.56 AM.png
    Screenshot 2024-10-04 at 9.45.56 AM.png
    140.4 KB · Views: 103
Thanks fellow Festool owners. I was able to align the sliding table with the saw to near perfection. I first made sure that the miter bar was perpendicular to the direction of travel as bobtskutter noted was indicated in the manual.

I made a 200mm long cut that was 72mm wide. The variation from start to finish was approximately 0.12mm.

As many others have noted, the Festool instructions were terse and I had to reread them several times to fully grasp what they were directing me to do. But I read through countless tech manuals when I was in the Navy, so I'm used to grappling with terseness.

If I were chasing perfection I think I would clamp a dial indicator to the sliding table and use it to really ensure parallelism.
 
Back
Top