woodbutcherbower
Member
It’s been a while since I posted a project. This one’s really nothing special or fancy, but I’m posting it for an altogether different reason which I hope will make you smile [smile] The back story - I moved house a few years ago, and got rid of my bed because I always hated it (a cheap cam-and-dowel chipboard-and-cardboard stopgap bought in a hurry from a well-known Swedish store whose name rhymes with diarrhoea). I thought to myself - “Yeah, I can build myself a proper bed later this month”. But fast-forward several years - and I’m still sleeping on a mattress on the floor. Life (and more specifically - work) just exploded and there was just never any time to get this done. FOG members who’ve seen the other work I periodically post on here will realise that much of it is pretty specialist, so I’m always completely snowed under, I always have a crazy-long waiting list – and the customer always comes first. But suddenly, and completely out of the blue, I get a call from a customer to tell me that the little two-day job she’s booked me in for (hanging eight new doors plus locks, latches and hardware) is going to have to be delayed because her new doors are going to be delivered 48 hours late. My immediate reaction would normally be to call the next-in-line customer to tell them that their job could be started two days early. But a slightly angry voice in my head was saying “Kevin, for heaven’s sake – you’re sleeping on the floor. You need a bed. Quit making excuses and just get it done.”
Aside from the voice from beyond - I’ll freely admit that glancing at my diary and seeing it 100% full for the next five months was also pretty motivating. But to properly build, finish, paint and assemble a nice-quality double bed in two days – maybe only 14-15-16 hours of actual construction/finishing/painting and assembly time? How would this even be remotely possible?
But hey – you’ll never score the goals you don’t shoot for, right? Let’s go ………
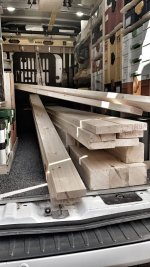
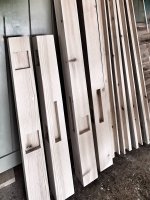
Tuesday 30th, 7.00am - Down at my regular yard picking up the timber for the posts, crossrails, siderails, headboard and footboard panels = 94mm x 94mm (4” x 4”) for the posts, 94mm x 69mm (4” x 3”) for the crossrails, 120mm x 28mm for the panel infills, and 220mm x 32mm for the siderails. Some of the timber (especially the 4” x 3”) has the increasingly-common-but-harmless ‘blue stain’ caused by an outbreak of the Ophiostomatales tree fungus in Sweden and Finland which is where the majority of Europe’s softwood comes from, so my long-standing friends down at the yard give me all of the blue stuff for free once I tell them what it's for. This thing’s gonna be heavy. The additional timber for the bed (mattress support slats etc.) is already sitting on the rack in the shop.
It's been there for a few years …….
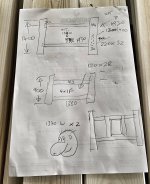
I’d scrawled a 30-second thumbnail of the basic dimensions (easy – you just take the size of your mattress and work outwards), but to stand any chance of success within the scary timeframe, this whole thing was going to get thrown together pretty much on the fly;
[attachimg=1]
[attachimg=2]
Tuesday 30th, 7.45am – Straight to work (No - I still haven’t had time to paint the floor or get it cleaned up). The first thing I always do when working with knotty softwood is to get everything filled and sanded to 120 grit, ready to take paint. It’s so much easier and quicker to do this ‘on the flat’ rather than goofing around attempting to do things like cramming triangular detail sanders into internal right-angled corners when stuff’s all built. My regular Isopon 2-pack filler sets rock-hard chemically, and is ready to sand in 20 minutes. Once the timber’s all prepped, the first actual woodworking job is to machine small 45-degree chamfers on all four edges of the 120mm x 28mm infill panel boards so V-grooves will appear on both faces. The machined board edges are then biscuit-jointed every 400mm, glued up with EB502 and clamped together using 4 x six-foot-long Magnusson sash clamps with three top-and-bottom pairs of 3” x 2” G-clamped CLS construction timber cauls to keep everything flat. Always thinking ahead, I make these panels way oversize so I have enough left over to build a toy chest for my tiny granddaughter. With a little luck, she might get it by her 10th birthday. Or maybe her 18th. Or her 21st. Or on her wedding day.
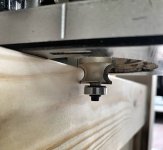
Tuesday 30th, 12.30pm – The construction was going to consist of the headboard/footboard crossrails and siderails acting as stub tenons sitting inside shallow (30mm) mortises in the vertical posts, and with the crossrails being trenched to take the 28mm thick V-grooved panels. So whilst the panel glue’s drying, out comes the mighty OF2200 to hack out the post mortises and crossrail trenches. The mortise corners get squared off with one of my treasured Kirschen firmer chisels;
[attachimg=3]
Tuesday 30th, 3.15pm – I grab the pile of years-old 4” x 1” to make the mattress support slats. No filling or sanding these because they’re functional, not decorative. But boy – are those edges mattress-rippingly sharp. So into the trim router goes the 5mm rounding-over cutter to fix this. 22 boards x 4 edges per board. The nature of doing this for a living means that I habitually do repetitive stuff, but by the time I do the 88th edge (with one eye on the clock), I'm losing the will to live;
[attachimg=4]
Tuesday 30th, 4.30pm – it’s a warm day and the glue’s now had almost 5 hours. That’s plenty enough for an indoor, non-stressed application. So off come the cauls and clamps, and the panels are cut to size;
[attachimg=5]
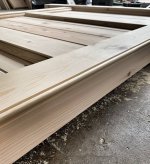
Tuesday 30th, 5.15pm – Mortised & trenched posts and rails are cut to length, the surfaces of the machined components are all carefully checked, and the odd scrapes and dings caused by moving stuff around are re-filled and re-sanded;
[attachimg=6]
Tuesday 30th, 6.30pm – The headboard and footboard components are assembled, glued up and clamped with the Magnussons so they’ll be ready for tomorrow. Since the bed is going to be painted a flat, pale grey/stone colour, I decide that oak caps will look cool on top of the posts. So I cut four of them from kiln-dried offcuts. Tip of the day = to safely put chamfers or similar edge mouldings on small pieces like this, screw them to a batten from underneath, then clamp the batten tight so that nothing can move. This gives you solid, all-edges access to your workpiece so you can use a bearing-guided cutter and get the desired result whilst retaining all of your fingers. A quick wipe over with tung oil and they’re good to go;
[attachimg=7]
[attachimg=8]
Tuesday 30th, 7.30pm – I spend half an hour tidying up the chaotic sawdust and offcut-strewn floor and attempt to restore some sense of order and tranquillity to my place of work. Day #1 is complete, and almost unbelievably, I already have the basics of a bed. It’s been non-stop relentless, and I’ve pretty much brickwalled by this point. Time for a shower and a nice Australian Shiraz.
Wednesday 31st, 8.00am – The clamps come off, and the basic blanks are done. You can see the ‘blue stain’ on the left side of both top crossrails. I always make a point of caulking V-grooves, so that any subsequent drying-out or other movement will be taken up by the flexible nature of the sealant. I cut a pair of 3” x 2” CLS support battens to length, and fix these to the siderail bottom edges using more EB502 and screws. These battens will support the ends of the mattress support slats. I’d normally fill and sand the screw heads. But I look at the clock - and don’t, figuring that they’re under the bed and they’ll never be seen. There also needs to be a central front-to-back support spar to stop the slats from sagging and bending in the middle. All I have lying around is the CLS 3” x 2” construction timber which I’d used as clamping cauls. One piece won’t be strong enough. So I sister two of them together using more glue and screws and cut the sistered spar to length.
[attachimg=9]
Wednesday 31st, 9.30am – It’s time to start adding some visual interest. So I attack it using what’s left of the 4” x 1” and a pile of 16mm quadrant mouldings (classic UK mixed measurement units again there) which I had sitting on the rack as leftovers from some distant, long-forgotten job. I do the footboard at the same time so they’ll be a visual match for each other. The framing is bradded and glued on, but the quadrant mouldings are fixed on using 2-pack cyanoacrylate because it’s effective - and fast. By way of temporary diversion - even something as relatively small as this headboard & footboard needs 24 x mitre joints for the quadrant mouldings. That’s 48 x precision 45-degree cuts consuming shedloads of time which I don’t have. Since I frequently get hired to replace rotted-out wall panelling in the multitude of 18th century Georgian townhouses in this area, I figured long, long ago that positioning the framing rails super-accurately means that the mitred mouldings can then be batch-cut using a length stop on the mitre saw, saving vast amounts of time;
[attachimg=10]
Wednesday 31st, 11.00am Back on topic - the woodwork’s miraculously done, my KFC order hasn't even shown up yet, and everything’s looking tight and seamless. I then decide that the square edges of the posts look too harsh - they need a ‘certain something’ to soften them, so after carefully thinking it over for 0.000001 seconds, I pull out my favourite face-frame beading cutter and pop it into a quarter-inch router. This genius device rounds over the edge and digs out a little trench at the same time. You make the cut, then repeat it on the adjacent 90-degree face to generate a lovely edge profile. But wait..........the legendary 100-piece 'woodworker's bucket' arrives. Mmmmmmm (Homer Simpson voice) ....KFC + sawdust.
[attachimg=11]
[attachimg=12]
[attachimg=13]
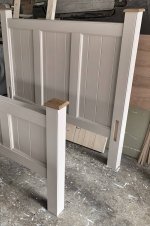
Wednesday 31st, 12.00pm – A final vacuum and brush down, a few dabs of knotting shellac here & there, and it’s ready for paint, starting with two coats of Leyland hi-build acrylic primer which I always dilute 70/30 with water. This makes the paint flow way better, the thinned coats don’t mask all the detail on the workpiece, it doesn’t leave any brush marks, and the additional water raises the grain very slightly so the texture just peeks through the surface. I personally prefer this natural ‘made of wood’ look to something which looks like it’s got a crummy plastic coating on it. This primer also dries in 30-40 minutes if the temperature’s reasonable. The dry 2-coat primer is then gently de-nibbed and flattened using worn-out Mirka Abranet discs which I save for delicate stuff like this. Another brush down, and on with the topcoat – Farrow & Ball eggshell. This paint’s expensive - but for good reason, and it dries to an almost-flat finish with just the tiniest hint of sheen. Considering the breakneck speed at which it’s all come together – I have to admit that it’s looking remarkably crisp and tight;
[attachimg=14]
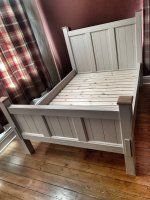
Wednesday 31st, 4.00pm – The paint’s dry and I start taking the components upstairs to assemble it. You remember I said it was gonna be heavy? No way can I get the headboard upstairs, so I call my brother who lives just a few miles away. The emergency reinforcements arrive quickly, up it goes, and assembly starts. The bed will probably have to come apart at some point in the future, so the side rails are fixed through the post mortises using hefty 6mm x 150mm screws, countersunk below the surface. The heads are then hidden using small concealment plates cut from 44mm x 8mm door edge lipping (WAY too clunky, but it's all I had lying around) and fixed on using little dabs of silicone so they can easily be peeled off again for disassembly should the time come. The central sistered spar is secured onto the headboard and footboard using chunky steel brackets, on go the slats - et voilà …….. the 15-hour bed. Total cost just £140. I decided not to bill myself for labour. We all work wood because we love doing it, but the £££/$$$/€€€ we can save is often super-satisfying, too;
[attachimg=15]
Sweet dreams [big grin]
Kevin
Aside from the voice from beyond - I’ll freely admit that glancing at my diary and seeing it 100% full for the next five months was also pretty motivating. But to properly build, finish, paint and assemble a nice-quality double bed in two days – maybe only 14-15-16 hours of actual construction/finishing/painting and assembly time? How would this even be remotely possible?
But hey – you’ll never score the goals you don’t shoot for, right? Let’s go ………
Tuesday 30th, 7.00am - Down at my regular yard picking up the timber for the posts, crossrails, siderails, headboard and footboard panels = 94mm x 94mm (4” x 4”) for the posts, 94mm x 69mm (4” x 3”) for the crossrails, 120mm x 28mm for the panel infills, and 220mm x 32mm for the siderails. Some of the timber (especially the 4” x 3”) has the increasingly-common-but-harmless ‘blue stain’ caused by an outbreak of the Ophiostomatales tree fungus in Sweden and Finland which is where the majority of Europe’s softwood comes from, so my long-standing friends down at the yard give me all of the blue stuff for free once I tell them what it's for. This thing’s gonna be heavy. The additional timber for the bed (mattress support slats etc.) is already sitting on the rack in the shop.
It's been there for a few years …….
I’d scrawled a 30-second thumbnail of the basic dimensions (easy – you just take the size of your mattress and work outwards), but to stand any chance of success within the scary timeframe, this whole thing was going to get thrown together pretty much on the fly;
[attachimg=1]
[attachimg=2]
Tuesday 30th, 7.45am – Straight to work (No - I still haven’t had time to paint the floor or get it cleaned up). The first thing I always do when working with knotty softwood is to get everything filled and sanded to 120 grit, ready to take paint. It’s so much easier and quicker to do this ‘on the flat’ rather than goofing around attempting to do things like cramming triangular detail sanders into internal right-angled corners when stuff’s all built. My regular Isopon 2-pack filler sets rock-hard chemically, and is ready to sand in 20 minutes. Once the timber’s all prepped, the first actual woodworking job is to machine small 45-degree chamfers on all four edges of the 120mm x 28mm infill panel boards so V-grooves will appear on both faces. The machined board edges are then biscuit-jointed every 400mm, glued up with EB502 and clamped together using 4 x six-foot-long Magnusson sash clamps with three top-and-bottom pairs of 3” x 2” G-clamped CLS construction timber cauls to keep everything flat. Always thinking ahead, I make these panels way oversize so I have enough left over to build a toy chest for my tiny granddaughter. With a little luck, she might get it by her 10th birthday. Or maybe her 18th. Or her 21st. Or on her wedding day.
Tuesday 30th, 12.30pm – The construction was going to consist of the headboard/footboard crossrails and siderails acting as stub tenons sitting inside shallow (30mm) mortises in the vertical posts, and with the crossrails being trenched to take the 28mm thick V-grooved panels. So whilst the panel glue’s drying, out comes the mighty OF2200 to hack out the post mortises and crossrail trenches. The mortise corners get squared off with one of my treasured Kirschen firmer chisels;
[attachimg=3]
Tuesday 30th, 3.15pm – I grab the pile of years-old 4” x 1” to make the mattress support slats. No filling or sanding these because they’re functional, not decorative. But boy – are those edges mattress-rippingly sharp. So into the trim router goes the 5mm rounding-over cutter to fix this. 22 boards x 4 edges per board. The nature of doing this for a living means that I habitually do repetitive stuff, but by the time I do the 88th edge (with one eye on the clock), I'm losing the will to live;
[attachimg=4]
Tuesday 30th, 4.30pm – it’s a warm day and the glue’s now had almost 5 hours. That’s plenty enough for an indoor, non-stressed application. So off come the cauls and clamps, and the panels are cut to size;
[attachimg=5]
Tuesday 30th, 5.15pm – Mortised & trenched posts and rails are cut to length, the surfaces of the machined components are all carefully checked, and the odd scrapes and dings caused by moving stuff around are re-filled and re-sanded;
[attachimg=6]
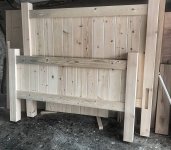
Tuesday 30th, 6.30pm – The headboard and footboard components are assembled, glued up and clamped with the Magnussons so they’ll be ready for tomorrow. Since the bed is going to be painted a flat, pale grey/stone colour, I decide that oak caps will look cool on top of the posts. So I cut four of them from kiln-dried offcuts. Tip of the day = to safely put chamfers or similar edge mouldings on small pieces like this, screw them to a batten from underneath, then clamp the batten tight so that nothing can move. This gives you solid, all-edges access to your workpiece so you can use a bearing-guided cutter and get the desired result whilst retaining all of your fingers. A quick wipe over with tung oil and they’re good to go;
[attachimg=7]
[attachimg=8]
Tuesday 30th, 7.30pm – I spend half an hour tidying up the chaotic sawdust and offcut-strewn floor and attempt to restore some sense of order and tranquillity to my place of work. Day #1 is complete, and almost unbelievably, I already have the basics of a bed. It’s been non-stop relentless, and I’ve pretty much brickwalled by this point. Time for a shower and a nice Australian Shiraz.
Wednesday 31st, 8.00am – The clamps come off, and the basic blanks are done. You can see the ‘blue stain’ on the left side of both top crossrails. I always make a point of caulking V-grooves, so that any subsequent drying-out or other movement will be taken up by the flexible nature of the sealant. I cut a pair of 3” x 2” CLS support battens to length, and fix these to the siderail bottom edges using more EB502 and screws. These battens will support the ends of the mattress support slats. I’d normally fill and sand the screw heads. But I look at the clock - and don’t, figuring that they’re under the bed and they’ll never be seen. There also needs to be a central front-to-back support spar to stop the slats from sagging and bending in the middle. All I have lying around is the CLS 3” x 2” construction timber which I’d used as clamping cauls. One piece won’t be strong enough. So I sister two of them together using more glue and screws and cut the sistered spar to length.
[attachimg=9]
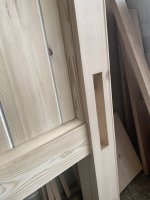
Wednesday 31st, 9.30am – It’s time to start adding some visual interest. So I attack it using what’s left of the 4” x 1” and a pile of 16mm quadrant mouldings (classic UK mixed measurement units again there) which I had sitting on the rack as leftovers from some distant, long-forgotten job. I do the footboard at the same time so they’ll be a visual match for each other. The framing is bradded and glued on, but the quadrant mouldings are fixed on using 2-pack cyanoacrylate because it’s effective - and fast. By way of temporary diversion - even something as relatively small as this headboard & footboard needs 24 x mitre joints for the quadrant mouldings. That’s 48 x precision 45-degree cuts consuming shedloads of time which I don’t have. Since I frequently get hired to replace rotted-out wall panelling in the multitude of 18th century Georgian townhouses in this area, I figured long, long ago that positioning the framing rails super-accurately means that the mitred mouldings can then be batch-cut using a length stop on the mitre saw, saving vast amounts of time;
[attachimg=10]
Wednesday 31st, 11.00am Back on topic - the woodwork’s miraculously done, my KFC order hasn't even shown up yet, and everything’s looking tight and seamless. I then decide that the square edges of the posts look too harsh - they need a ‘certain something’ to soften them, so after carefully thinking it over for 0.000001 seconds, I pull out my favourite face-frame beading cutter and pop it into a quarter-inch router. This genius device rounds over the edge and digs out a little trench at the same time. You make the cut, then repeat it on the adjacent 90-degree face to generate a lovely edge profile. But wait..........the legendary 100-piece 'woodworker's bucket' arrives. Mmmmmmm (Homer Simpson voice) ....KFC + sawdust.
[attachimg=11]
[attachimg=12]
[attachimg=13]
Wednesday 31st, 12.00pm – A final vacuum and brush down, a few dabs of knotting shellac here & there, and it’s ready for paint, starting with two coats of Leyland hi-build acrylic primer which I always dilute 70/30 with water. This makes the paint flow way better, the thinned coats don’t mask all the detail on the workpiece, it doesn’t leave any brush marks, and the additional water raises the grain very slightly so the texture just peeks through the surface. I personally prefer this natural ‘made of wood’ look to something which looks like it’s got a crummy plastic coating on it. This primer also dries in 30-40 minutes if the temperature’s reasonable. The dry 2-coat primer is then gently de-nibbed and flattened using worn-out Mirka Abranet discs which I save for delicate stuff like this. Another brush down, and on with the topcoat – Farrow & Ball eggshell. This paint’s expensive - but for good reason, and it dries to an almost-flat finish with just the tiniest hint of sheen. Considering the breakneck speed at which it’s all come together – I have to admit that it’s looking remarkably crisp and tight;
[attachimg=14]
Wednesday 31st, 4.00pm – The paint’s dry and I start taking the components upstairs to assemble it. You remember I said it was gonna be heavy? No way can I get the headboard upstairs, so I call my brother who lives just a few miles away. The emergency reinforcements arrive quickly, up it goes, and assembly starts. The bed will probably have to come apart at some point in the future, so the side rails are fixed through the post mortises using hefty 6mm x 150mm screws, countersunk below the surface. The heads are then hidden using small concealment plates cut from 44mm x 8mm door edge lipping (WAY too clunky, but it's all I had lying around) and fixed on using little dabs of silicone so they can easily be peeled off again for disassembly should the time come. The central sistered spar is secured onto the headboard and footboard using chunky steel brackets, on go the slats - et voilà …….. the 15-hour bed. Total cost just £140. I decided not to bill myself for labour. We all work wood because we love doing it, but the £££/$$$/€€€ we can save is often super-satisfying, too;
[attachimg=15]
Sweet dreams [big grin]
Kevin
Attachments
-
 1.JPG182 KB · Views: 11,683
 -
 2.JPG218.3 KB · Views: 11,663
 -
 3.JPG322 KB · Views: 11,609
 -
 4.JPG218.2 KB · Views: 11,566
 -
 5.JPG489.1 KB · Views: 11,234
 -
 6.JPG305.8 KB · Views: 10,566
 -
 7.JPG449.3 KB · Views: 10,246
 -
 8.JPG264.4 KB · Views: 10,055
 -
 9.JPG165.8 KB · Views: 9,828
 -
 10.JPG292.9 KB · Views: 9,576
 -
 11.JPG188.3 KB · Views: 9,249
 -
 12.JPG94.3 KB · Views: 8,444
 -
 13.JPG249 KB · Views: 7,764
 -
 14.JPG137.9 KB · Views: 7,609
 -
 15.JPG292.6 KB · Views: 7,511
 Only 'the chosen one' knows what I'm referring to ........ [big grin] [big grin]