Carved Cedar Bentwood Box -COMPLETED

Frank Pellow

Member
Joined
Jan 16, 2007
Messages
2,743
(post 1 of 5)

Ever since I carved a small totem pole a couple of years ago (see http://festoolownersgroup.com/various-woodworking-crafts-topics/i-am-carving-a-small-totem-pole-this-week/) I have been searching for a course where I could learn how to make and carve a bentwood box.

Last week, I attended a five day course on Bentwood Boxes taught by Steve Brown at the Port Townsend School of Woodworking.  The school is located in Port Townsend Washington and that town is among my favourite places in the world.  The school is located in the Fort Warden state park, a closed (but very well maintained) military facility.  Here is a picture of the main school building (the old powerhouse) which contains two shops:

[attachthumb=#1]
   
Our course was taught in a nearby auxiliary building:

[attachthumb=#2]
   
Here is a picture if a portion of the interior of our building with the cedar planks that we were to use for our boxes leaning in the foreground:

[attachthumb=#3]

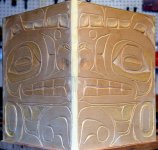
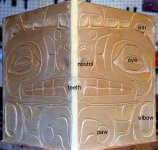
Steve Brown is a well known artist who lives in nearby Sequim and he specializes in west coast native art.

The sides of a bentwood box are made from a single plank.  First three kerfs and a rabbet are cut in the plank, then the plank is soaked in water, then it is steamed, then it is bent into shape.  It sounds easy, but it isn’t.

Steve started the course by drawing  a handful of  various ways that people have chosen to make a kerf and explaining the advantages and disadvantages of each.  Here is a drawing of the shape of kerf that Steve prefers to use:

[attachthumb=#4]
 
Steve starts these kerfs by making three different cuts with a Japanese Azebiki saw then hollows and rounds the kerf with one or more of his home-made bent knives.
 
Here Steve is demonstrating the use of an Azebiki saw on a scrap piece of wood with Tim Lawson (the director of the Port Townsend Woodworking school) looking on:

[attachthumb=#5]
 
And, here are several photos of Steve showing the use of a bent knife to complete a kerf:

[attachthumb=#6]  [attachthumb=#7]  [attachthumb=#8]
         
The demonstration culminated with Steve soaking, steaming, then bending the wood into a 90 degree angle.  This is the technique that should be used to make such a bend:

[attachthumb=#9]


(post 2 of 5)

We were turned loose to practice making and bending our own kerfs.  Here are pictures where I am using an Azebiki saw to make a 45 degree cut and where I am steaming a kerf over an electric kettle (without a shut -off when boiling control):

[attachthumb=#1]  [attachthumb=#2]
     
Observe the marker lines drawn on the saw.  I drew these in order to help determine the proper depth of cut.

Steve spent some time showing his technique for carving some typical elements that are found on bentwood boxes:

[attachthumb=#3]  [attachthumb=#4]
     
Starting around noon on Tuesday, we were left to make our own boxes, the practice carving, or to do whatever we wished to do under Steve’s guidance.  I chose to make a fairly large box out of a yellow cedar plank.  I decided to make a bigger box knowing that I would not have time to complete the painting and carving during the week.  I am fairly sure that I could have completed a small box.  The plank that I chose was 13.5 inches wide and 5/8 of an inch thick.  The length was sufficient to create a box with exterior sides of about twelve inches.  (aside: I almost always work in metric, but everyone in this class was using imperial measurements, so I went along with it.)

The board that I chose was quite warped:

[attachthumb=#10]
 
but both Steve and I were confident that the warp would disappear once the board was soaked and steamed.

Here is a rough sketch showing the dimensions that I was aiming for:

[attachimg=#5]
   
I’m not sure how I could have cut the kerfs in this warped board if I had not had an Azebiki saw.  But, I did have such a saw, so it was relatively easy to cut to an even depth by following the lines I marked on the blade:

[attachthumb=#6]

I first sawed the two vertical kerfs, then cleaned out the material between with a “normal bench” chisel:

[attachthumb=#7]
   
Then I sawed at 45 degrees to start the undercut portion of the kerf:

[attachthumb=#8]  [attachthumb=#9]
     
 
(post 3 of 5)

Then I rounded the kerf and cut out the material under the lip with a bent knife:

[attachthumb=#1]
   
Cutting the rabbet at the end of the curved plank was also a challenge:

[attachthumb=#2]
   
Several times I had Steve check the kerfs only to be told that this or that needed more work.  Finally, he pronounced them to be good and told me that I could proceed to soak, steam, and bend the board.

[attachimg=#3]
   
At this point, I made a big mistake.  [crying]  I should have soaked the board at least overnight.  There were no facilities at the shop to do so but I could have taken it back to my digs and soaked it in a bathtub.  When I make boxes in the future (and I will), I will soak planks for one or two days.  All I did with this plank was to pour hot water into the kerfs for about half an hour:

[attachthumb=#4]    

The school provided a very well planned and well built steaming box:

[attachthumb=#5]
   
Once the steam got going, I placed my plank in the box for about half and hour:

[attachthumb=#6]
   
As we expected, the steaming removed almost all of the warp.

I started to bend the plank into a box and heard a scary CRACK sound.  Because, I had not properly soaked the plank, the wood in the middle was still dry and it split quite a bit.  I was lucky in that on two of the corners there was still about 1/16 of an inch of undamaged material and on the third corner, although the wood cracked right through in a couple of spots, about 1/16th of an inch remained on about two thirds of the joint.  

After bending the corners, I determined the spot to cut off the excess material so that the end would fit into the rabbet on the fourth corner:

[attachthumb=#7]
   
I cheated and used glue to hold the rabbeted corner:

[attachthumb=#8]
   
But, I also used the more traditional pegs (bamboo in this case) across the corner of the joint:

[attachthumb=#9]
   
 
(post 4 of 5)

I carefully cleaned up the outside corners with sandpaper:

[attachthumb=#1]
   
To add stability to the box before starting carving, I built a bottom for it (out of red cedar).   It was necessary to first hand plane the bottom piece to a uniform thickness:

[attachthumb=#2]
   
Then ¼ inch deep rabbets were cut around all four sides:

[attachthumb=#3]
     
Our benches did not have any vises, hence my kneeling on the ground with the wood pressed against a pillar in order to get some stability when sawing.  I used both glue and pegs to attach the bottom.

[attachthumb=#4]

Inspired by this box carved by John Vanpronssen:

[attachthumb=#5]
   
And by this short totem pole that I carved two years ago:

[attachthumb=#6]
   
I decided that I wanted to represent a beaver on the box.  In one corner I will have the beaver’s tail etc. taking up two sides of the box and in the other corner I will have the beaver’s mouth etc. taking up the other two sides of the box.  Steve JBrown explained to me that the carvings on boxes are usually more abstract than those on totem poles and more abstract than the beaver on John’s box.  In looking at the carvings of the pictures of many boxes I can now see that Steve is correct about this.  Steve generously offered to draw designs for my box on appropriate sized paper.  Here is a photo of him just getting started on a drawing for the tail sides of the box:

[attachthumb=#7]
   
 
(post 5 of 5)

I traced Steve’s design onto some transparent paper, then transferred this to the box in several steps:

[attachthumb=#1]    

Each of the two sides are mirror images of the other as can be seen in these photos of opposing corners:

[attachimg=#2]  

[attachimg=#3]  
                                                 
This is considerably more abstract than John Vanpronssen’s beaver box but, with careful study, one can not just find the beaver's mouth and tail but also the ears, eyes, nostrils, webbed feet, etc.  Steve went further than I would have in that eyes appear on both images but his opinion is that this particular beaver is somewhat mythical so is allowed to have four eyes.

Everyone in the class decided to do something quite different.  For instance Jesus Garcia made a large red cedar chest:

[attachthumb=#4]  
   
and Roman Cehelnycky concentrated on enhancing his carving skills:

[attachthumb=#5]  
   
I had time to get a little bit of carving done on my box:

[attachthumb=#6]
   
But, I will have to finish the carving and do all the painting at home.  Steve took the time to suggest how various portions of the box could be carved and what would be the best colours to use.  I will endeavour to follow his advice.

I flew back to Toronto to Vancouver on Saturday and the folks at Air Canada were kind enough to bend the rules a bit and to let me take the box on the plane as carry-on even though it could not fit into an overhead bin.  In travelling, I found that many people were curious about the box and I had a few interesting conversations about it.

Sunday morning I started repairs on the really bad corner.  I mixed epoxy and sawdust and applied it:

[attachthumb=#7]    [attachthumb=#8]    
     
After sanding, the corner looks a lot better and is certainly stronger:

[attachthumb=#9]  
   
Once this has been sanded some more then painted, I am sure that no one will notice that there was once a problem.

That’s as far as I have gone with the box.  Once it has been completed I will write and post Part 2 of this document.
 
Frank, WOW!  Way to recover.  I can't way to see the carvings and the finished project.

Peter
 
Frank,

Thank you for spending the time to document these things for us. This one and those in the past are delightful and the work is completely different from anything I do, so it's extra appreciated for that reason. It is beautiful work.

Oh, and you bear an uncanny resemblance to my maternal grandfather who worked wood, especially building clocks, after retirement.
 
I just thoroughly enjoyed reading this thread with a cup of coffee while taking a small lunchtime break. Thanks for the thread, appreciate sharing your experience with ya!

Have a good one,

Vi_k
 
RonMiller said:
Frank,

Thank you for spending the time to document these things for us. This one and those in the past are delightful and the work is completely different from anything I do, so it's extra appreciated for that reason. It is beautiful work.

Oh, and you bear an uncanny resemblance to my maternal grandfather who worked wood, especially building clocks, after retirement.

Thanks Ron.

I build docks too.  Here is one of them:

[attachthumb=#1]  [attachthumb=#2]

Interesting that I look like your grandfather.  Could you send me his photo in a private message?

 
I will not have a solid block of time that I can devote to working on this box until next September and I don't want to wait that long to see how the box turns out, so I have set up a "carving station" in a convenient spot and I grab a few minutes here and there to do a bit of detail carving.  That seems to be working out OK.

First of all, I know that a traditional Haida carver would use bent knives for this task, but I am only just getting used to such knives and I am much more comfortable with my set of Flexcut tools:

[attachthumb=#1]

That's a piece of scrap yellow cedar that I am using to practice carving many of the symbols before I carve them for real on the box.

I carved the tail while still in Port Townsend.  Since I set up the carving station a couple of days ago, I have carved the mouth and the nostrils:

[attachthumb=#2]

It is very difficult to cut around the corners without threatening to integrity of the box.  I am only carving shallow outlines there and will rely on paint.  As you can see, even on the two corners that I did not repair there is some surface damage.  I will use wood filler to fix up those spots before painting.
 
Good post, Frank. Thanks for going to the effort to put it together.

You probably have read the book Cedar that shows some more of amazing things coastal tribes did with the abundant cedars of the NW coast. Some of their bentwood boxes were shaped to tuck up into the bow of their cedar dugout canoes.

And to think they did it with bone and stone tools!

They even used cedar to make rope, cloaks, hats and mats--even diapers for their babies.
 
Really cool project! I have a SERIOUS itch to start into carving. The set of knives I want doesn't come into Toronto until the 5th some I'm just waiting to drop the cash. Can't wait to see how this turns out!
 
rdesigns said:
Good post, Frank. Thanks for going to the effort to put it together.

You probably have read the book Cedar that shows some more of amazing things coastal tribes did with the abundant cedars of the NW coast. Some of their bentwood boxes were shaped to tuck up into the bow of their cedar dugout canoes.

And to think they did it with bone and stone tools!

They even used cedar to make rope, cloaks, hats and mats--even diapers for their babies.

Thanks and you are welcome.

I scanned the Cedar book (author Hilary Stewart, ISBN 13-987-0-295-97448-4) while at the class.  It is every bit as good as you say  and I intend to borrow it from the Toronto Public Library.  Thanks for the reminder.
 
GhostFist said:
Really cool project! I have a SERIOUS itch to start into carving. The set of knives I want doesn't come into Toronto until the 5th some I'm just waiting to drop the cash. Can't wait to see how this turns out!

What is the set of knives that you are waiting for?
 
The Box now Has a Lid

I decided to take a break from carving today and build a lid.  None of the wood available at Port Townsend was as thick as I would like the lid to be.  I knew that I had a big supply of think ash at in one of my sheds so decided to wait until I got home to make a lid.

This morning, I picked this ash slab out of the pile:

[attachthumb=#1]

The slab was much too wide to fit into my planer and too wide to fit on its side on my bandsaw.  What to do?

I managed to cut the slab reasonably square on my bandsaw.  Now I needed to make it make it uniformly thick.  The approach I used was first to cut a kerf as deep as possible on all four sides using my tablesaw:

[attachthumb=#2]

Then I completed the cut using a special long tree trimming blade on my reciprocating saw:

[attachthumb=#3]

The cut was surprisingly good and the slab was easily levelled using Saphir 50 abrasive on a Rotex 150 sander in aggressive mode.

[attachthumb=#4]

I cut 15 degree bevels along all four edges than sanded all surfaces to 120 grit.  There are a couple of cracks in the wood and I am going to wait a couple of months to see if they widen before putting a final finish on the lid.  I did install a couple of temporary cleats:

[attachthumb=#5]

Being made of heavy ash rather than light cedar, the lid weighs at least twice as much as the box.  I consider that to be a good thing.  

The lid fits well and looks good:

[attachimg=#6]
 
Front Sides Now (almost) Carved:

It was a rainy dismal day here in Toronto today, so I decided to stay inside and do some carving.  I have not touched the box since last May and feels good to get back to it.

I spent about 7 hours carving and, in that time completed the two sides that represent the top half of the beaver.  Here is a photo:

[attachthumb=#1]

I will still need to do a little bit of cleanup before I paint these sides.

For those wondering just what is supposed to represent which body parts, here is a "map":

[attachthumb=#2]


Attachments

  • Carved Cedar Bentwood Box 48 -Two front sides (almost) carved -small.JPG
    Carved Cedar Bentwood Box 48 -Two front sides (almost) carved -small.JPG
    183.4 KB · Views: 716
  • Carved Cedar Bentwood Box 49 -Front sides body parts labelled -small.JPG
    Carved Cedar Bentwood Box 49 -Front sides body parts labelled -small.JPG
    187.1 KB · Views: 524
The two back sides of the box are now carved except for clean up.

[attachthumb=#1]       [attachthumb=#2]

The extra eyes in the back are because the beavers near Pellow's Camp seem to be able to see someone approaching from behind no matter how quiet that person is.
 

Attachments

  • Carved Cedar Bentwood Box 50 -Two back sides (almost) carved -small.JPG
    Carved Cedar Bentwood Box 50 -Two back sides (almost) carved -small.JPG
    161 KB · Views: 1,248
  • Carved Cedar Bentwood Box 51 --Backsides body parts labelled -small.JPG
    Carved Cedar Bentwood Box 51 --Backsides body parts labelled -small.JPG
    165.8 KB · Views: 735
We're not worthy!  Extraordinarily not worthy...  That is the stuff most people don't have the patience to even think about anymore. Very impressive and nicely done !  That's one I'll be mentally saving for when I have a few hundred years of practice under my belt.
 
Back
Top