mastercabman
Member
- Joined
- Apr 15, 2007
- Messages
- 1,854
I have been pretty busy lately with remodels
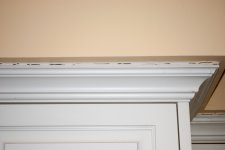
Most of them the homeowners wants to have the cabinets to the ceiling with crown molding at the top
Some are 1 piece and some are 2
But of course I usually come across out of level ceilings and that really makes it hard to keep nice reveals and pushing the crown to the ceiling
I try to work the crown the best I can but that leaves some gaps to be fill with caulk
But we are getting call back because of the crown separating from ceiling or caulk is cracking/shrinking
Most are not really bad maybe 1/8"
And some gets to about 1/4"-3/8" !
I know that wood does expand/shrink with season change
The boss man is tired of having to send someone to recaulk and then having to pay someone to touch up paint
So I am trying to solve this problem
I was looking at my crown molding that I installed/caulked/finished at my house and still looks good and I can't recall that I ever had to recaulk it
Do you guys have those issues with having to recaulk molding?
Maybe I need to go back to caulking 101 class!