Crox G
Member
- Joined
- Nov 27, 2012
- Messages
- 93
Executive Summary: Domino connectors pull the chair joints together.
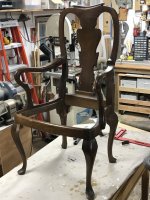
I've been anxious to find a project for Domino Connectors ever since I saw them in person at Festool Connect at Norfolk (Va.) Woodcraft. A friend asked me those dreaded words "Do you think you could fix my favorite chair for me?" I'm a Windsor chair lover (a Mike Dunbar disciple), and believe that all non-Windsor chairs are designed to fall apart. I agreed to try.
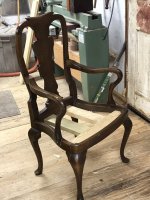
It is a factory-made side chair, held together with mortises and tenons at the tops of the legs. The tenons are 14mm and look like broad Dominoes. The glue had failed at the front leg joints, and the chair was wobbly. I wanted to knock it apart, clean the joints, and re-glue it, but I wanted to add something to keep the frame from racking and pulling apart.
I thought an interior frame would give stiffness, and needed a way to draw the chair parts inward in compression. The Domino Connectors can draw parts together from 1 or 2 mm apart, and that seemed like just what I needed.
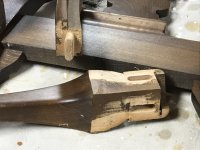
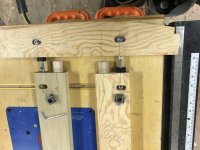
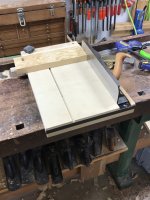
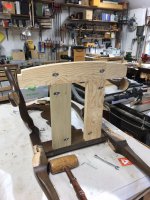
I used 30 mm stock for the parts, leftover pine and poplar. I first made a curved section to match the inside of the front rail, trimming it close with a spokeshave.
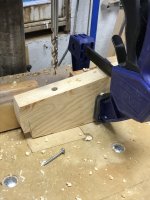
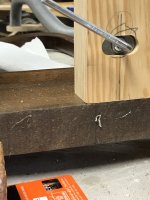
Using a 3/8" Kreg drill, which steps down to 1/8", I counterbored the front piece to accept 1.5" Kreg screws. This piece would be fastened tight against the inside of the front rail. I also drilled for pocket hole screws to draw the side stretcher tight. I left a 1mm gap between these parts so the pocket holes would draw the side rail inward.
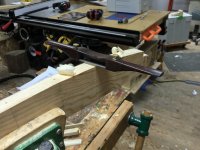
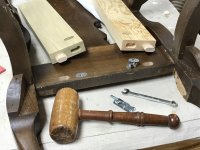
I then roughed out the two fore-and-aft pieces, and used right-angle connectors to connect them to the back rail. Just for the fun of it, I used the in-line connectors to fasten the frame pieces together. With my shooting board I trimmed the two new pieces about 1 mm short (see credit card in the gap), leaving a gap to be drawn up later (see after picture).
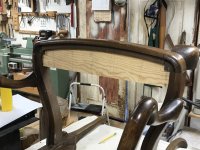
I then knocked the side rails off the back legs and cleaned those joints. I snugged up the three frame pieces together, fastened the two rear parts to the rear rail with the gap, and glued the side rails and the front rail together. I then fastened the front part to the front rail with Kreg screws through the counterbored holes, and to the side rails with pocket screws. Then--with great satisfaction!--I drew together the rear connectors. That chair is tight! The corner blocks went back on with glue and 23 ga. brads from my Green Buddy.
The chair now weighs a ton. This was a case of gross over-designing, but it was a good excuse to play with the nifty, precise Connectors and my beloved XL700.
Cheers.
I've been anxious to find a project for Domino Connectors ever since I saw them in person at Festool Connect at Norfolk (Va.) Woodcraft. A friend asked me those dreaded words "Do you think you could fix my favorite chair for me?" I'm a Windsor chair lover (a Mike Dunbar disciple), and believe that all non-Windsor chairs are designed to fall apart. I agreed to try.
It is a factory-made side chair, held together with mortises and tenons at the tops of the legs. The tenons are 14mm and look like broad Dominoes. The glue had failed at the front leg joints, and the chair was wobbly. I wanted to knock it apart, clean the joints, and re-glue it, but I wanted to add something to keep the frame from racking and pulling apart.
I thought an interior frame would give stiffness, and needed a way to draw the chair parts inward in compression. The Domino Connectors can draw parts together from 1 or 2 mm apart, and that seemed like just what I needed.
I used 30 mm stock for the parts, leftover pine and poplar. I first made a curved section to match the inside of the front rail, trimming it close with a spokeshave.
Using a 3/8" Kreg drill, which steps down to 1/8", I counterbored the front piece to accept 1.5" Kreg screws. This piece would be fastened tight against the inside of the front rail. I also drilled for pocket hole screws to draw the side stretcher tight. I left a 1mm gap between these parts so the pocket holes would draw the side rail inward.
I then roughed out the two fore-and-aft pieces, and used right-angle connectors to connect them to the back rail. Just for the fun of it, I used the in-line connectors to fasten the frame pieces together. With my shooting board I trimmed the two new pieces about 1 mm short (see credit card in the gap), leaving a gap to be drawn up later (see after picture).
I then knocked the side rails off the back legs and cleaned those joints. I snugged up the three frame pieces together, fastened the two rear parts to the rear rail with the gap, and glued the side rails and the front rail together. I then fastened the front part to the front rail with Kreg screws through the counterbored holes, and to the side rails with pocket screws. Then--with great satisfaction!--I drew together the rear connectors. That chair is tight! The corner blocks went back on with glue and 23 ga. brads from my Green Buddy.
The chair now weighs a ton. This was a case of gross over-designing, but it was a good excuse to play with the nifty, precise Connectors and my beloved XL700.
Cheers.
Attachments
-
 UNADJUSTEDNONRAW_thumb_1213.jpg266.4 KB · Views: 584
 -
 UNADJUSTEDNONRAW_thumb_1215.jpg230.7 KB · Views: 556
 -
 UNADJUSTEDNONRAW_thumb_1217.jpg235.7 KB · Views: 561
 -
 UNADJUSTEDNONRAW_thumb_1216.jpg195.3 KB · Views: 464
 -
 UNADJUSTEDNONRAW_thumb_1221.jpg220.8 KB · Views: 517
 -
 UNADJUSTEDNONRAW_thumb_1214.jpg257 KB · Views: 489
 -
 UNADJUSTEDNONRAW_thumb_1219.jpg228.6 KB · Views: 486
 -
 UNADJUSTEDNONRAW_thumb_1218.jpg246.1 KB · Views: 457
 -
 UNADJUSTEDNONRAW_thumb_1223.jpg267.2 KB · Views: 475
 -
 UNADJUSTEDNONRAW_thumb_1222.jpg258.8 KB · Views: 446
 -
 UNADJUSTEDNONRAW_thumb_1227.jpg215.6 KB · Views: 481
 -
 UNADJUSTEDNONRAW_thumb_1224.jpg272.1 KB · Views: 542
")