Chamfer plane

derekcohen

Member
Joined
Jun 22, 2008
Messages
921
I have been happy in the past to use a block plane to chamfer edges. I once built a bevel up chamfer plane, but it required resetting the depth of cut each time, and it just became too much work.


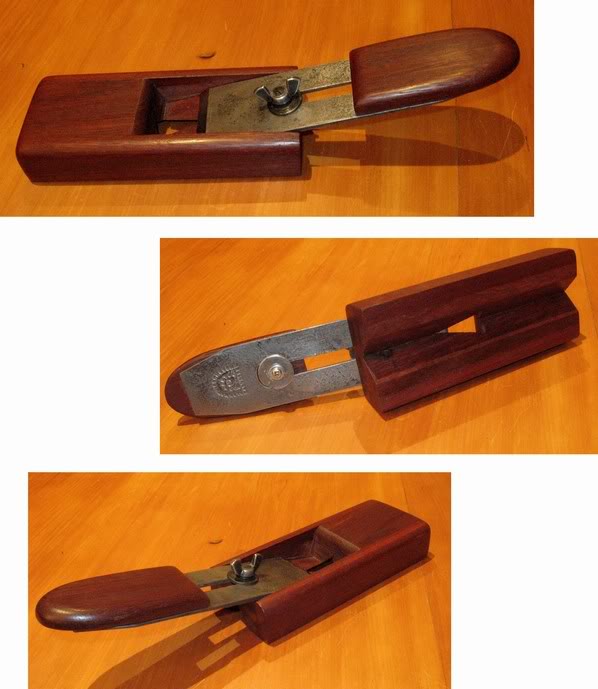
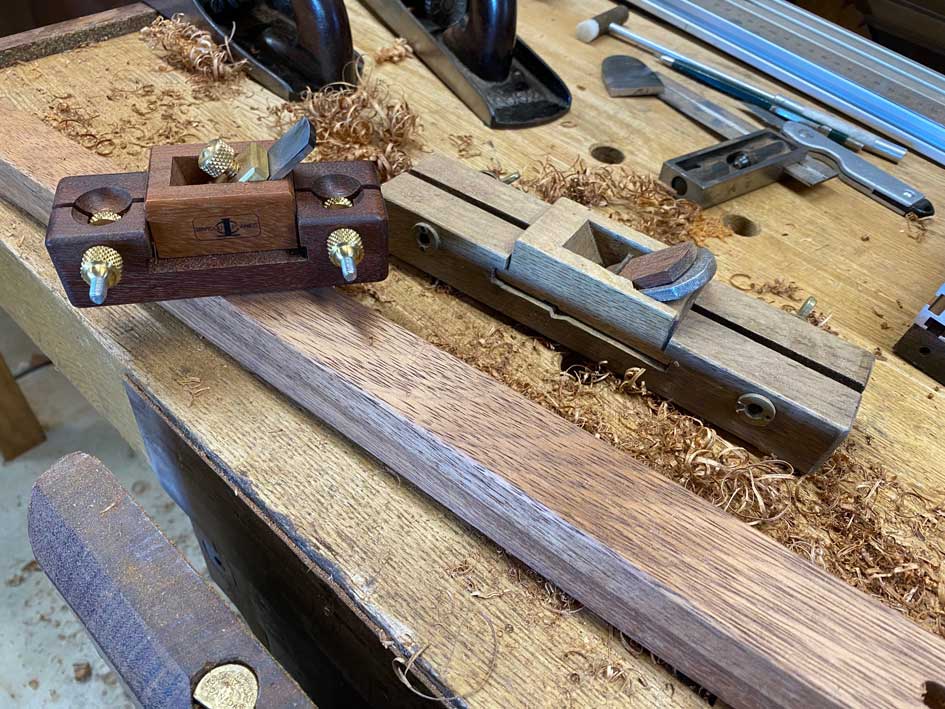
Then I purchased a well-used Japanese chamfer plane. This has an adjustable carriage for the blade. The adjustable carriage slides side-to-side to offer a fresh edge once the used edges dulls.

Mine lacked the chipbreaker (I made one from wood) and the carriage was loose (so I added a shim), and it all worked reasonably well to form even chamfers on show edges. I cannot say that I was in love with it - it felt a little Heath Robinson, and I knew that I needed to either restore it properly or accept its quirks.

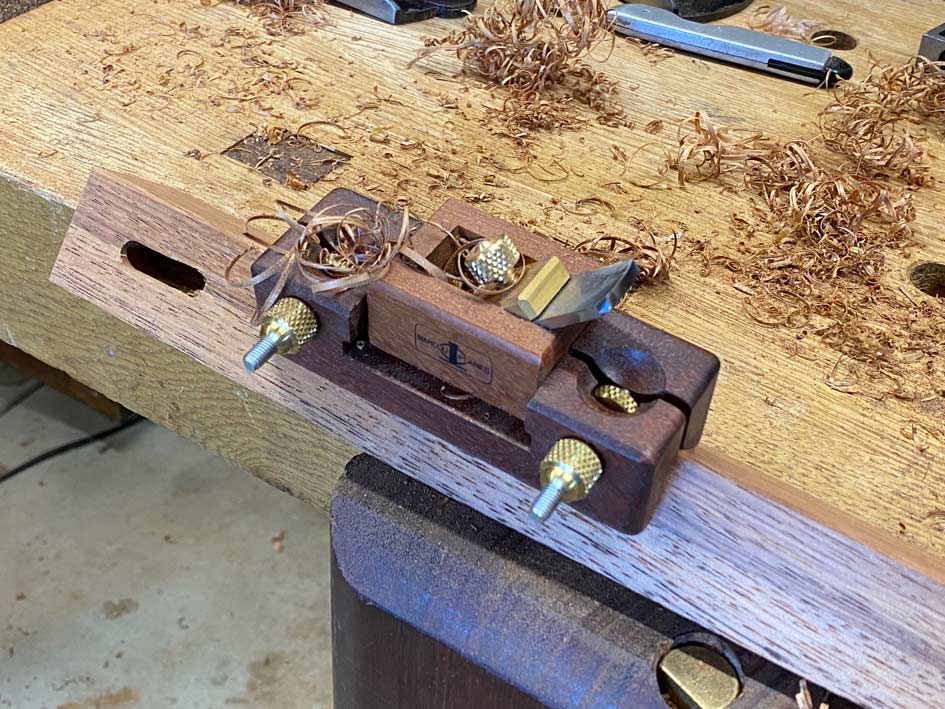
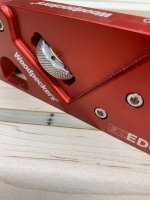
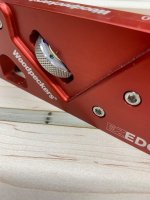
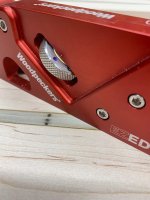
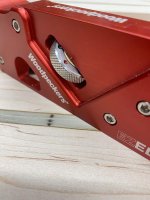
On a bit of a whim, I decided to purchase a chamfer plane made by my old New Zealand friend, Philip Marcou. And I am so glad that I did so as it is easy to use, reliable, and produces a great chamfer. His is based on the Japanese design but somewhat cheaper. From Pirana Tool in NZ: https://piranhatools.co.nz/products/philip-marcou-chamfering-plane  Morre details in this link.

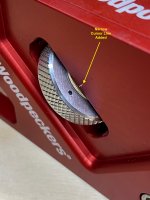
110mm in length, with a blade with of 18.5mm and 3mm thick  (although I did find the original blade too short for my liking, and made another that was about 10mm longer) ...


Here it is against the Japanese version. You can see how compact the Marcou is ...


It worked flawlessly and the small size just nestles nicely in the palm. It cuts to depth and then stops cutting, which ensures all chamfers are exactly the same.
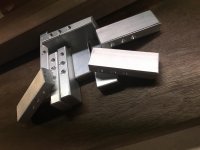
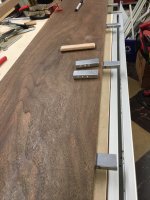
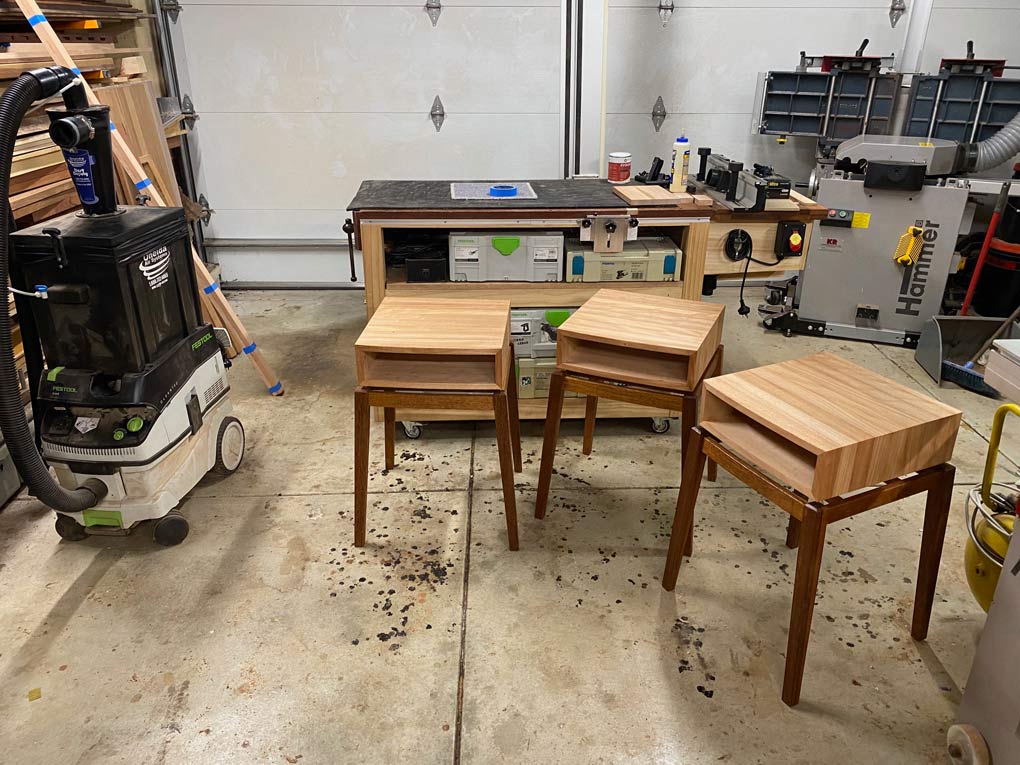
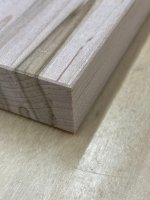
Twelve legs  ...


...  for three bedside tables (in progress) ...


Regards from Perth

Derek
 
Gorgeous tables!

I love the design of the Philip Marcou chamfer plane. Very clever to let you use any part of the blade and easily adjust for depth. Mine are just block planes with 45º fences underneath. At least the one I made out of an HP-8 is tiny tiny.
 
Chamfer plane or a block plane with chamfer guides is the way to go.
The one which requires progressive blade advancement (Woodpeckers sells one) is just poor design. Not because of constant adjustments, but because it lacks sole in front of the blade (essentially no plane mouth). That increases the likelihood of tear out.
 
The part I've always had a hard time with on my woodpecker chamfer planes is getting a consistent depth across multiple edges because of the adjustment mechanism.  I don't take full-depth passes because it feels like a recipe for chatter and tear-out, so it ends up as 3 or 4 passes at increasing depths until I get to where I want to be, then rinse and repeat on the next board.

I suppose I could take the first pass, swap the board, take the first pass, etc., and do that again until I'm done with the first pass on everything before dropping the blade deeper, but that introduces even more steps in the operation.

I've attempted to add one or two dots of ink or paint on the depth wheel to know what my final goal is, but even that's not 100% reliable.

I'd be curious to hear how others address this.  I've resorted to just chucking a bit in my MFK700 for my last project, but that's only possible when it's nice to be in the garage; the hand tool solution is much more amenable to being used in the basement while people are in the house.
 
Nice tables.
What is the wood on the waterfall box ?

I made a magnetic chamfer adapter for my block plane.
The adapter actually works ok, the cheap plane - not so much.


Attachments

  • CPA -1.jpg
    CPA -1.jpg
    454.7 KB · Views: 45
  • CPA -4.jpg
    CPA -4.jpg
    476.4 KB · Views: 40
The shop-made magnetic jig (I think I first saw it in Woodsmith) is more user-friendly (but not adjustable) than the chamfer guide, which requires some unscrewing and screwing as part of the installation.

Unknown to many, the Japanese chamfer plane can be used to make dowels or rods by hand, albeit in a slow and tedious manner.
 
squall_line said:
The part I've always had a hard time with on my woodpecker chamfer planes is getting a consistent depth across multiple edges because of the adjustment mechanism.  I don't take full-depth passes because it feels like a recipe for chatter and tear-out, so it ends up as 3 or 4 passes at increasing depths until I get to where I want to be, then rinse and repeat on the next board.

I suppose I could take the first pass, swap the board, take the first pass, etc., and do that again until I'm done with the first pass on everything before dropping the blade deeper, but that introduces even more steps in the operation.

I've attempted to add one or two dots of ink or paint on the depth wheel to know what my final goal is, but even that's not 100% reliable.

I'd be curious to hear how others address this.  I've resorted to just chucking a bit in my MFK700 for my last project, but that's only possible when it's nice to be in the garage; the hand tool solution is much more amenable to being used in the basement while people are in the house.

The Woodpecker manual suggests easing ALL edges on all the boards before advancing the cutter. While that may work on just a couple of boards, when more than 10 boards need to be edged, that method is problematic and a PITA.

I decided to add 8 index marks to the thumbwheel with a spotting drill and then color them in with 4 different colors. The cutter has a 5/16-32 thread so moving each index mark to a narrow cursor line will advance the cutter by .004". And if you stop between the index marks, the cutter will advance in .002" increments.

This all should have been provided by Woodpeckers where the index lines could be numbered instead of colored and you wouldn't have to remember "Was it the 1st red index or was it the 2nd red index"?

Here are the index marks added to the thumb wheel and the added cursor line to the plane body.

[attachimg=1]

[attachimg=2]

And this gives you an idea of the visibility of the red, blue, green & black index marks. Numbers would have been better. [crying] [crying]

[attachimg=3]

[attachimg=4]

[attachimg=5]

[attachimg=6]

And finally, a drawer front from Ambrosia that's been chamfered.

[attachimg=7]


Attachments

  • 9394.JPG
    9394.JPG
    335.9 KB · Views: 162
  • 9541 black.JPG
    9541 black.JPG
    325.9 KB · Views: 163
  • 9540 green.JPG
    9540 green.JPG
    320 KB · Views: 162
  • 9539 blue.JPG
    9539 blue.JPG
    330 KB · Views: 165
  • 9538 red.JPG
    9538 red.JPG
    326.1 KB · Views: 166
  • 9460 .004%22:index marked.JPG
    9460 .004%22:index marked.JPG
    651.1 KB · Views: 164
  • 9543.JPG
    9543.JPG
    665.4 KB · Views: 166
Would it be an idea to have a thin ring with numbers on it 3D printed and glued to the thumbwheel? I can't access my set of WP planes to verify, but judging from the photos there seems to some space for such a ring.
 
hdv said:
Would it be an idea to have a thin ring with numbers on it 3D printed and glued to the thumbwheel? I can't access my set of WP planes to verify, but judging from the photos there seems to some space for such a ring.

Ya that may work, the problem is the ring would have to be very thin and be securely attached to the thumb wheel as that is constantly being "thumbed" forward and "thumbed" backward.

A simple laser marked thumb wheel from Woodpeckers would be a godsend.  [big grin] 🙏🙏🙏
 
Thinness shouldn't be a problem for a good 3D printer. And you have already created a nice set of recesses to prevent the ring from coming loose from the shearing forces when turning the wheel. Just add some corresponding dots on the backside of the printed ring. I would expect a bit of sanding, degreasing and a bit of epoxy would be secure enough for this. Might be worth to try it?
 
hdv said:
Thinness shouldn't be a problem for a good 3D printer. And you have already created a nice set of recesses to prevent the ring from coming loose from the shearing forces when turning the wheel. Just add some corresponding dots on the backside of the printed ring. I would expect a bit of sanding, degreasing and a bit of epoxy would be secure enough for this. Might be worth to try it?

Ya, you bring up an interesting point, those divots on the top of the thumb wheel would provide a nice locking/keying feature for attaching something. I used that same method to secure some aluminum Dominos in walnut with epoxy.

[attachimg=1]

[attachimg=2]
 

Attachments

  • 4987-S.jpg
    4987-S.jpg
    284.8 KB · Views: 109
  • 4989.JPG
    4989.JPG
    736.4 KB · Views: 108
Well, now you got my curiosity peaked. What did you need that for?
 
Back
Top