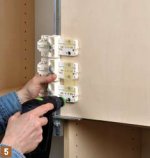
"Chaos Theory" new How To Video from Guido Henn on Festool.de

I used to iron on the melamine edges, and then bought a small mechanical benchtop edge bander, the main difference is that it works allot faster. But it doesn't hold better compared to ironed on properly. As Tedric said, there is a danger of melting the plastic, and it will happen a few times until you learn the correct work flow. The most tricky part for me is/was trimming the edges, i had this special knife but it doesn't work ferfectly, now i just set up my router table with the fences pulled up a few mm so the protruding edge band can slide under, and with a 45 degree but i make perfect trims.
 
txrpls said:
Getting ready to make a modified Vesion since there is only white 4x8 0.75 melamine sheets available around here. I can't seem to find any 5mm or 1/4" for the back. Do you think that will work OK? Also is the white melamine iron on tape any good?

If you are shopping at the Depot, you should be able to get some melamine faced hardboard that is about 1/8-3/16" thick that would be considerably easier to install than a full 3/4" back.  Regarding the edge banding, make sure you buy from a cabinet supply or online.  Don't be tempted by the big box edgebanding, it is very thin and friable.
 
Ok, seems like the only thing available in my area is 4x8 sheets. I tried google translate without much luck. I trying to figure out if there would be any problem with the sliding hardware if I change the depth to 16" instead of 16.535" to minimize waste. Anyone see any problem?
 
I'm considering making some version of these, too, and am thinking the same thing - 16" depth to fully use the sheets.  Looking at the drawers supporting the systainers, he uses a deep block of wood to hold them in place.  They could easily be almost two inches shorter.  In other threads where people have built their own sysports, I think some people use 14" slides, which should easily fit in a shallower cabinet.  I don't know if you'd be able to keep the lids open in that case, though.

My German isn't so good, so I haven't read the article, just looked at the pictures.  Maybe a lot of the waste goes towards making the drawer sides.  Looks like the drawer sides are 15mm instead of 19mm, but it's a possible use of the waste if you want to follow the depth dimension exactly.

An alternative that I'm thinking about is to build 4' upper cabinets with rolling sysports underneath.  Size the sysports to match the height of my MFT/3 so they could be used for material support.  Should be somewhere around 7' to the top instead of 8' - I'm just average height, so there's no way I'd be able to reach the upper part of the 8' cabinets without grabbing the stepstool.
 
Sorry to bump this old thread, but a quick question for those who have followed Guido's plans - Will the 400mm euro slides allow you to open the lid while the systainer is still on the drawer?  By my calculation it comes up a bit short, though I don't have any 400mm slides on hand to verify.
 
oil trader said:
Sorry to bump this old thread, but a quick question for those who have followed Guido's plans - Will the 400mm euro slides allow you to open the lid while the systainer is still on the drawer?  By my calculation it comes up a bit short, though I don't have any 400mm slides on hand to verify.

I used 14"  (350mm) full extension drawer slides for my setup.  With the full extension slide it allows you to open the systainer while it's still in the drawer.  Make sure the slide you use is a full extension slide.

Eric
 
I used standard 400 mm slide that pull out 320 mm and the lid doesn't open fully but I can get all of my stuff out with no problem. Saved me a lot of money.
 
I know this is an old thread, but I just found it and was thinking of making something similar, though not for Systainers.   Would anyone be kind enough to point me to a link to the PDF of the plans  that are mentioned ? The link given in the thread does not work and I couldn't find one on the webpage linked to, either.

I tried watching the video and it kept halting for me every few seconds.

Thanks !
 
They use a drilling template for drilling holes in the doors for the handles.
Over the non-usable holes there is some tape attached so you cannot make a mistake drilling the wrong holes.
 

Attachments

  • Pages from Holzidee_11.jpg
    Pages from Holzidee_11.jpg
    22.3 KB · Views: 664
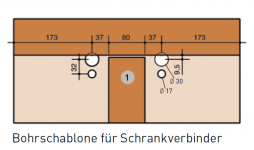
Did anyone make the template that Guido uses for the panel connectors (Hettich?).  I have the plans but it does not indiIf so, do you know what size the holes for the two routers bits are?  I believe its a 20mm and 10mm for the router bits, which leads me to believe that a 24mm and 13.8mm template were used.  If so, what did you use to drill the holes in the wooden template for the router template guides?

Thanks,
John
 
The Hettich VB36 connectors are 20mm hole, 14mm deep and 10mm hole, 11mm deep. Guido used a 30mm and 17mm copy ring.

I bought FAMAG Bormax Forstner bits in sizes to match my copy rings and use those to make templates.

Here is the information from the PDF showing the 30mm and 17mm diameter holes and spacing.

[attachimg=1]

(Bohrschablone fr Schrankverbinder = Drilling template for cabinet connector)
 

Attachments

  • ScreenShot144.png
    ScreenShot144.png
    66 KB · Views: 1,756
Back
Top