Cherry armoire

ear3

Member
Joined
Jul 24, 2014
Messages
4,341
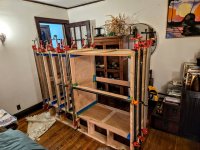
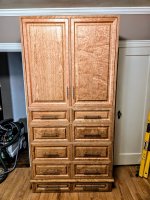
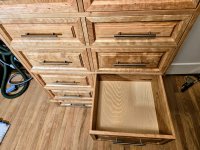
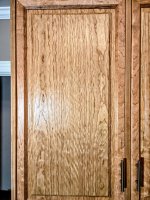
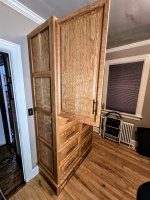
Just wrapped up a rather large project for a room I renovated in my house over the summer.  It's a cherry armoire, with the beastly dimensions of 82" x 44" x 22 1/4" -- set atop a leveling platform, it actually rises to 89".  Not necessarily all that complicated in execution, but definitely time consuming due to the size of the casing and the 10 total drawers (8 for the armoire proper and 2 for the leveling platform) that had to be constructed and individually fitted.  Checking the dates on the process photos I took along the way, I started it in early October.  I've made larger pieces of furniture out of multiple units, but this is the single largest continuous solid structure I have built.

[attachimg=1]

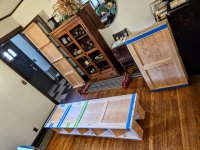
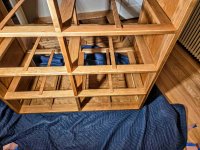
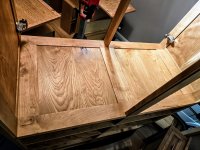
Because the casing was just a series of framed panels made from 5/4 stock (rather than having feet to make it free standing), I had to construct a platform to raise it above the base moulding, level it, and make it flush to wall.  Rather than just a quick 2x4 job that would then be covered up with hardwood, I decided to maximize the storage capacity of that space and build a mini case and drawers, topped off with a 24" x 45.5" platform, mitred and with a hole in the center since it did not have to be completely solid to do its trick.

[attachimg=2]

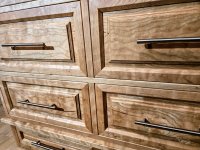
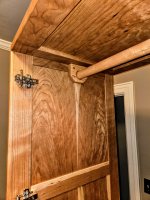
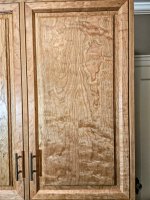
The panels for the casing were resawn to create bookmatched grain, and then set inside a dominoed and dadoed frame.  Drawer fronts and doors were constructed via a mitered frame with a 45 degree beveled edge with inset raised panels.  I spent a lot of time at the lumber yard picking through the pile to get decently figured cherry.  The doors came out particularly well -- each panel is laminated from two pieces of a single board (different board for each panel), so that the center seam is less obvious.  I was able to get 6 drawer front panels from a single board, and arrange it so that the grain runs continuously for each pair of panels, but the top two in the armoire proper and the bottom ones in the platform use a different piece, which is why the grain pattern is slightly different for those.

Overall I'm pretty happy with the results.  I was initially going to make my own handles, but I kind of ran out of energy towards the end and for the moment opted for the home depot brass finish bauhaus design.  Might get back to the handles at some future date.

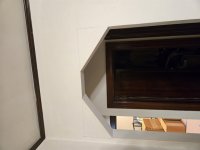
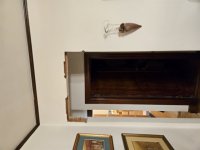
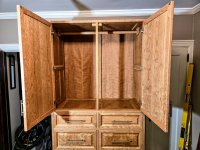
Note some interior photos taken prior to attachment of the back.

[attachimg=3]

[attachimg=4]

[attachimg=5]

[attachimg=6]

[attachimg=7]

[attachimg=8]

[attachimg=9]

[attachimg=10]

[attachimg=11]

[attachimg=12]
 

Attachments

  • 20250110_202303.jpg
    20250110_202303.jpg
    567.1 KB · Views: 372
  • 20250110_002133.jpg
    20250110_002133.jpg
    699.6 KB · Views: 358
  • 20250110_011247.jpg
    20250110_011247.jpg
    578.5 KB · Views: 357
  • 20250110_202333.jpg
    20250110_202333.jpg
    516.6 KB · Views: 360
  • 20250110_230647.jpg
    20250110_230647.jpg
    586 KB · Views: 363
  • 20250110_203806.jpg
    20250110_203806.jpg
    559.3 KB · Views: 365
  • 20250110_190257.jpg
    20250110_190257.jpg
    567.5 KB · Views: 362
  • 20250110_175331.jpg
    20250110_175331.jpg
    590.9 KB · Views: 369
  • 20250110_230925.jpg
    20250110_230925.jpg
    584 KB · Views: 364
  • 20250110_230918.jpg
    20250110_230918.jpg
    619.8 KB · Views: 365
  • 20250110_203709.jpg
    20250110_203709.jpg
    554.7 KB · Views: 364
  • 20250108_220920.jpg
    20250108_220920.jpg
    535.2 KB · Views: 362
Beautiful work!  I have to say though that you must be fairly young, as a drawer at floor level would remain unused in my home.
 
I wish there was a better response, but "WOW" will have to do for now.  I would love to see a build thread for this project.
 
[member=60975]kevinculle[/member] Funny you should say that -- I was actually thinking of the armoire in the opposite way, as a screw you to short people, and more appropriately sized for people of my size in the mid 6ft range.  My wife has to stand on her tip-toes to get the hanger off the bar.  But we are hard up for drawers and additional storage space in our house, so when my wife noticed the bottom drawers, she immediately claimed them for her own stuff.

[member=70363]MikeGE[/member] That was my original intention and I had actually started a draft, but became overwhelmed sorting through the hundreds of process pictures I accumulated over the past few months.  But certainly if you are curious about any individual aspect of the build, would be happy to add details.  As I mentioned, it wasn't all that complex a process, just long and drawn out with lots of reiterations of a few core methods.  The most challenging part may have actually been the glue up, which took an entire day of pre-staging and assorted prep: constructing an elevated platform, taping all the joints, pre-positioning the clamps, etc.

[attachimg=1]

[attachimg=2]

There were something like 54 dominoes used for the casing, not counting those used for the internal construction of the frames and drawer dividers.  I got Lee Valley's Cabinetmaker's adhesive specifically for this glue-up, which has a much longer open time than the Titebond III I normally use.  Worked fantastically, and it's quite a valuable adhesive to have in my arsenal now, so thanks [member=4165]Rob Lee[/member] for making it available.

[attachimg=3]

I needed every additional minute, and was lucky to have my wife's hands when attaching the final vertical.  I don't think it would have been possible as a one-person operation, absent  changing the approach to pre-glue some of the dominoes (which I wanted to avoid doing).
 

Attachments

  • 20241119_165815.jpg
    20241119_165815.jpg
    406.6 KB · Views: 311
  • 20241119_165108.jpg
    20241119_165108.jpg
    525.1 KB · Views: 311
  • 20241119_124420.jpg
    20241119_124420.jpg
    570.7 KB · Views: 308
Nice build!

I've been using that glue (and the Garrett-Wade version as well) for decades now. It's great for darker woods, too, as the glue itself dries to a medium dark brown. My bottle says the open assembly time is 15-20 minutes, so I get your point about every minute counting compared to the 8-10 minute open time for TB III. For really big glue-ups, I'll sometimes turn to epoxy, as some versions can have assembly times approaching a hour if the weather isn't too hot.

I'm guessing you intend to stay in this home for a long time, maybe forever, as gluing up something that big in the room might mean getting it out if/when you move would be hard.

Novel idea to make a separate base instead of scribing a cut-out for the baseboard (or cutting the baseboard, which I'd never do persontally). Was there any interference with the closet door on the right's molding, or does this unit just miss that?

If I could make a couple suggestions/criticisms, which are minor:
1) Use of a wooden center runner for the drawers totally fits this solid wood, frame and panel construction. But, then to use plain metal Euro Kitchen style hinges seems a miss. I would have chosen to use something like Soss hidden hinges, or at least a nice traditional hinge in a material matching the handles. True, the hinges are only visible when the doors are open, but you've put in such amazing efforts to get everything just right as a labor of love (including using nicely figured/finished cherry on pieces that will never be visible, like the back of the base), this one misses for me.

2) Proportionally, having the handles on the doors shorter than the handles on the smaller drawers isn't quite right to my eye. I might have used the same smaller handles on the drawers, or even bigger handles on the doors. That said, maybe it looks different in person (door handles closer to your eye and so look bigger than drawer handles further away), or maybe if you change the handle design that might go away, too.

But again, great build - love the attention to grain!
 
Phenomenal craftsmanship. The usage of the wood grain is so elegant and the trim detail is immaculate. This is the kind of thing you'll be able to look at with pride for years to come.
 
[member=77266]smorgasbord[/member]  Both good suggestions, thx!  If I get around to redoing them in wood, can definitely correct the handle issue.

Funny you should mention the fit issue.  I was so narrowly focused on getting the dimensions of the unit right for the space, that I neglected to check if it would fit through the hallway to get into the room, which had a half-hexagonal arch design.

So now I have to redo that entryway.  It's one of those mistakes you only make once, so at least I have put that one behind me with relatively minimal collateral damage.

[attachimg=1]

[attachimg=2]

smorgasbord said:
Nice build!

I've been using that glue (and the Garrett-Wade version as well) for decades now. It's great for darker woods, too, as the glue itself dries to a medium dark brown. My bottle says the open assembly time is 15-20 minutes, so I get your point about every minute counting compared to the 8-10 minute open time for TB III. For really big glue-ups, I'll sometimes turn to epoxy, as some versions can have assembly times approaching a hour if the weather isn't too hot.

I'm guessing you intend to stay in this home for a long time, maybe forever, as gluing up something that big in the room might mean getting it out if/when you move would be hard.

Novel idea to make a separate base instead of scribing a cut-out for the baseboard (or cutting the baseboard, which I'd never do persontally). Was there any interference with the closet door on the right's molding, or does this unit just miss that?

If I could make a couple suggestions/criticisms, which are minor:
1) Use of a wooden center runner for the drawers totally fits this solid wood, frame and panel construction. But, then to use plain metal Euro Kitchen style hinges seems a miss. I would have chosen to use something like Soss hidden hinges, or at least a nice traditional hinge in a material matching the handles. True, the hinges are only visible when the doors are open, but you've put in such amazing efforts to get everything just right as a labor of love (including using nicely figured/finished cherry on pieces that will never be visible, like the back of the base), this one misses for me.

2) Proportionally, having the handles on the doors shorter than the handles on the smaller drawers isn't quite right to my eye. I might have used the same smaller handles on the drawers, or even bigger handles on the doors. That said, maybe it looks different in person (door handles closer to your eye and so look bigger than drawer handles further away), or maybe if you change the handle design that might go away, too.

But again, great build - love the attention to grain!
 

Attachments

  • 20250105_192513.jpg
    20250105_192513.jpg
    213.5 KB · Views: 282
  • 20250108_192145.jpg
    20250108_192145.jpg
    223 KB · Views: 279
It's always nice to see your recent post Edward...you always post interesting builds and you never scrimp on the details...that's really important.  [big grin]
 
The raised platform is a great solution for too tall cabinets.

Last time I made something that was too tall/bulky to stand up from horizontal I was saved by the Zeta. With it I could build/finish one side at a time and fit/scribe remove/reassemble any order required.
But my final joinery isn't as perfect as you've achieved so in the future I hope I can use the platform idea.

You did a splendid job matching figure. Resawing is the way to go.

Where did you go to get that beautiful cherry?
 
[eek]  [blink] WOW! That is fantastic. The design, the craftsmanship, and that Cherry......wow.
It looks great.
 
[member=297]Michael Kellough[/member]  Thanks!  Got the boards from Rosenzweig, though it took at least two trips and a few hours to sort through the  piles to find enough choice boards.  I've been mostly building in cherry since the post-Covid lumber inflation, as this is one of the few species that didn't undergo significant price spikes.

[member=65451]Steve1[/member] Just Osmo polyx matte finish, which I've been using for years very happily.

Michael Kellough said:
The raised platform is a great solution for too tall cabinets.

Last time I made something that was too tall/bulky to stand up from horizontal I was saved by the Zeta. With it I could build/finish one side at a time and fit/scribe remove/reassemble any order required.
But my final joinery isn't as perfect as you've achieved so in the future I hope I can use the platform idea.

You did a splendid job matching figure. Resawing is the way to go.

Where did you go to get that beautiful cherry?
 
ear3 said:
[member=297]Michael Kellough[/member]  Thanks!  Got the boards from Rosenzweig, though it took at least two trips and a few hours to sort through the  piles to find enough choice boards.  I've been mostly building in cherry since the post-Covid lumber inflation, as this is one of the few species that didn't undergo significant price spikes.

[member=65451]Steve1[/member] Just Osmo polyx matte finish, which I've been using for years very happily.

Michael Kellough said:
The raised platform is a great solution for too tall cabinets.

Last time I made something that was too tall/bulky to stand up from horizontal I was saved by the Zeta. With it I could build/finish one side at a time and fit/scribe remove/reassemble any order required.
But my final joinery isn't as perfect as you've achieved so in the future I hope I can use the platform idea.

You did a splendid job matching figure. Resawing is the way to go.

Where did you go to get that beautiful cherry?

Finish looks shiny for a matte surface. How many applications?
 
ear3 said:
I got Lee Valley's Cabinetmaker's adhesive specifically for this glue-up, which has a much longer open time than the Titebond III I normally use.  Worked fantastically, and it's quite a valuable adhesive to have in my arsenal now, so thanks [member=4165]Rob Lee[/member] for making it available.

I just went to buy another bottle, and it's no-where on their website anymore.
 
Back
Top