Cherry cabinets with rosewood and turquoise inlays...

Joined
May 27, 2016
Messages
76
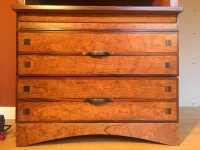
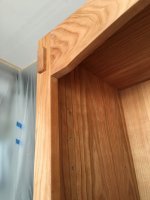
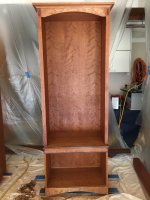
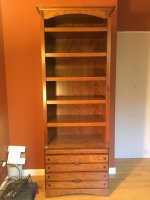
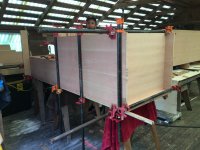
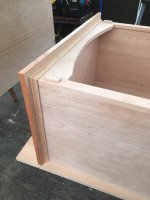
Thought I'd throw these up here, project I just finished, and my first foray into some cabinetry work. Learned a helluva lot, and overall they turned out pretty good! Didn't use a single Festool on them, but after this project I've been inspired to buy some and they come in the mail tomorrow...

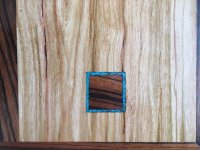
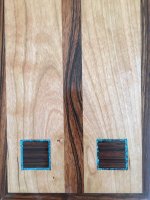
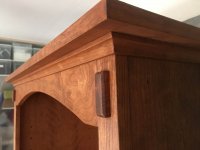
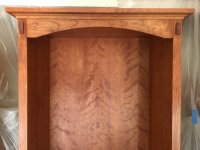
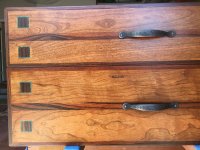
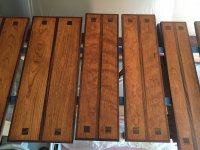
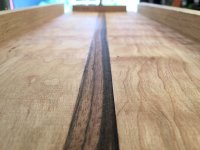
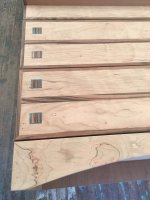
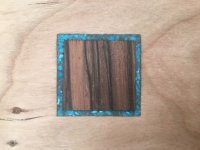
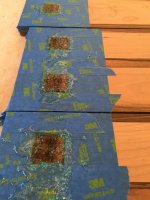
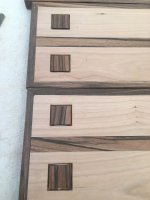
All A grade cherry ply, inlays are rosewood, and drawers are cherry with rosewood borders and inlays with a turquoise border set into West Systems epoxy. Varathane Golden Mahogany stain with Deft Semi-Gloss furniture finish, sprayed on with an HVLP gun.

Note: I would never try to spray a poly finish again! Next time, I'll just do a lacquer. The sanding in between coats was really sucky on all of that surface area, and I had issues with drips on vertical surfaces no matter how lightly I applied, but I try to stay away from solvent chemicals as much as I can. That said, darn do they have their place...

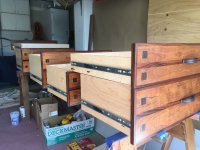
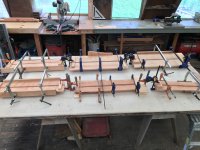
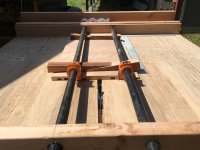
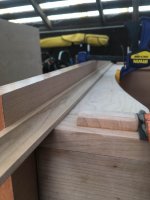
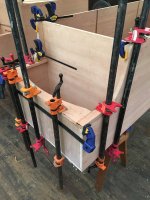
Took a couple of shots of our custom dado sled that took us like a day to build and dial in, but it seriously worked like a charm! Bar clamps with wedges kept it tight against the fence and table, runners kept it in the saw's grooves, attached vacuum hose to the front which captured most of the dust, and made crosscut dadoes a breeze!

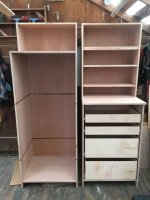
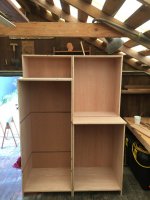
Felt kinda lame using pre-finished maple for drawer boxes but budget was getting tight to do anything much fancier!

Between myself and my buddy, I think we probably have about 300 hours into these things. All in all, not bad for cabinetry built in an old converted chicken barn...
 

Attachments

  • 20160520-IMG_4372.jpg
    20160520-IMG_4372.jpg
    843.4 KB · Views: 437
  • 20160510-IMG_4288.jpg
    20160510-IMG_4288.jpg
    705 KB · Views: 238
  • 20160512-IMG_4295.jpg
    20160512-IMG_4295.jpg
    688.7 KB · Views: 205
  • 20160512-IMG_4300.jpg
    20160512-IMG_4300.jpg
    1.5 MB · Views: 239
  • 20160512-IMG_4303.jpg
    20160512-IMG_4303.jpg
    1.2 MB · Views: 226
  • 20160512-IMG_4308.jpg
    20160512-IMG_4308.jpg
    980.9 KB · Views: 192
  • 20160516-IMG_4320.jpg
    20160516-IMG_4320.jpg
    614.3 KB · Views: 187
  • 20160516-IMG_4322.jpg
    20160516-IMG_4322.jpg
    816.4 KB · Views: 204
  • 20160516-IMG_4332.jpg
    20160516-IMG_4332.jpg
    727.8 KB · Views: 205
  • 20160516-IMG_4335.jpg
    20160516-IMG_4335.jpg
    729.8 KB · Views: 221
  • 20160520-IMG_4371.jpg
    20160520-IMG_4371.jpg
    679.5 KB · Views: 318
  • 20160520-IMG_4368.jpg
    20160520-IMG_4368.jpg
    734.8 KB · Views: 274
  • 20160520-IMG_4360.jpg
    20160520-IMG_4360.jpg
    771.4 KB · Views: 274
  • 20160520-IMG_4354.jpg
    20160520-IMG_4354.jpg
    832.1 KB · Views: 326
  • 20160520-IMG_4353.jpg
    20160520-IMG_4353.jpg
    1.4 MB · Views: 232
  • 20160518-IMG_4350.jpg
    20160518-IMG_4350.jpg
    686.9 KB · Views: 227
  • 20160516-IMG_4336.jpg
    20160516-IMG_4336.jpg
    924.7 KB · Views: 222
pt. 2
 

Attachments

  • 20160422-IMG_4150.jpg
    20160422-IMG_4150.jpg
    933.8 KB · Views: 183
  • 20160421-IMG_4137.jpg
    20160421-IMG_4137.jpg
    736.4 KB · Views: 199
  • 20160419-IMG_4129.jpg
    20160419-IMG_4129.jpg
    773 KB · Views: 168
  • 20160418-IMG_4124.jpg
    20160418-IMG_4124.jpg
    887.5 KB · Views: 177
  • 20160414-IMG_4081.jpg
    20160414-IMG_4081.jpg
    930.5 KB · Views: 180
  • 20160414-IMG_4078.jpg
    20160414-IMG_4078.jpg
    1.7 MB · Views: 225
  • 20160408-IMG_4061.jpg
    20160408-IMG_4061.jpg
    356.8 KB · Views: 190
  • 20160408-IMG_4060.jpg
    20160408-IMG_4060.jpg
    440.5 KB · Views: 168
  • 20160422-IMG_4154.jpg
    20160422-IMG_4154.jpg
    719.7 KB · Views: 167
  • 20160502-IMG_4233.jpg
    20160502-IMG_4233.jpg
    778.8 KB · Views: 186
  • 20160510-IMG_4284.jpg
    20160510-IMG_4284.jpg
    710.1 KB · Views: 211
  • 20160510-IMG_4283.jpg
    20160510-IMG_4283.jpg
    773.8 KB · Views: 212
  • 20160510-IMG_4279.jpg
    20160510-IMG_4279.jpg
    647 KB · Views: 173
  • 20160505-IMG_4265.jpg
    20160505-IMG_4265.jpg
    616.5 KB · Views: 181
  • 20160505-IMG_4263.jpg
    20160505-IMG_4263.jpg
    761.6 KB · Views: 170
  • 20160504-IMG_4259.jpg
    20160504-IMG_4259.jpg
    1,003.6 KB · Views: 179
  • 20160504-IMG_4258.jpg
    20160504-IMG_4258.jpg
    825.1 KB · Views: 254
  • 20160503-IMG_4253.jpg
    20160503-IMG_4253.jpg
    732.6 KB · Views: 182
Hi!

Looks great, very nice build! Thanks for sharing!

Kind regards,
Oliver
 
[member=61469]BigfootBuilder[/member] - looks great. The inlays really add a visual "pop".

I have been playing with stone inlay, what did you use for that? I tried gap-filling CA and 3 epoxies, finally settled on Bob Smith 5-minute with ground malachite fines mixed in and crushed malachite pressed in. Worked pretty good but I think there must be better options.

Keep posting.

RMW
 
Nicely done sir! I admire your ambition for your first effort! Are these cabinets for you and yours or are they for a client? Either way, someone is going to enjoy them for a very long time.

When you embark on your next cabinet(s), I would love you hear how the process was affected by your latest Festool investments.

Beautiful, keep up the great work!

Kevin
 
Richard/RMW said:
[member=61469]BigfootBuilder[/member]
I have been playing with stone inlay, what did you use for that? I tried gap-filling CA and 3 epoxies, finally settled on Bob Smith 5-minute with ground malachite fines mixed in and crushed malachite pressed in. Worked pretty good but I think there must be better options.

I used West Systems epoxy with the fast 205 hardener. It was my first attempt at doing such a thing, and the one thing that I would have done differently is added a sprinkle of dry fines on top after filling with the epoxy, as the heavier solids settle to the bottom and I was wanting more of the stone itself to be sanded down and at the surface. In a few of them they sunk too far, but you only notice up close. I think it can be a good idea to do 2 fills too, rather than trying to fill all iin one fell swoop, believe it helps temper the formation of air bubbles close to the surface. I'd like to see some of your inlays if you care to share! And any tips you might have ;)

Krkww said:
Nicely done sir! I admire your ambition for your first effort! Are these cabinets for you and yours or are they for a client? Either way, someone is going to enjoy them for a very long time.

When you embark on your next cabinet(s), I would love you hear how the process was affected by your latest Festool investments.

Beautiful, keep up the great work!

Kevin

Thank you! They are for a client, I'd never build something this nice for myself! About to start the next phase for the same client, so my new CT26 and ETS EC 125 EQ should come in very handy quite soon.

Thank you all for the replies!
 
Cherry is my all-time favorite wood, by a long reach.  You've done a wonderful job with it, and the rosewood/turquoise inlays just make it pop.  Well done!!! 

[smile]
 
[member=61469]BigfootBuilder[/member] - the inlays I referred to are here.

The best result I got was using epoxy with ~20% fines mixed in so it had a consistent color, filling the void and then pressing in stone afterwards. I ground it mostly down with a Foredom/grinding wheel then used the RO90 to bring it level with the slab and worked thru grits from there.

[attachimg=1] 

Worked out pretty good. I have 4 more slabs to play with & want to experiment with other forms of inlay.

RMW

BigfootBuilder said:
Richard/RMW said:
[member=61469]BigfootBuilder[/member]
I have been playing with stone inlay, what did you use for that? I tried gap-filling CA and 3 epoxies, finally settled on Bob Smith 5-minute with ground malachite fines mixed in and crushed malachite pressed in. Worked pretty good but I think there must be better options.

I used West Systems epoxy with the fast 205 hardener. It was my first attempt at doing such a thing, and the one thing that I would have done differently is added a sprinkle of dry fines on top after filling with the epoxy, as the heavier solids settle to the bottom and I was wanting more of the stone itself to be sanded down and at the surface. In a few of them they sunk too far, but you only notice up close. I think it can be a good idea to do 2 fills too, rather than trying to fill all iin one fell swoop, believe it helps temper the formation of air bubbles close to the surface. I'd like to see some of your inlays if you care to share! And any tips you might have ;)

Krkww said:
Nicely done sir! I admire your ambition for your first effort! Are these cabinets for you and yours or are they for a client? Either way, someone is going to enjoy them for a very long time.

When you embark on your next cabinet(s), I would love you hear how the process was affected by your latest Festool investments.

Beautiful, keep up the great work!

Kevin

Thank you! They are for a client, I'd never build something this nice for myself! About to start the next phase for the same client, so my new CT26 and ETS EC 125 EQ should come in very handy quite soon.

Thank you all for the replies!
 

Attachments

  • ScreenClip [1].png
    ScreenClip [1].png
    1.6 MB · Views: 731
Great piece.  I usually go with the 'less is more' theory with cherry, but this is the bee's knees!

I like the hardware, too.  I've used that pattern on a few projects.

Hope you get a nice fat paycheck soon, you sure have earned it. [big grin]
 
Back
Top