jonny round boy
Member
- Joined
- Jul 21, 2007
- Messages
- 3,223
Just finished this - I installed it last Friday, but couldn't get back to do the final paint coat until today.
Client wanted some built-in shelving/clothes storage for a child's room. After various discussions, we ended up at this design:
[attachimg=1]
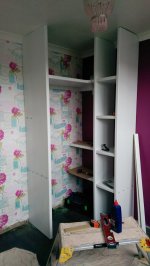
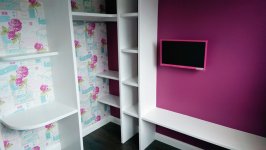
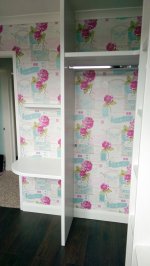
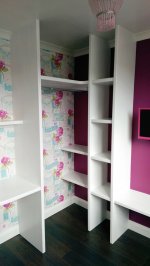
Working from the left, there's a small desk area next to the door, then a wardrobe section with a hanging rail & shelving above & in the back corner, then a tall shelf section, then a long low shelf under the TV.
Note that the room is very small - only 2.74 x 2.56 metres. When I went to look/measure up, the room had been gutted, and re-boarded/skimmed, and the walls were pretty much straight and plumb. The uprights were to go floor to ceiling, so to make it easier I asked them not to install the skirting board - I would cut & fit that after the uprights were in. That way, I wouldn't need to scribe around them.
I wanted the panels to be quite chunky, so used 2x 18mm MR (moisture resistant) MDF glued together. The sheets were rough cut with my TS55R, glued together, and then cut to final size once dry (again with the TS55R). All the parts are dominoed together, using 8mm dominos. A 6mm round-over was added with my OFK500, and then all the pieces were sanded to 180 grit with my ETS150. I applied 2 coats of water based pure white eggshell with a roller.
I used MR MDF as it takes paint better than standard MDF, particularly on the edges. Unfortunately that also means it's really heavy! At Ron's FOG meet, Gary Martin introduced me to paintable edging tape for MDF, but I'd already bought all the sheets by then! Now I know this stuff exists, I'd use standard or maybe even lightweight MDF & use the tape for the edges.
When I got to site to install it, I found that they had done as requested and not fitted the skirting. Unfortunately, they had installed plaster coving all round the ceiling (which I didn't know they were doing!) and completely decorated & finished the room! I would have to scribe all 3 uprights around the coving and install/assemble it all without marking or damaging the paintwork & wallpaper... [eek]
Here's a shot once all 3 uprights were in with the shelves in between:
[attachimg=2]
As you can see, the gaps between the uprights & the ceiling weren't great due to the unevenness of the ceiling and the fact they had to be angled in. I filled these gaps afterwards.
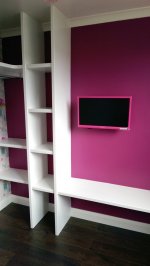
Finished pictures:
[attachimg=3]
[attachimg=4]
[attachimg=5]
[attachimg=6]
[attachimg=7]
There's still a couple of bits to do - they've decided to add an extra shelf to the left under the TV for a sky box. Also, I've still to make the matching bedside table and stool for the desk (which I'll hopefully get done next week).
Client wanted some built-in shelving/clothes storage for a child's room. After various discussions, we ended up at this design:
[attachimg=1]
Working from the left, there's a small desk area next to the door, then a wardrobe section with a hanging rail & shelving above & in the back corner, then a tall shelf section, then a long low shelf under the TV.
Note that the room is very small - only 2.74 x 2.56 metres. When I went to look/measure up, the room had been gutted, and re-boarded/skimmed, and the walls were pretty much straight and plumb. The uprights were to go floor to ceiling, so to make it easier I asked them not to install the skirting board - I would cut & fit that after the uprights were in. That way, I wouldn't need to scribe around them.
I wanted the panels to be quite chunky, so used 2x 18mm MR (moisture resistant) MDF glued together. The sheets were rough cut with my TS55R, glued together, and then cut to final size once dry (again with the TS55R). All the parts are dominoed together, using 8mm dominos. A 6mm round-over was added with my OFK500, and then all the pieces were sanded to 180 grit with my ETS150. I applied 2 coats of water based pure white eggshell with a roller.
I used MR MDF as it takes paint better than standard MDF, particularly on the edges. Unfortunately that also means it's really heavy! At Ron's FOG meet, Gary Martin introduced me to paintable edging tape for MDF, but I'd already bought all the sheets by then! Now I know this stuff exists, I'd use standard or maybe even lightweight MDF & use the tape for the edges.
When I got to site to install it, I found that they had done as requested and not fitted the skirting. Unfortunately, they had installed plaster coving all round the ceiling (which I didn't know they were doing!) and completely decorated & finished the room! I would have to scribe all 3 uprights around the coving and install/assemble it all without marking or damaging the paintwork & wallpaper... [eek]
Here's a shot once all 3 uprights were in with the shelves in between:
[attachimg=2]
As you can see, the gaps between the uprights & the ceiling weren't great due to the unevenness of the ceiling and the fact they had to be angled in. I filled these gaps afterwards.
Finished pictures:
[attachimg=3]
[attachimg=4]
[attachimg=5]
[attachimg=6]
[attachimg=7]
There's still a couple of bits to do - they've decided to add an extra shelf to the left under the TV for a sky box. Also, I've still to make the matching bedside table and stool for the desk (which I'll hopefully get done next week).
Attachments
-
 ClaireWardrobes101.jpg152.2 KB · Views: 1,161
 -
 ClaireShelves00.jpg648.7 KB · Views: 1,087
 -
 ClaireShelves01.jpg593.6 KB · Views: 1,091
 -
 ClaireShelves02.jpg585.1 KB · Views: 1,085
 -
 ClaireShelves03.jpg654.1 KB · Views: 1,079
 -
 ClaireShelves04.jpg595 KB · Views: 1,076
 -
 ClaireShelves05.jpg523.6 KB · Views: 1,110