CMS-GE router table horizontal bearing shoe is too loose.

dhoover1027

Member
Joined
Sep 8, 2014
Messages
33
I have a new CMS-GE router table and I'm having a problem with the press down fixture. The clear plastic that provides pressure against the outside of the wood can't be tightened against the silver rod that it rides in and out and rotates on. If I try to swing it up and 180degrees so that it is on top and out of the way, it will not stay. Simply swings back down thanks to gravity. The rotary knob will not tighten enough to provide a squeeze to hold it.
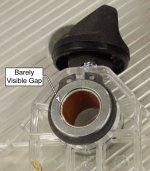
This is called the horizontal bearing shoe. Also, because of this it does not provide consistent horizontal pressure against the work piece. I took it apart and the screw applies pressure against a split bearing which should apply pressure against the silver bar upon which it rides to and fro or in and out or rotated out of the way. The bearing is split and I can see the line of the split and both sides meet and it is tight together. This does not allow any pressure to be placed because it does not compress. Also there is no hole thru this bearing to allow the screw to make contact with the silver bar to apply pressure. Maybe there is no hole to keep the screw from boogering up the silver bar surface. Maybe not ?
Sorry for the long winded thread. I have pictures if you need them.
Any ideas ?
Drill, call customer service, or what ?
 
Sorry to read about your issue.  Photos are always great. I suspect that ultimately a call to Festool USA on Monday will be in order but once we see some images who knows.  [big grin]

Peter
 
dhoover1027 said:
I took it apart and the screw applies pressure against a split bearing which should apply pressure against the silver bar upon which it rides to and fro or in and out or rotated out of the way. The bearing is split and I can see the line of the split and both sides meet and it is tight together. This does not allow any pressure to be placed because it does not compress. Also there is no hole thru this bearing to allow the screw to make contact with the silver bar to apply pressure. Maybe there is no hole to keep the screw from boogering up the silver bar surface. Maybe not ?
Sorry for the long winded thread. I have pictures if you need them.
Any ideas ?
Drill, call customer service, or what ?

If you've already taken it apart, place the split bearing (by itself) on the aluminum rod and double check that there isn't a visible gap between the ends. If there is no gap, then your assessment is correct. There may not be a visible gap when it is not on the rod, but there should be a visible gap when it is on the rod.

I just noticed that mine is similar to yours and it just barely tightens down on the rod.

You could either send it back to Festool, or try to file the split a little bit to create more gap.

P.S. No, there should not be a hole through the bearing for the reason you suggested.

[attachimg=1]
 

Attachments

  • Split Bearing.jpg
    Split Bearing.jpg
    99.5 KB · Views: 419
I had the same issue.

As Rick mentioned, the proper process would be having Festool repair or replace your feather board.

If you want to address the issue yourself, here is the video I shot of the repair process. You making this repair will most probably void any warranty on the item.


Tom
 
Thanks, for your thoughtful replies. I thought about increasing the split in the bearing as well. And I'm glad I asked about drilling a hole in it before I did it. I have a habit of trying to fix things myself and get away with it most of the time. This time I think I'll talk to Festool on Monday and see what they have to say. I will let you all know how that goes.
I had a failure of the on/off switch on the Domino 500 and had it fixed under warranty. It all went well and was handled well so I have faith this will be the same.

Thanks, Doug
 
So yesterday, I really needed to use the CMS and the bearing shoe.
Realizing I was wimping out by calling Festool and waiting for a new bearing to be sent out.
I did it myself using the above referenced uTube video as a guide.
Works like a champ !

Now, I need help getting the left and right fence pieces to be coplaner. A straight edge is embarrassed to be placed along both at the same time. I want to edge joint.
I've searched and found no help, except to add different parts from other companies.
I don't really want to shell out more money. The CMS GE router table was enough.
Thanks for all the help.
Doug
 
That's actually a very easy adjustment.  If you're looking at the back of the fence, on the left side near the end are two white nylon grub screws.  Loosen the black fence adjustment knobs, then "tune" the two grub screws until you get the fences coplanar.  Also, be sure that the right side adjuster is set to zero before you start with the grub screws.
 
I took it all apart as far as resonable, cleaned everything and put it back together.
I then got it almost perfect. Perfection would follow if the right fence where it is closest to the router bit extended out a tiny bit. I can see a bit of light in back of the straightedge when it is held up across both fences. Can the rotary knob be adjusted to extend the fence a bit more than where it now stops ?
When edge jointing cherry I get a slight step in the edge just jointed. It is much less than yesterday however. Thanks to "Sparktrician".

Doug
 
I did what Tom did and it works great. However, after Gerry demo'd the jessum stock guides on my CMS I went and got a pair of them, they work great.
 
Back
Top