Complex Domino glue-up. Need advice.

Steveng57

Member
Joined
Oct 6, 2019
Messages
6
Hi all,

I am new to the forum he and new to Festool Dominos as well.  Of course, it being my first time with it, I have chosen an outrageously complex project involving hundreds of Dominos.  I think I should have started with a footstool.

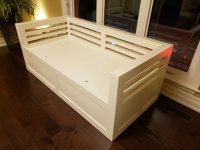
Anyway, I have managed to carve the project up into 4 major glue-ups, but the largest of those has me worried.  Think of it as two stiles with 6 rails (slats) between them.  Each slat has its own Domino.  That makes for 12 Dominos total.

Add to the 12 Dominos another 24 holes to fill, and then the sides as well.  My glue is Titebond III, which specifies a set time of 10 minutes.  I really don't think I can glue 12 Dominoes, 24 holes, 2 stiles, and properly clamp it all up in that amount of time. 

Is there a better way to do this?  Can I put break the job into two, putting the Dominoes into the slats on part 1, letting them dry, then assembling the slats to the stiles as part 2, the next day? 
 
Hi
Welcome to the FOG. Here are some options
Put the glue in the refrigerator, it will slow the cure time,
Use a longer setting glue to allow for placement of the dominoes This decreases stress
Do a few practice ( or several ) dry runs (without glue ) You can sand the edges of the dominoes for your dry runs then write on them and reuse them for all future projects when you are doing dry run practice. Sand them so they are loose in the mortise and easy to disassemble your project. Then use original tight fitting dominoes at glue up time
Be sure to have all of your clamps set out ( this is part of your practice dry runs)and even get them to a proper dimension so you aren’t clumsy or have to run around and get clamps
When you’re comfortable with the setup, domino placement etc and are ready for glue up follow your practice procedure. Do your glue up with original size dominoes Making a list of the order is helpful as well

Having an extra set of hands is helpful as well. Doing your complicated projects in multiple phases can help a lot as well
Best
 
You need a helper (or two or three).

I was building a crib that had 13 slats with two rails. There were Dominos in each end of the slats. You don't have to wait until all the components are glued to start assembly. Plan it out and practice without glue and have your clamps ready to go.

Good luck!
 
[member=71455]Steveng57[/member]
Welcome to the FOG!

Don't stress out too much about it, it's much easier than it seems.

I just built a set of doors for my son's mini-shed and construction method was similar, 2 styles, 3 rails and a bunch of slats in between. Each rail had 4 dominoes on either end (10 mm variety, each rail was 1" thick). So 24 dominoes per door. Used Titebond 3 as well. Didn't freeze it and didn't add any extenders.
I did one dry run using normal dominoes to make sure everything fits and everything is square.

You can add glue to holes in one side of rails first (one rail at a time), then set dominoes in every hole. You don't need to cover dominoes in glue, glue you have in holes is sufficient. Don't wait until glue cures or sets.
Once you have all dominoes glued to one side of all rails, add glue to all style holes.
Insert rails into the first style.
Add glue inside holes on the exposed end of all rails.
Pound in dominoes.
Add glue to the holes in the remaining rail and put it in it's place.
Clamp it.
Done.
 
Hello

Yes, you can break it up like you envision, especially doing the dominos into the ends of slats ahead of time.  The glue does dry fast and the Dominos "lock" into their position quickly with contact with the glue, so you wouldn't have to wait until the next day.

Another tip is to figure out which Domino mortises to cut in the narrow (exact width) position and which ones can be cut in one of the wider width settings. If you set it up so that only certain key mortises are in the narrowest setting and the rest are wider, that will remove some of the panic factor when assembling with glue and clamps.

Another tip, and I learned this the hard way on a big glue up  [eek] [scared], is to have pliers and the Domino ready to go in case you find a domino is in place but is "off" just a little and preventing pieces from coming together.  With your pliers handy you can yank it out and quickly adjust the mortise with a fresh plunge with the machine and then you're right back at it on the assembly. 
 
The responses given before this cover everything you need for a successful glue-up.

Everything else (including this) is just noise. [big grin] [big grin].

P.S. Just in case you want insurance, use Old Brown Glue or the like.
 
ChuckM said:
The responses given before this cover everything you need for a successful glue-up.

Everything else (including this) is just noise. [big grin] [big grin].

P.S. Just in case you want insurance, use Old Brown Glue or the like.
Indeed, Hide glue gives you some extra time
 
You folk are awesome!  Thanks so much for all the tips and techniques.  I’ll experiment and practice some tomorrow, and go for real later this week. 

Thanks again.
 
"Can I put break the job into two, putting the Dominoes into the slats"

Sure. The domino that goes into end grain do not have to be clamped. Put glue on them and tap them in until they bottom out.

BINGO......you now have an integral tenon. Clean up any glue squeeze-out and set aside for an hour or so.

Then proceed  to assembling the rails(with integral tenons) to the stiles. Glue one side and dry fit the other side and clamp.

After an hour or so. Take the clamps off and glue up the other side and clamp again.

Take a break and and have a cold brew. Listen to the glue dry and admire your work.

HTH

 
Unless you specifically need the waterproof feature of Titebond III, I would use Original. "Stronger" glues seem a little over-the-top to me, since even original white Elmer's is stronger than the wood itself. Original gives you a nice long open time.
 
So did a few tests on scrap this a.m. and dove in this evening.  Tried a number of things mentioned in this thread, thanks all very much.  I had 4 panel of the above mentioned format (each one with 6 slats).  The first one was a bit of "panic city" as my timer was ticking away and the first Domino that I had glue was giving me grief.  An extra reefing on the clamp took care of that.  On the remaining 3 panels I was much more adept, so by the time I got to clamping, things moved much more easily.

The "cold brew" advice was the most useful of all.  I implemented that procedure several times, and while it may not have helped my speed and accuracy, it certainly helped with the stress level.  Thanks Trossy.

Additionally, I...
  • Enlisted a helper.  She too works for beer.
  • Broke the job into smaller parts: gluing just the slats a Trossey mentioned, and also left side first, then right side. 
  • Cooling the glue a bit.

Given there were 4 panels, I was always busy with something, never the same thing, but something.
 
You can sand the edges of the dominoes for your dry runs then write on them and reuse them for all future projects when you are doing dry run practice. Sand them so they are loose in the mortise and easy to disassemble your project. Then use original tight fitting dominoes at glue up time.

This advice deserves a peace prize of some sort.

Thanks Chris!
 
I've never really had an issue with gluing up Domino constructed projects. I always use the line-to-line setting so that there is no wiggle room for the Dominos. I know it yields a stronger joint.

I'll pop in all the mortises in the boards and then decide how I will approach the glue-up. Select a board and coat, glue and insert all Dominos in their mortises. Wipe any errant glue away with a damp cloth.

Just give it time and let it set up. Add the additional boards/ items and repeat.

It may seem that this process takes a long time, but unless you're doing this for a living, it works well. If you need to do this for a professional application, then there are other time saving methods available that only cost $$$ to implement.
 
Steveng57 said:
You can sand the edges of the dominoes for your dry runs then write on them and reuse them for all future projects when you are doing dry run practice. Sand them so they are loose in the mortise and easy to disassemble your project. Then use original tight fitting dominoes at glue up time.

This advice deserves a peace prize of some sort.
There's another one that involves a short microwave treatment of the dominos, shrinking them by motivating them to let go of the moisture inside. Which has the upside of not having to sand them so they can easily be removed on dry fits, not having to mark them to make them distinct from untreated ones - and it being absolutely no problem when confusing them for 'normal' ones on the glue-up, the moisture from the glue will return them to their former glory in no time.
 
Hi all.

Many thanks to all the advice in this thread.  Its done now, a Christmas present to my wife.  Turned out great thanks to your guidance.  About 180 dominoes in this thing, overkill I know, but it didn't creek a decibel when we carted it up the stairs.  Dominos are so strong, you could park a truck on this thing.  Custom pillow insert should be ready in about a month to really finish it off.

Thanks again.
 

Attachments

  • 20191225_174204-Copy.jpg
    20191225_174204-Copy.jpg
    1.7 MB · Views: 438
Titebond makes other glues under the name "Extend". I believe Titebond II Extend will give you at least an extra 5 minutes plus I believe it's also waterproof if you need that.

You can certainly glue together one side of each joint and then put glue on the exposed side of the Domino, but I have never waited overnight. This will just give you a bit more time since you haven't spread the glue all over the Domino to start.

Practice ahead of time so that you know what to expect and have a "plan" when the actual glue-up occurs. This won't eliminate all unexpected things that could happen but will allow you to know how you will handle each phase before you start spreading glue.
 
I use a lot of blue tape when constructing a complex project. I mark up every joint with what it mates to. I also do a video of my practice run. The suggestion to have clamps ready is wise.
 
Plastic resin glue is another option.  I use it a fair amount when veneering, especially the thicker shop-sawn veneers.  But it works for all the typical woodworking applications.  It has a long open time (at least 30 minutes), and has a lubricating quality that helps the domino joints slide together easily.

It has disadvantages.  It contains formaldehyde.  So, wear a respirator when handling the dry powder.  And you must mix it in “fairly” precise ratios (water, powder).  But I’ve found this to be easy using a mini-liquid measuring cup (1/4 oz. graduations – about the size of a shot glass) and standard dry measuring cups.  Also, the product sheet states minimum use temperature of 70F (but I’ve had success at 60F multiple times).

I use CP Adhesives CP-0503.  I’ve been using the same 5lb. pail for over 10 years, even though the stated shelf life is 12 months.  If I haven’t used it in a while, I’ll mix a batch and glue up some scrap in advance to ensure it’s still good.  You only need to mix very small quantities for a typical assembly glue-up (less than 1/4 cup of dry powder).
 
Birdhunter said:
I use a lot of blue tape when constructing a complex project.

A British woodworker, David Barron, uses different color dots (self-adhesive) to mark the matching pieces. I rely on mostly on the cabinetmakers' triangles system.
 
Back
Top