Corner Banquette Build

SoonerFan

Member
Joined
Jan 27, 2014
Messages
754
I am getting ready to build a corner banquette for some friends.  I have built several book cases, desks, cabinets, etc. but have not built an L shaped banquette before.  I have a couple questions before I start.  The banquette will be 80 inches by 50 inches.  My questions related to the back and corner.  They’d like the back to have a slight angle.

1.  Would it be best to build one bench 80 inches long, one 32 inches long (32 inches + 18 inch depth on the 80 inch bench = 50 inches)? 

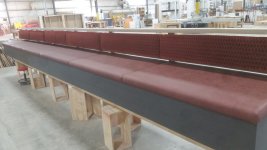
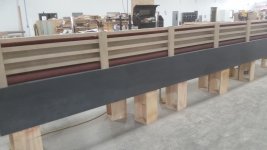
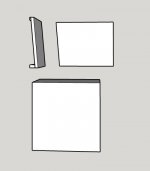
2.  For the back would it be best to build this all as one unit?  If so, what the best approach to build the corner since both backs will be angled back (most likely 5 degrees)?  Any pictures or examples would be appreciated.  I do have a CNC that if that can be used to simplify the construction on the angled corner.

3.  I have used software to design cabinets, produce cut lists, etc.  My SW does not however have the ability to design the angled back.  I have thought trying out the free version of Sketchup previously and then maybe migrating to Sketchup Go if I like it.  If I use Skecthup, are there sample projects available or a community that shares files?  Ideally I’d like to get a file for a corner bench with an angled back I could use as a starting point and modify to my needed design as I earn the software.

4.  Also, it might be time to up my SW game overall.  In addition to the older cabinet SW, I have a subscription to Easel that I use to create g code for my CNC.  I have thought about switching to Fusion 360.  Any other cabinet makers out there with a CNC?  If so, what SW do you use for cabinets and to produce g code?

Another other suggestions would be appreciated.  Thanks in advance.

 
I can answer part of question 3:  There is Sketchup Warehouse, which contains all sorts of models for all sorts of things that others have contributed.  You would likely be able to find examples in there, although quality varies.

Depending on how they would like the interior divided, it may be better to make this as 2 or 3 separate units that are all assembled together.  At a very minimum, you won't be able to physically move anything that is 80"x50" through a standard doorway.  Even if it's L-shaped and can "swing" around a door, why make it so difficult?
 
squall_line said:
I can answer part of question 3:  There is Sketchup Warehouse, which contains all sorts of models for all sorts of things that others have contributed.  You would likely be able to find examples in there, although quality varies.

Depending on how they would like the interior divided, it may be better to make this as 2 or 3 separate units that are all assembled together.  At a very minimum, you won't be able to physically move anything that is 80"x50" through a standard doorway.  Even if it's L-shaped and can "swing" around a door, why make it so difficult?

[member=75217]squall_line[/member] thank for the input.  After thinking about it some more I think I will go with three pieces: a corner unit, and a bench for each side.  I will attach the backs (once I figure out how the angle the corner back 5 degrees) before delivering and installing. 

Probably will give Sketchup and/or Fusion 360 a shot at some point.

Thanks for the input
 
We build a lot of seating, for cafes, restaurants etc. We usually break them into three components - a back wall, the seat base and a plinth. Storage is usually incorporated into the base. Everything exposed is clad in the chosen finish. The rake/angle is usually built into the upholstery - the foam is cut to shape before being wrapped. We supply mdf boards to the upholsterer for him to build the cushions/backs on. Seats lock onto the bases with stop blocks, so they can be removed. Backs are french-cleated to the back wall, either a low height wall we build as part of the unit, or in some cases directly to the existing wall.
 
Lincoln said:
We build a lot of seating, for cafes, restaurants etc. We usually break them into three components - a back wall, the seat base and a plinth. Storage is usually incorporated into the base. Everything exposed is clad in the chosen finish. The rake/angle is usually built into the upholstery - the foam is cut to shape before being wrapped. We supply mdf boards to the upholsterer for him to build the cushions/backs on. Seats lock onto the bases with stop blocks, so they can be removed. Backs are french-cleated to the back wall, either a low height wall we build as part of the unit, or in some cases directly to the existing wall.
[member=69760]Lincoln[/member] excellent information thanks.  Challenge I have is they dont want cushions on the back.  Any suggestions for angled backs without cushions?  In the end I might just make the backs straight, build in three pieces and install. 
 
I have built more benches than I could ever guess, and one of the first concerns is always shipping/fitment. Doorways, especially interior doors are almost always a restriction, but breaking it down into too many pieces is a pain too. It costs more in time during assembly, during disassembly, and again on re-assembly too. I always try to be strategic about joints, and trying to make it so they don't line-up on adjacent surfaces. That way it never looks like it was "parts" that were put together.
Angling the back just depends on the design style of the project. Sometimes it's built into the padding of upholstered panels, sometimes its just a taper in the internal ribs.

The veneered ones are built at an angle, but not upholstered. They were not really intended to be comfortable though.....they go to the phone banks of the county jail.  [eek]
 

Attachments

  • bench3.jpg
    bench3.jpg
    190.5 KB · Views: 61
  • bench4.jpg
    bench4.jpg
    154.9 KB · Views: 57
  • BenchesFCCC.jpg
    BenchesFCCC.jpg
    322.9 KB · Views: 66
Crazyraceguy said:
I have built more benches than I could ever guess, and one of the first concerns is always shipping/fitment. Doorways, especially interior doors are almost always a restriction, but breaking it down into too many pieces is a pain too. It costs more in time during assembly, during disassembly, and again on re-assembly too. I always try to be strategic about joints, and trying to make it so they don't line-up on adjacent surfaces. That way it never looks like it was "parts" that were put together.
Angling the back just depends on the design style of the project. Sometimes it's built into the padding of upholstered panels, sometimes its just a taper in the internal ribs.

The veneered ones are built at an angle, but not upholstered. They were not really intended to be comfortable though.....they go to the phone banks of the county jail.  [eek]

They're sensational! I'd love to know is there a general guide you follow as to the height/angle etc of the padded benches, or is all custom, as I'm planning on building a nook in our kitchen.
 
To address your question about making the corner, here's what I might do (I haven't actually built something like this myself). The base block in the drawings below is just for reference - you will design a real base. Assuming you do as others have suggested and make the bench in three pieces, the corner unit might look like this:

[attachimg=1]

The left hand part of the back would be full length of the base.

[attachimg=2]

The right hand part of the back would be cut off at the an angle to match the left hand part. Because the back of this will be hidden, there's no need for any fancy joinery.

[attachimg=3]

One thing you will need to take into account (especially if this will be built-in and attached to the wall) is that the walls may not be perfectly straight and the corner may not be exactly 90 degrees. You should check this before you build so you know what you are dealing with. I've shown a strip at the top that you can scribe to the wall for a better fit if the wall isn't straight. There's also a strip at the bottom but I would just keep that away from the wall completely. You may need to adjust the fit where the two back sections join if the corner isn't 90 degrees.
 

Attachments

  • Screen Shot 2024-02-03 at 2.13.35 AM.jpg
    Screen Shot 2024-02-03 at 2.13.35 AM.jpg
    34.4 KB · Views: 199
  • Screen Shot 2024-02-03 at 2.16.32 AM.jpg
    Screen Shot 2024-02-03 at 2.16.32 AM.jpg
    27.7 KB · Views: 197
  • Screen Shot 2024-02-03 at 2.16.47 AM.jpg
    Screen Shot 2024-02-03 at 2.16.47 AM.jpg
    17.7 KB · Views: 193
luvmytoolz said:
They're sensational! I'd love to know is there a general guide you follow as to the height/angle etc of the padded benches, or is all custom, as I'm planning on building a nook in our kitchen.

For me, it's all driven by the architect and to fit the individual space. I don't really have any control over it.
The only leigh way I get is the "how" part. As long as it looks like it is supposed to and is structurally sound, no one cares how it's done. (most of them don't know enough to tell anyway)
In general, I build things with the installers in mind, and somewhat for the delivery guy too.
There is also the repairability factor. There are times when I assemble layers based on how hard it would be to get something back apart, or at least partly. Most of the time though, it's just not possible.
Those are the ones that get my "special" (only partly joking) warning of "Be careful..... if you tear it up, you have to fix it" Knowing full-well that they can't [huh] These are the jobs that I usually refer to as "dynamite and a bulldozer" meaning that once fully assembled, they can never come apart again and any kind of repairs are going to have to be done on site....and it will never look the same. When it had to be removed someday for a remodel.....blow it up and scoop up the piece. That's about all that can ever happen  [blink] Field joints get glued shut, solid surface joints are permanently fused. It's not coming apart, even if you knew how it was built, and by then, no one will.

[member=608]Mark Katz[/member] drawing looks good as a generic example. Though I think I would try to incorporate the shorter side of the L into it, rather than the corner as a square "corner only" if you can still get it in the space. The fewer field joints you have, the better.....if you can get it in the space.
I'm a big fan of Dominos to align the largest face panels and threaded inserts/bolts to hold them together.
Leave yourself access to the inside to reach that hardware.
As mentioned earlier, a lot of times seating like this is used for storage, this is your opportunity to give yourself that access.

As far as height and angles, just replicate something you already like and don't neglect the height of the table. Having that ratio off is quite annoying. HTH 
 
Back
Top