corner clamping

squall_line said:
HowardH said:
Hello, Peter.  These boxes will be used as a floating nightstand and will need to be able to withstand the weight not only of a table lamp but potentially books, etc in the open section.  I'm afraid that a mitered end grain joint wouldn't hold up to the weight without the added strength the addition of a domino/dowel would bring. 

In this case, would the dowels into each face be providing that much added strength, or just registration for fitting?

I would think that dowels parallel to the ground, in a mitered joint, would offer not only registration, but also strength against breakage as well as a parallel plane to clamp against.

Or a lock joint, or a lock dowel, or...?

I could certainly construct the boxes using a butt joint but I would want the top surface to be continuous rather than the vertical pieces be visible by having them attach to the outside of the horizontal pieces. That would work well strength wise but not aesthetically. Otherwise, having the end pieces attached on the underside where the dowels would be inserted vertically which would add no strength.  I would think a row of them inserted into the miter as shown would add sufficient strength unless I was shown otherwise. 
 
Birdhunter said:
Splines solve both the alignment issue and the strength issue.
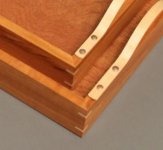
  Isn't that essentially what the dowels would do, except they are hidden? 
 
Whether glue alone is good enough for end-grain bevels obviously depends on the intended use. There's no agreement even among box-makers. For example, Doug Stowe uses splines, while Matt Kenney (52 boxes in 52 weeks) mostly goes with just glue.

Boxes can be dropped, and I seriously doubt that glue alone is sufficient to handle the impact. But then I'm a woodworker, I can easily fix it. When I'm not sure (what stress, including change in humidity, a joint may be subject to), I'll err on the safe side, and reinforce the joint with dominoes or keys, etc.
 

Attachments

  • miters.JPG
    miters.JPG
    18.2 KB · Views: 202
HowardH said:
I could certainly construct the boxes using a butt joint but I would want the top surface to be continuous rather than the vertical pieces be visible by having them attach to the outside of the horizontal pieces. That would work well strength wise but not aesthetically. Otherwise, having the end pieces attached on the underside where the dowels would be inserted vertically which would add no strength.  I would think a row of them inserted into the miter as shown would add sufficient strength unless I was shown otherwise.

I meant still use a miter joint, but use the dowels perpendicular to the face of the box, rather than perpendicular to the face of the cut.
 
squall_line said:
HowardH said:
I could certainly construct the boxes using a butt joint but I would want the top surface to be continuous rather than the vertical pieces be visible by having them attach to the outside of the horizontal pieces. That would work well strength wise but not aesthetically. Otherwise, having the end pieces attached on the underside where the dowels would be inserted vertically which would add no strength.  I would think a row of them inserted into the miter as shown would add sufficient strength unless I was shown otherwise.

I meant still use a miter joint, but use the dowels perpendicular to the face of the box, rather than perpendicular to the face of the cut.

Gotcha! 
 
The side that goes against the wall does not need to be finish grade, if I understand your project.

If you cut miters on the front of the bottom and top pieces, then dowel and clamp the vertical pieces in but set them back 3/4"+ from the front and back you could fit and glue the front on after the box is stable. Then you only need to clam in 1 direction.

You would not be able to dowel the front on unless the dowels ran in the same direction as the top, but you should not need dowels, and they would make clamping more difficult.

This would leave a recess for your french cleat.
 
Oldwood said:
The side that goes against the wall does not need to be finish grade, if I understand your project.

If you cut miters on the front of the bottom and top pieces, then dowel and clamp the vertical pieces in but set them back 3/4"+ from the front and back you could fit and glue the front on after the box is stable. Then you only need to clam in 1 direction.

You would not be able to dowel the front on unless the dowels ran in the same direction as the top, but you should not need dowels, and they would make clamping more difficult.

This would leave a recess for your french cleat.

[attachimg=1]

This is what I'm thinking about but I'll probably build a drawer in it as well.  I'm trying not to over think it!  [big grin]


Attachments

  • DIY-floating-nightstand.jpg
    DIY-floating-nightstand.jpg
    56.9 KB · Views: 350
That is not what I had imagined, ;) So clearly my plan will not work! [eek]

I think I would build it as it looks in your picture, then veneer the sides to cover the butt joint. You could use ply and this would cover the ends.  You could band the front edges with light pieces mitred to give you the look you want.

I think this would be stronger than the mitres and would take about the same time or maybe less, depending on how your veneering goes.

 
Oldwood said:
That is not what I had imagined, ;) So clearly my plan will not work! [eek]

I think I would build it as it looks in your picture, then veneer the sides to cover the butt joint. You could use ply and this would cover the ends.  You could band the front edges with light pieces mitred to give you the look you want.

I think this would be stronger than the mitres and would take about the same time or maybe less, depending on how your veneering goes.

This would give a good excuse to buy a veneering vacuum bag.  I have a Festool vac pump already. 
 
I would just clamp it with a 3/4 piece of melamine or MDF as a caul. I either wax the caul or put wax paper between the the caul and the veneer, so any squeeze out does not stick.

It takes a very fine spread of glue, and it is worth doing a test to find the right amount.

Then you can buy a veneer bag for the next project ;)
 
If you put a solid back set in a dado you would not need the dowels and it would be plenty strong. Plus it would help keep it square when clamping.  The weak point would be the wall connection.
 
I think that this is what you are after ... I built these two bedside tables recently for a spare bedroom over a 3-day weekend ...

10.jpg


The two sides ...

12.jpg


11.jpg


The cases are mitred and reinforced with biscuits ...

7.jpg


1.jpg


Two Bessey web clamps were used to clamp the parts ...

81oBTSZbVgL._AC_SL1500_.jpg


The mitred edges were finished by burnishing. To do this, run a hard, flat steel along each side of the join (I used a scraper burnisher). This closes any gaps.
=9s&ab_channel=CleanCutWoodworking

The cases are Merbau, which was stained to match the Jarrah drawer fronts. The legs were turned from Hard Maple and also stained Jarrah.

Regards from Perth

Derek
 
Oldwood said:
I think I would build it as it looks in your picture, then veneer the sides to cover the butt joint.

I've done this before, and probably won't do it again in the future.  Depending on the veneer and edge of the plywood, the joint can show through.
 
I've made several projects with mitered joints like this.  I use no fasteners at all typically. 

I lay all the pieces flat with the cut miters facing down.  I apply clear packing tape to join the four panels into one linked unit.

I then turn it over and apply glue to the surfaces and fold up into the rectangle.  I use tape the close the final assembly. 

After the glue cures, I remove the tape.  I use a round shaft on a screwdriver to burnish the corners tight if there is a tiny gap. 

The plywood assembly is quite strong.  Half of the glued surface area will be face grain to face grain and the other half will be end grain to end grain.  That means that with 3/4" thick plywood, just over a half inch of the surface will be face grain to face grain.  The joint in plywood is probably stronger than the joint in solid wood construction.  Small glue blocks can be added in the corners if you are worried.  I use use 3/4" solid hardwood for the glue strips.  I rip them at a 45 degree angle, and glue and pin in place.

Two of the interior corners are easy to glue up, but once the last panel is glued in place, but last panel on a small post will limit access for gluing the extra glue block. 

In any event I almost never resort to that. The joint is surprisingly strong and the finished appearance belies the ease and quickness in which the joint is made.

I've always done this on a table saw.  Since I got my track saw I have not had an occasion to build another.  But this should go very fast with the track saw.

The table saw requires a special scrificial fence to do the job safely.
 
Back
Top