Cover Plate for TS75

jbasen

Member
Joined
Jan 27, 2013
Messages
740
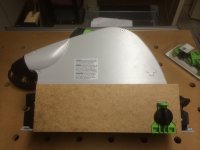
After seeing all the posts on TS saw cover plates I decided to just go ahead and make one.  This is my first attempt.  It is made out of 1/8" hardboard and held in place with two 5/16" rare earth magnets that align with two of the screws that hold the saw together.  There is a cutout to allow you to use the splinter guard while cover plate is attached.

Unfortunately, there are no measurements other than the overall dimensions are 12 1/4" by 4".  Everything else was done by holding the board up against the saw and marking where I needed.  I was going to scan the cover to give people a template.  However, it is a little too big for my inexpensive flat bed scanner so I'm going to try and find someone with a larger one.  I have attached 2 photos that may help people. 

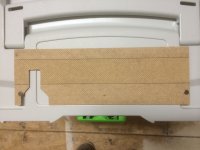
In the photo of the cover plate sitting on a Systainer I tried to highlight a few things in pencil.  I used a dado blade to trim back by 1/32" to fit the contour of the saw and provide for a more airtight fit around the "window" in the side of the saw.

All this being said I haven't tried it yet myself [eek].  The magnets need to protrude slightly to attach themselves to the screws in the TS75 so I don't want to glue them in place and then put the cover plate on the glass of somebody's scanner. 

Enjoy

Jay


Attachments

  • photo1.JPG
    photo1.JPG
    1.6 MB · Views: 1,453
  • photo.JPG
    photo.JPG
    1.6 MB · Views: 1,034
Attached is the full sized scan of the back side of the TS75 cover plate I made so anyone can use it as a template for making their own.    Note the section that is raised so it tightly covers the opening in the TS75 cover and the holes for the rare earth magnets. 

Sorry this it took a while to get the scan.  The cover plate is a little to large for my scanner and I had to go to the local copy/print shop and get them to scan it for me.  I felt like I was buying a new Festool accessory; $8 to scan it and email the scan to me [eek]

Jay
 

Attachments

I was just wondering if Festool made one these for the TS75. Now I can make my own. Thank you.
 
I'm glad this has been helpful to others.  Having used this quite a bit now, the bond between the magnets and the screws on the TS-75 to hold the hardboard cover to the saw isn't as strong as I would like.  I have found that when you start the saw up the hardboard cover may be pushed away from the saw a little from the sudden movement of air as the blade spins up.  It doesn't happen once the saw is up and running, only when you first press down on the trigger.  It is easy to take your hand and push it back before you start your cut but obviously this isn't ideal. 

I have ideas for an enhanced version sometime down the road when I get the time. 
 
Don T said:
I was just wondering if Festool made one these for the TS75. Now I can make my own. Thank you.

Nope.

Seth
 
jbasen said:
I'm glad this has been helpful to others.  Having used this quite a bit now, the bond between the magnets and the screws on the TS-75 to hold the hardboard cover to the saw isn't as strong as I would like.  I have found that when you start the saw up the hardboard cover may be pushed away from the saw a little from the sudden movement of air as the blade spins up.  It doesn't happen once the saw is up and running, only when you first press down on the trigger.  It is easy to take your hand and push it back before you start your cut but obviously this isn't ideal. 

I have ideas for an enhanced version sometime down the road when I get the time.
Maybe you could use Velcro. I think that is what I going to use. 
 
Don T said:
jbasen said:
I'm glad this has been helpful to others.  Having used this quite a bit now, the bond between the magnets and the screws on the TS-75 to hold the hardboard cover to the saw isn't as strong as I would like.  I have found that when you start the saw up the hardboard cover may be pushed away from the saw a little from the sudden movement of air as the blade spins up.  It doesn't happen once the saw is up and running, only when you first press down on the trigger.  It is easy to take your hand and push it back before you start your cut but obviously this isn't ideal. 

I have ideas for an enhanced version sometime down the road when I get the time.
Maybe you could use Velcro. I think that is what I going to use.

Thanks, that is a good idea.  One of my other design goals for a next gen cover plate is to make it thin enough that I don't have to take it off when I put my saw back in it's Systainer.  My current prover plate, made out of hardboard, is too thick.  I'm thinking the next one will be made out of a piece of thin aluminum sheet. Velcro would be a great and easy way to hold it in place but it may add too much thickness and force me to remove it after each use.  For better, or worse, the foam insert in a TS-75 Systainer is a pretty tight fit. 

Thanks again.
 
I think thin aluminum is a great idea. I wonder if the rare earth magnets would be enough to hold the cover on if it was that thin and lightweight?

Neat idea! I think I might have some light aluminum that I could try this with. I'll have to look the next time I go to the shop.
 
wow said:
I think thin aluminum is a great idea. I wonder if the rare earth magnets would be enough to hold the cover on if it was that thin and lightweight?

Neat idea! I think I might have some light aluminum that I could try this with. I'll have to look the next time I go to the shop.

I think the rare earth magnets will be too thick.  The ones I have now are about 1/8" thick; the same thickness as the hardboard I'm using.  I think for the magnets to have a good purchase in the aluminum sheet you wouldn't able to go much thinner than 1/8" thick and that is too thick to fit in the case while still mounted on the saw. 

My thought is to rivet another small piece of aluminum sheet that is about the size of the opening in the saw cover to the cover plate with a spacer in between that is the thickness of the saw cover.  This smaller piece of aluminum would only be attached at it's top edge to the cover plate.  In a nutshell this piece would be positioned so it would go through the hole in the cover and then you would slide the cover down so that the lip would catch on the inside of the saw cover and hold the cover plate onto the saw cover.  I hope this explanation makes sense.

Using aluminum sheet I'm hoping this will create a cover plate that is thin, easy to take on and off if you need to change blades, but also thin enough that it won't need to be removed when you store the saw in it's systainer.

Now if only I could figure out a way to keep the splinter guards, using half-inch-shy's modification for the TS-75, on the saw every time I want to put it back into the systainer  [smile]
 
jbasen said:
Now if only I could figure out a way to keep the splinter guards, using half-inch-shy's modification for the TS-75, on the saw every time I want to put it back into the systainer  [smile]

Good luck with that!

[big grin]

I haven't done the mod for that very reason. (Well, that and I have too much on my plate right now.)
 
I use a piece of National Guard Products brush door sweep with 1" brush.  The same size fits both my 55 & 75.  I use a spring clamp to attach to the saws.  A standard clamp works fine for the 75 but I ground out a notch inside the clamp for the 55 as it barely clipped on going over the front miter gauge.  NO DUST
 
rst said:
I use a piece of National Guard Products brush door sweep with 1" brush.  The same size fits both my 55 & 75.  I use a spring clamp to attach to the saws.  A standard clamp works fine for the 75 but I ground out a notch inside the clamp for the 55 as it barely clipped on going over the front miter gauge.  NO DUST

That is interesting.  If I understand you correctly, and please correct me if I'm wrong, you are just clamping the door sweep so the brush covers the gap at the bottom of the saw between the saw and the wood.  Are you doing anything to cover the window in the side of the blade cover?

Thanks
 
The piece I use covers the entire opening, splinter guard and all.
 
Back
Top