iamnothim
Member
- Joined
- Feb 5, 2014
- Messages
- 1,436
I started this thread to document a craftsman lamp build. I made a couple posts at the end of the Roubo thread since this is my first project on the bench.
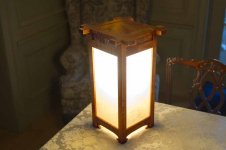
The plan is from Paul Seller's "Woodworking Master Class" site.
The project looked simple enough. Simple being the key word…Not. As I stated on the Roubo thread I wanted to build it using only hand tools. Right.
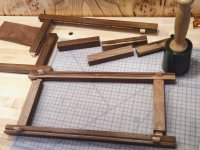
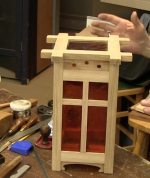
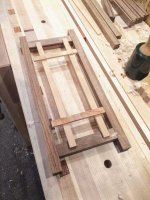
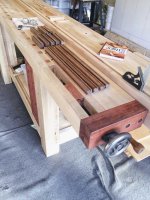
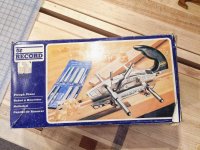
I started by making the grooves with a Record plough plane I bought on eBay for about $60. The plane is from the early 70’s, had never been used, and works great. With the grooves/rabbets completed I moved on to make the 16 mortise and tenons for the main structure and the 48 lap joints for the mullions. Is a square groove a rabbet or does a rabbet only have an open end?
Two days later I scrapped the mullions and used dominos for the structure. The lamp is for my son and I didn’t want him to get it posthumously.
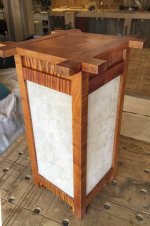
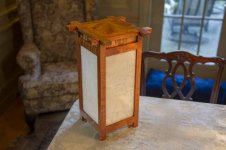
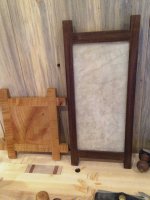
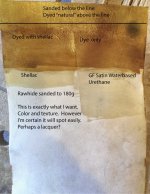
I didn’t like the look of colored glass so investigated mica and paper. Then I came across some lamp shades made from skins. I discovered that 1oz. rawhide (I have no idea why rawhide is measured in ounces) can be translucent. I bought some from a farrier on Etsy. It was pricy but I wanted it. As in $20 a panel pricy. Ridiculous.
I should have known that it would be exactly like a doggie chewy toy.... exceptionally hard….. because, well, rawhide is what doggie chewy toys are made from. Tough, like a potato chip, and ugly. It looked like those plastic strips on the entrance to giant freezers that the forklifts drive through. I experimented with GF dye. It took the dye but still looked 1970’s Spanish ugly. I put the panels in water with a little fabric softener then pressed them while drying. (They are opaque and floppy like lasagna after soaking for a day.)
As soon as they are out of the press they potato chip again. I tried sanding and … guess what…They were the exact look I wanted and were more pliable. I measured and cut one panel. I knew I had to wait a couple days for them to dry before cutting because I cut a dyed panel and it shrank. Hello farrier… The panels never really dry in the press. I suppose if you wait a few weeks.
Soooo yesterday I did some additional sanding on a panel, crossed my fingers and cut the piece. I fit nicely. Then I cut very small sticks to wedge behind the panel to hold the panel in place…. The panel is now taunt.")
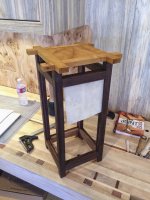
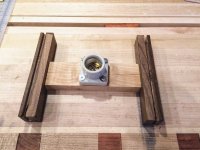
I picked up a porcelain fixture that is rated for 600w and fixed it to a cross member. Thankfully I tested the mounting and discovered that a light bulb would not fit through the gap. Gotta rethink this one because I want the bulb centered.
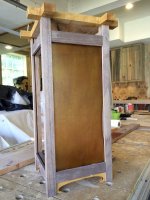
It's nearing the finish line.
Thanks for reading,
Luke
[attachimg=1]
[attachimg=2]
[attachimg=3]
[attachimg=4]
[attachimg=5]
[attachimg=6]
[attachimg=7]
[attachimg=8]
[attachimg=9]
The plan is from Paul Seller's "Woodworking Master Class" site.
The project looked simple enough. Simple being the key word…Not. As I stated on the Roubo thread I wanted to build it using only hand tools. Right.
I started by making the grooves with a Record plough plane I bought on eBay for about $60. The plane is from the early 70’s, had never been used, and works great. With the grooves/rabbets completed I moved on to make the 16 mortise and tenons for the main structure and the 48 lap joints for the mullions. Is a square groove a rabbet or does a rabbet only have an open end?
Two days later I scrapped the mullions and used dominos for the structure. The lamp is for my son and I didn’t want him to get it posthumously.
I didn’t like the look of colored glass so investigated mica and paper. Then I came across some lamp shades made from skins. I discovered that 1oz. rawhide (I have no idea why rawhide is measured in ounces) can be translucent. I bought some from a farrier on Etsy. It was pricy but I wanted it. As in $20 a panel pricy. Ridiculous.
I should have known that it would be exactly like a doggie chewy toy.... exceptionally hard….. because, well, rawhide is what doggie chewy toys are made from. Tough, like a potato chip, and ugly. It looked like those plastic strips on the entrance to giant freezers that the forklifts drive through. I experimented with GF dye. It took the dye but still looked 1970’s Spanish ugly. I put the panels in water with a little fabric softener then pressed them while drying. (They are opaque and floppy like lasagna after soaking for a day.)
As soon as they are out of the press they potato chip again. I tried sanding and … guess what…They were the exact look I wanted and were more pliable. I measured and cut one panel. I knew I had to wait a couple days for them to dry before cutting because I cut a dyed panel and it shrank. Hello farrier… The panels never really dry in the press. I suppose if you wait a few weeks.
Soooo yesterday I did some additional sanding on a panel, crossed my fingers and cut the piece. I fit nicely. Then I cut very small sticks to wedge behind the panel to hold the panel in place…. The panel is now taunt.
I picked up a porcelain fixture that is rated for 600w and fixed it to a cross member. Thankfully I tested the mounting and discovered that a light bulb would not fit through the gap. Gotta rethink this one because I want the bulb centered.
It's nearing the finish line.
Thanks for reading,
Luke
[attachimg=1]
[attachimg=2]
[attachimg=3]
[attachimg=4]
[attachimg=5]
[attachimg=6]
[attachimg=7]
[attachimg=8]
[attachimg=9]
Attachments
-
 Cr_Lamp.png1.4 MB · Views: 2,047
 -
 panel-1.jpg105.5 KB · Views: 2,023
 -
 lampA-8.jpg139.4 KB · Views: 1,958
 -
 lampA-2-2.jpg137 KB · Views: 2,011
 -
 lampA-6.jpg126.9 KB · Views: 1,978
 -
 lampA-7.jpg184.4 KB · Views: 1,961
 -
 lampA-2.jpg143.4 KB · Views: 1,954
 -
 lampA-1.jpg200.6 KB · Views: 1,972
 -
 lampA-3-2.jpg179.5 KB · Views: 2,023