Custom Bed Frame

Tayler_mann

Member
Joined
Nov 23, 2014
Messages
416
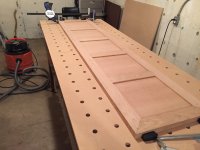
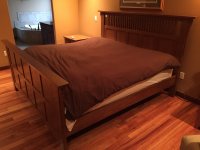
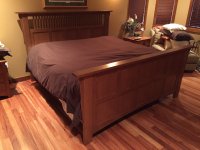
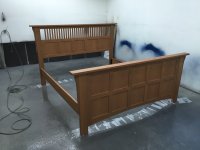
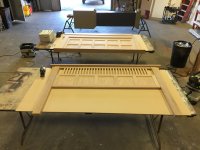
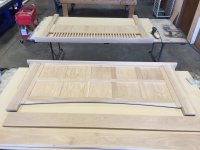
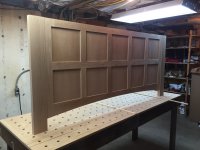
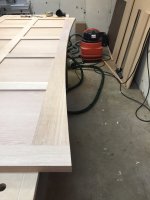
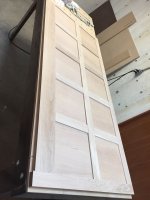
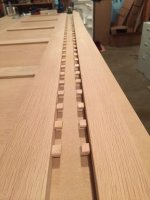
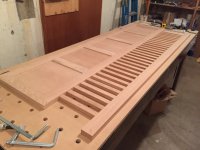
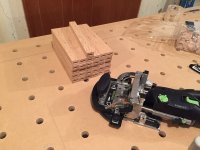
So this summer I had an inquiry to build a custom bed frame for a split king size temperpedic with adjustable bases. It ended up being one of those projects that got put to the wayside a few....10 times or so. It really ended up taking all summer, but at the end of it I was very happy with the build. It was my first veneer project and I felt it went well. I really ended up enjoying the veneer process and plan to get more technical with it in the future. I also kept note of how many dominos are in the frame and I counted over 140 give or take a few. I ended up finishing the frame at my sign shop and sprayed it with magnalac high build and have to say not my favorite finish. It turned out to have a lot of a plastic look. Also, they provided the stain claiming it was a perfect match to their other furniture in the room and after many long conversations of how it is not quite right I caved and used it anyways. The stain was more of a dye and sat on top of the wood and had no penetration. Overall finishing went really well, however, I just didn't quite like the end results. The client was ecstatic though and thats what counts. Oh yeah, and it didn't match their furniture....at all  [big grin]. Here are the picture of the build in stages.


Attachments

  • IMG_0566.jpg
    IMG_0566.jpg
    1.2 MB · Views: 438
  • IMG_0936.jpg
    IMG_0936.jpg
    1.2 MB · Views: 501
  • IMG_0933.jpg
    IMG_0933.jpg
    1.2 MB · Views: 575
  • IMG_0930.jpg
    IMG_0930.jpg
    1.3 MB · Views: 631
  • IMG_0924.jpg
    IMG_0924.jpg
    1.5 MB · Views: 335
  • IMG_0920.jpg
    IMG_0920.jpg
    1.3 MB · Views: 326
  • IMG_0877.jpg
    IMG_0877.jpg
    1.4 MB · Views: 380
  • IMG_0852.jpg
    IMG_0852.jpg
    1.4 MB · Views: 308
  • IMG_0851.jpg
    IMG_0851.jpg
    1.5 MB · Views: 323
  • IMG_0590.jpg
    IMG_0590.jpg
    1.1 MB · Views: 413
  • IMG_0578.jpg
    IMG_0578.jpg
    1.2 MB · Views: 383
  • IMG_0577.jpg
    IMG_0577.jpg
    1.4 MB · Views: 421
  • IMG_0574.jpg
    IMG_0574.jpg
    1.2 MB · Views: 385
Beautiful Build. The finish looks great! Now I really, really, really  know what that trim stop is for..
 
bdiemer said:
Beautiful Build. The finish looks great! Now I really, really, really  know what that trim stop is for..

It's not that the finish didn't look great or go well. The stain picked out just hid all of the natural characteristics of the wood. You probably can't even see the quarter sawn slats and set in panels. It hid all of the flaking and formation in the wood. I should have put in a hint of natural stain booster to maybe try and bring the wood to life. I just did what the client said and didn't want it to turn out different than what they expected.

The trim stop came in handy big time for this build. Also, the view finder on the domino was a god send for this project. I did find out that the domino should have an optional LED light for making 0 degree plunges it is quite hard to see your view finder when the domino machine is perpendicular to the surface of your piece.

On another note this was project was started in imperial (big mistake) and ended in metric. It really wasn't conversion project to the metric systems and I will never look back.
 
Nice work.

BTW, I met a guy once who had a deal with a local mattress distributor.  My friend made samples for each retail store and supplied them with a catalog.  Not sure what percentage the store took, but the guy said he was getting more work than he could handle and was looking to hire help.

 
Jesse Cloud said:
Nice work.

BTW, I met a guy once who had a deal with a local mattress distributor.  My friend made samples for each retail store and supplied them with a catalog.  Not sure what percentage the store took, but the guy said he was getting more work than he could handle and was looking to hire help.

I'm actually taking some of the pictures of the bed frame to furniture stores and my brother-in-law owns a Mattess Firm franchise and am going to try and get him to sell some as well. My main goal is to come out with a furniture line this year and sell the set to the regions furniture store. Building furniture is definitely my passion for woodworking.
 
Ah, finishing QSWH!

My best success has been using dye and GF hand-applied finishes.

Dye first for your base color, then GF Seal-A-Cell, then GF Gel stain in the color that will go into the pores and crevaces but leave the rayflakes alone, then topcoat with GF Arm-R-Seal Satin.

The rich red-brown finish Stickley calls Onandaga is emulated this way with the dye being red-brown, and the gel color Georgian Cherry, shown here.
 

Attachments

  • IMG_1745.JPG
    IMG_1745.JPG
    84 KB · Views: 231
My tiny critique:  lose the miters in the head frame.  They are an anomaly in this Craftsman composition.

 
Lbob131 said:
Very nice.
What parts are veneered?

All 15 of the set in panels on the head and foot board. I used quarter sawn white oak veneer for them. I did veneer because the bed frame was already a few 100 lbs and the veneered panels would be much more stable. I plan on getting into veneering a lot more in the future as well I had fun doing it and can't wait to try some more. Whenever I am going to have about 10mm of scrap on a rip I'll take my track saw now and rip off a 1-2mm thick strip until I get my desired cut. I plan on using it for different edge bands and segmented veneering when I actually get a chance to work on something for myself.
 
Gene Davis said:
My tiny critique:  lose the miters in the head frame.  They are an anomaly in this Craftsman composition.

Ahhhh haaaa someone noticed  [big grin]. I know for the style their was no place for them but I think they look so much better and my client thought it looked cool on his mirror he had in his room. It was more challenging than the rail and stile so I took it on with a smile. I actually really liked the look of it when it was all done. Another note, those had to be the longest miters I had ever had to make a square with before and I amazed the s**t out of myself that they were not even a mm off corner to corner at glue up.
 
Do you use  an mdf  substrate  for the veneer  panel?
And vaccum  pressed on?
 
Really nice work on the bed frame.

Tayler_mann said:
My main goal is to come out with a furniture line this year and sell the set to the regions furniture store.

Good luck. I hope it works out for you. Have you checked out any of the furniture makers on Instagram. The community there shares a lot and I always learn something.
Tim
 
Lbob131 said:
Do you use  an mdf  substrate  for the veneer  panel?
And vaccum  pressed on?

I used 3/8 MDF and made my own presses out of c clamp threads and 3/4" MDF. I now have a vacuum press and bag available after that slow going fiasco. It worked really well it was just a pain to do 17 panels individually. I now have a press with a 4' x 8' bag.

jacko9 said:
Nice job, how did you attach the head food frames to the bed stretchers?

I ordered a set of keyhole clips from rockler. I thought of making my own French cleat system out of oak but figured this bed was already running low on profit margins and I would be the only one to appreciate them as the owner would have no idea the amount of craftsmanship in them.
 
Nice bed, my wife wants me to make us one at some point, really would be nice to have a king size bed so I'll have more room to sleep all awkward like haha.
 
Back
Top