GoingMyWay
Member
I’m posting the final chapter of my cutting board project saga. We last left off with me trying to make a router sled plane to flatten my glue-up:http://festoolownersgroup.com/festool-how-to/uneven-router-sled-planing-53818/.
I gave up on trying to make a router plane sled. Instead, I sanded with the RO150 (40 grit granat made very quick work of the bulk unevenness removal) and used a small block plane to get the glue-up as flat as I thought I could. I later learned that you need a really long plane like a #7 jointer if you want to get something flat since a short plane will for the most part just follow the unevenness of the surface. I went ahead and cut the strips for the end grain cutting board after I felt like I had done the best I could – if I had kept trying to get it flatter it would end up being so thin there’d be nothing left.
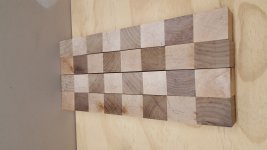
After cutting the strips, I flipped every other piece end over end and discovered that I had a major problem. Each piece was slightly curved, which created a decent gap. View attachment 1 There was no way I’d be able to glue these pieces together, even with a ton of clamping pressure. I went out and bought a Ridgid belt sander and mounted it horizontally in an attempt to flatten the strips, but that didn’t really work at all. I had given up on this whole cutting board project for a while. I was just about to hang my hat up in defeat when I realized that I could use a hand bench plane to flatten out some of the unevenness.
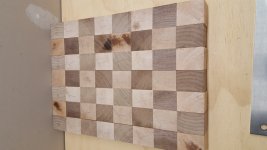
I bought a 4 1/2 Woodriver plane and I also got a Veritas straight edge and a few other accessories that I can't remember specifically, but they all assisted me in getting each strip more straight and flat and ultimately being able to salvage the cutting board from what was seeming to become destined to "burn pile." View attachment 2
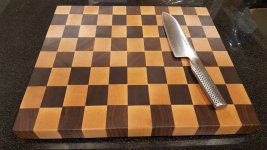
It doesn't look so bad if you ignore the fact that not all of the joints line up, it's not perfectly flat on the top or bottom, the individual squares aren't all the same size, and the fact that the overall cutting board is not square. View attachment 3
BUT hey, the cutting board sits flat with rubber feet so that it doesn't rock like our current Boos or our cheap bamboo cutting board do. I also think it looks pretty good so long as you don't examine it too closely to see the multitude of imperfections. It’s definitely “unique and one of a kind.” I’d call this making lemonade from the lemons that hand selected.
I now realize the specific mistakes that I made during each step of the process. I think most if not all of these problems were pointed out by other FOG members, but I didn’t listen. Seeing is believing as they say. I had to experience these things empirically myself in order to fully understand.
Lessons Learned:
I still have a bunch of wood leftover so I think I will attempt to make another cutting board again in the future knowing the things that I now know.
That was probably waaaay too long of a rambling post. May be there will be a sequel to this story…
I gave up on trying to make a router plane sled. Instead, I sanded with the RO150 (40 grit granat made very quick work of the bulk unevenness removal) and used a small block plane to get the glue-up as flat as I thought I could. I later learned that you need a really long plane like a #7 jointer if you want to get something flat since a short plane will for the most part just follow the unevenness of the surface. I went ahead and cut the strips for the end grain cutting board after I felt like I had done the best I could – if I had kept trying to get it flatter it would end up being so thin there’d be nothing left.
After cutting the strips, I flipped every other piece end over end and discovered that I had a major problem. Each piece was slightly curved, which created a decent gap. View attachment 1 There was no way I’d be able to glue these pieces together, even with a ton of clamping pressure. I went out and bought a Ridgid belt sander and mounted it horizontally in an attempt to flatten the strips, but that didn’t really work at all. I had given up on this whole cutting board project for a while. I was just about to hang my hat up in defeat when I realized that I could use a hand bench plane to flatten out some of the unevenness.
I bought a 4 1/2 Woodriver plane and I also got a Veritas straight edge and a few other accessories that I can't remember specifically, but they all assisted me in getting each strip more straight and flat and ultimately being able to salvage the cutting board from what was seeming to become destined to "burn pile." View attachment 2
It doesn't look so bad if you ignore the fact that not all of the joints line up, it's not perfectly flat on the top or bottom, the individual squares aren't all the same size, and the fact that the overall cutting board is not square. View attachment 3
BUT hey, the cutting board sits flat with rubber feet so that it doesn't rock like our current Boos or our cheap bamboo cutting board do. I also think it looks pretty good so long as you don't examine it too closely to see the multitude of imperfections. It’s definitely “unique and one of a kind.” I’d call this making lemonade from the lemons that hand selected.
I now realize the specific mistakes that I made during each step of the process. I think most if not all of these problems were pointed out by other FOG members, but I didn’t listen. Seeing is believing as they say. I had to experience these things empirically myself in order to fully understand.
Lessons Learned:
- This really should have been made with a table saw – I don’t have the space and insisted on being able to do it with a track saw.
- The TS75 would have been better suited for trying to cut 8/4 stock as the dimensions are just at the maximum capacity and power for the TS55.
- I should have been using the panther blade from the beginning – that definitely helped with the blade deflection that initially caused the unevenness in the cut edges and thus didn’t really leave a glue-up ready edge. My solution for that was just clamp harder! That leads to the next problem.
- I applied so much clamping pressure to close up the gaps in the glue joints is what caused the overall glue-up to curve and bow, which led me down the path of trying to build a router sled plane to flatten it out. It might have also been a good idea to do the glue-up in a couple smaller sections and also to have used cauls to help keep it flat.
- Not all of the initial strips of maple and walnut were exactly the same width. I tried in some cases making several passes in an attempt to clean up the uneven saw kerf marks, which resulted in slightly narrower strips. Now the joints don’t like up perfectly.
I still have a bunch of wood leftover so I think I will attempt to make another cutting board again in the future knowing the things that I now know.
That was probably waaaay too long of a rambling post. May be there will be a sequel to this story…
 of how much you learned from the project. That’s invaluable first hand information.
") Looks a bit like one I made awhile back. This picture shows the underside, where I routed out some finger holds.
Looks a bit like one I made awhile back. This picture shows the underside, where I routed out some finger holds.