Dedicated router table vs built into bench

3PedalMINI

Member
Joined
Nov 30, 2012
Messages
492
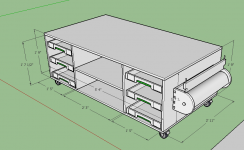
Let me start out by saying I’m in a desperate need of consolidating my work shop. One of the things I’m trying todo is consolidate some things into a work bench. I’m going to build a Paulk workbench type table but make it movable within the garage. I’ll make some systainer storage and a place for my CT and a place to put my planner and scroll saw underneath. Overall this table needs to be my workbench, assembly etc etc 

One of the areas where I can save a lot of space is to move my router table into the work bench. I have a Jessem Lift and table right now but I would just shift the lift into the workbench. I’m worried that it’s not going to be as accurate as my jessem table. I would get good quality ply for the top obviously and use the jessem fence on the bench when needed.

Thoughts on this? I don’t use my router a lot but do use it a lot for cabinetry (beaded face frames etc) I see a lot of plans out there that just use plywood for the top so maybe I’m overthinking this?

 
If you are concerned about the top surface, take a look at HPL, super rigid and flat. I just purchased some for an upcoming „MFTB-Sys“ (the benchworks/ timtool Version)with integrated router...
 
Top just needs to be reasonably slick and flat.  That's about it.  I take my lift and drop it in to the Paulk workbench once in a while.  I have a couple of coats of I believe shellac on fairly meh-quality plywood.  The surface isn't glass smooth but it's slick enough to work just fine as a router table surface.  And since the Paulk WB is essentially a torsion box, the top is flat enough. 

If I really wanted a slicker surface, I'd just rout out a shallow section and inlay some laminate.
 
I built a Paulk top with a rockler router insert and systainer storage for my son.  Router is at one end and the other is a table saw outfeed.  We inset T-track for fence adjustment and included a miter gauge slot.  Wired an interior receptacle into a switch set into the side of the bench for easy router power control.  It works really well. 

Positives - smaller footprint, larger work surface is handy on some routing tasks, dust is somewhat contained in the Paulk 'cavity' below the top as we did put a divider to deal with that.

Downsides - You CAN lose bench space when you are doing assembly / routing for things like cabinet doors or drawers.  You just need to plan better so that if you drop the router below the top and remove the fence you are ready for assembly.  I have a separate bench, MFT table and CMS table which I like because I frequently will be cutting / routing and assembling or tweaking fit and finish so being able to move between the router and bench / assembly is an advantage.

The base we built is 35 x 67 with four Systainer storage bays under it and a center cavity for larger items.  The Paulk style top is 36 x 76.  Make sure you get double locking casters for stability.  The bench we built is pretty heavy but would move if we didn't use the casters that lock from rolling and rotating.

I don't have a photo or drawing of the bench but attached is the base -

[attachimg=1]
 

Attachments

  • Screen Shot 2018-02-09 at 5.55.32 PM.png
    Screen Shot 2018-02-09 at 5.55.32 PM.png
    63 KB · Views: 977
Thanks guys! I like the idea of doing the top out of HPL. Not sure how a router will do cutting out the 20mm holes but I suppose that’s what harbor freight is for :D

[member=167]neilc[/member]

That’s EXACTLY what I was going to build. It’s like you read my mind or something lol! I love the Kraft paper roller, that’s a must for me! Did you guys use the LR32 system for the systainer storage or did you just evenly space the drawers and drill the pins where needed?
 

Attachments

  • IMG_1152.jpg
    IMG_1152.jpg
    1 MB · Views: 1,368
Back
Top