Demo on how I use the Domino for casework joinery

stvrowe

Member
Joined
Jan 27, 2007
Messages
834
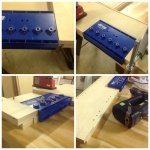
This demonstration video provides some useful tips for using the Festool Domino for casework construction.   A workpiece positioning jig is demonstrated along with using a single mark to place your Dominos slots where you want them without worrying about reference surfaces.  Using this technique, it is virtually impossible to forget which surface is your reference.  Enjoy!

Demo using Domino for Casework

Edit:  Correct broken link
 
[size=10pt]

Steve, how simple was that!

Some other videos have made domino  casework look complicated, your method, as presented on the video appears to be simple and straightforward.

I assume this is a contest entry?   [unsure]
 
Excellent stuff.

Are you Nicholas Cage in Con Air? If not, he definitely copied your accent for the role.

This comes from a clueless Brit, so no offence intended.

In fact we had a Nicholas Cage infestation to deal with near Bath.
 
Untidy Shop said:
[size=10pt]

Steve, how simple was that!

Some other videos have made domino  casework look complicated, your method, as presented on the video appears to be simple and straightforward.

I assume this is a contest entry?   [unsure]


Simple is always best.  I got tired of putting workpieces together to mark locations, moving fences, fiddling with support bases, and sometimes miscutting joints by using the wrong surface as a reference.  With this method, I don't have to deal with any of that and overall it is faster for me.
 
Wuffles said:
Excellent stuff.

Are you Nicholas Cage in Con Air? If not, he definitely copied your accent for the role.

This comes from a clueless Brit, so no offence intended.

In fact we had a Nicholas Cage infestation to deal with near Bath.

I hadn't heard that one before and now that you mention it, Nicholas must have copied my accent.  My accent is definitely not Arkansas and I am hard pressed to describe it.  It is mostly a mix of what I have picked up living in 13 different states over the course of my life (South, Midwest, Northeast, and Mountain West).

Hmmm  -  I wonder if I can get a royalty from Nicholas? ;D
 
Nice video, Steve. I just want to note that if you use this technique, always reference from the same surface: the fence or the base of the Domino. In this case, he's referencing from the base. If you use the base on one piece and the fence on another, you will likely have alignment issues.
 
Great job Steve, thanks especially for the idea for the alignment jig.  I generally like the idea of using the bottom as the reference surface of the Domino or a biscuit joiner.  FWIW, I only cut one pair of holes at the narrow setting on both, just to prevent a problem if the width of one panel is somehow a hair different from the other...which mine are from time to time.

--John
 
Great tip Steve! Love how you took an old technique and applied it to domino joinery. Simple jigs are the best. Thanks for sharing.
 
I am curious - you mentioned that you used to use biscuits.  Do you really find the Domino quicker to do a joint like that compared to a biscuit joiner?

 
Great Video Steve.

This is why I love this site.

The way everyone shares their idea.

That simple jig will save me a ton of time and frustration
 
John H said:
I am curious - you mentioned that you used to use biscuits.  Do you really find the Domino quicker to do a joint like that compared to a biscuit joiner?


John,
The time to make Domino mortises versus the biscuit joiner using this method is the same and the technique works equally well for both machines.  I have kept my biscuit joiner and it has mostly been relegated to  RTA type fasteners.  Since I purchased the Domino (at the USA introduction), I have glued exactly 3 #20 biscuits and that was for a joint load capacity test comparing dowels, biscuits and Dominos.
 
I can't speak from experience because I've never used a biscuit joiner.  I believe the time savings between the two techniques would occur during the assembly and glue up.  With using tight settings on the domino as shown in the video, there is no need to align the sides unlike the biscuit joint.
 
Shane Holland said:
Nice video, Steve. I just want to note that if you use this technique, always reference from the same surface: the fence or the base of the Domino. In this case, he's referencing from the base.
Is he ? It looks to me like he cut the inner two dominos on the two pieces using the alignment marks on the fence for one piece and the base for the other piece ?
 
Edit.[size=10pt]
Sun is shining today, so out of the shop setting out and digging post holes for a deck extension. Will return to this shelf unit in near future and report how I found Steve's jig for actual Domino use.
----------------
[size=14pt]
Whilst making a small HoopPine shelving unit this afternoon, I had occaision to  review Steve's video.

After sawing the components with TR55 REQ, rails and Parrallel Guides, I made my version of Steve's jig in preparation for Domino work in the morning.

This evening I returned to the shop to drill the shelf pinholes using a Kreg Jig for the first time.

How to reference the Kreg Jig at the start, to ensure an equal reference for the pinholes on both side pieces? Are yes, Steve's jig! The glue had sufficiently dried during dinner, so why not.

[attachimg=1]
[size=10pt]
[member=761]Steve Rowe[/member]


Attachments

  • image.jpg
    image.jpg
    765.7 KB · Views: 4,884
NuggyBuggy said:
Shane Holland said:
Nice video, Steve. I just want to note that if you use this technique, always reference from the same surface: the fence or the base of the Domino. In this case, he's referencing from the base.
Is he ? It looks to me like he cut the inner two dominos on the two pieces using the alignment marks on the fence for one piece and the base for the other piece ?

The reference face is the base (10 mm to the bit centerline), the alignment is pins on the outers, marks and centerline on the inners.

Tom
 
Back
Top