You are using an out of date browser. It may not display this or other websites correctly.
You should upgrade or use an alternative browser.
You should upgrade or use an alternative browser.
Demo on how I use the Domino for casework joinery
- Thread starter stvrowe
- Start date
stvrowe
Member
- Joined
- Jan 27, 2007
- Messages
- 811
Awesome! I would not have thought of using the jig in that manner. But, I don't have a Kreg jig either.
Steve
Steve
Untidy Shop said:[size=14pt]
Whilst making a small HoopPine shelving unit this afternoon, I had occaision to review Steve's video.
After sawing the components with TR55 REQ, rails and Parrallel Guides, I made my version of Steve's jig in preparation for Domino work in the morning.
This evening I returned to the shop to drill the shelf pinholes using a Kreg Jig for the first time.
How to reference the Kreg Jig at the start, to ensure an equal reference for the pinholes on both side pieces? Are yes, Steve's jig! The glue had sufficiently dried during dinner, so why not.
[attachimg=1]
[size=10pt]
[member=761]Steve Rowe[/member]
benwheeler
Member
- Joined
- Sep 29, 2014
- Messages
- 99
Could someone explain the advantage of this method over referencing off the fence? The only time so far I've felt the need to reference off the base was for mid-panel joinery, which this jig wouldn't work for anyway.
I think you may have missed the point that this method uses the jig but is not just about the jig. However it would be trivial to make a jig based on this one for mid-panel joinery, so staying with one method for all joints.benwheeler said:Could someone explain the advantage of this method over referencing off the fence? The only time so far I've felt the need to reference off the base was for mid-panel joinery, which this jig wouldn't work for anyway.
The advantage of staying with one method is to reduce the chances of errors, and the advantage of referencing from the base is that it will never change.
I think the big point with this, as with Peter's system for frames, is it is a method to reduce or, if we are lucky, eliminate errors.
But if it doesn't work for you don't use it.
benwheeler
Member
- Joined
- Sep 29, 2014
- Messages
- 99
Fair enough. I'm not trying to challenge anyone, just understand why the method is used, since it negates the advantages of the fence.Sometimewoodworker said:I think you may have missed the point that this method uses the jig but is not just about the jig. However it would be trivial to make a jig based on this one for mid-panel joinery, so staying with one method for all joints.benwheeler said:Could someone explain the advantage of this method over referencing off the fence? The only time so far I've felt the need to reference off the base was for mid-panel joinery, which this jig wouldn't work for anyway.
The advantage of staying with one method is to reduce the chances of errors, and the advantage of referencing from the base is that it will never change.
I think the big point with this, as with Peter's system for frames, is it is a method to reduce or, if we are lucky, eliminate errors.
But if it doesn't work for you don't use it.
I think that it shows that in some cases there is an easier or alternative to using the fence. The Domiplate is another alternative in some cases.benwheeler said:Fair enough. I'm not trying to challenge anyone, just understand why the method is used, since it negates the advantages of the fence.
I would like to understand what advantages the fence offers in the demonstrated case? And like you I am not trying to challenge just trying to understand what you mean.
stvrowe
Member
- Joined
- Jan 27, 2007
- Messages
- 811
benwheeler said:Could someone explain the advantage of this method over referencing off the fence? The only time so far I've felt the need to reference off the base was for mid-panel joinery, which this jig wouldn't work for anyway.
I'll take a shot at answering this. First, the jig is just a jig and is only good for connections on outside edges of the box. The technique of referencing off the base however, is perfect for mid panel joinery. Use the best technique that works for you. The advantages as I see them are:
1) You make one mark and cut both sides of the joint using the same reference mark. This saves time in layout and virtually eliminates reference surface mistakes and mis-cuts.
2) There is little possibility of tilting the biscuit joiner, Domino, or doweling machine with a small bearing surface of the fence on the thickness of the sheet material. This technique eliminates the need for the stabilizer mounted to the base of your Domino, etc. It is a much more stable platform and ensures square cuts everytime.
3) And lastly, I am old and techniques that have worked for me for decades die hard. My first plate joiner was a Porter Cable 555 that I purchased over 30 years ago. To put it politely, the fence adjustment was terrible. I used this method to avoid fussing with that thing and it worked so well, I have used it ever since.
benwheeler
Member
- Joined
- Sep 29, 2014
- Messages
- 99
Thanks for these replies. The reasons Steve has listed make sense. What I found confusing was that the jig, in a sense, re-creates functionality that the machine already has, without allowing you to control the height position of the mortise (ie always centred on 10mm). I accept though, that without good technique and concentration, it's easily possible to make errors.
Cheese
Member
[member=761]Steve Rowe[/member]
Excellent method, so simple to execute. I wish I'd seen this video about 5 months ago before I ordered the Woodpecker's Offset Base System.
Thanks for the post
Excellent method, so simple to execute. I wish I'd seen this video about 5 months ago before I ordered the Woodpecker's Offset Base System.
Thanks for the post
promhandicam
Member
- Joined
- May 14, 2008
- Messages
- 205
For me one of the big advantages of the domino with the cross stops was that I don't have to put pencil lines all over my work and I can make multiple identical panels with the motices all in the same place. So for me, although I can understand how this works, it makes no sense as it's making more work than is needed.
I like to use my MFT and the crosscut bridge for mid panel. I use the back of the guide for my straight edge and the fence makes sure the the partition will be square.
I have a problem with using the base of the Domino to register mortises in the ends of panels. My problem is that often my panels aren't completely flat. It's not a problem plunging into the face of a panel just the ends. So I use the fence or my Domi plate.
I have a problem with using the base of the Domino to register mortises in the ends of panels. My problem is that often my panels aren't completely flat. It's not a problem plunging into the face of a panel just the ends. So I use the fence or my Domi plate.
Stephen B
Member
- Joined
- May 6, 2013
- Messages
- 2,469
[size=12pt]I have now used Steve's technique to construct four box structures.
Whilst constructing the first I discovered you should not cut the components
before preliminary sanding and consequently leave the pieces for making the jig slightly thicker. [eek]
This week 'senior management' requested three enclosed boxes as display stands for an art exhibition. These were made from 17mm non structural ply for two sides and at both ends and for relative lightness, the other two sides were pined with 3mm Luan plywood.
From one sheet of the 17mm ply, I cut a 2400x350mm length per box. This was then sanded up to 180 grit before the other cuts and the jig were made.
In making the butt joints I used three 5X30mm dominos per joint with one pair at normal mortise width and the other two pairs at setting 2 [+6mm]. The mortise depths were 20 and 12mm per pair. The joints were glued with Titebond 111. I did not support the joints with screws or nails.
Upon completion each box was sanded to 240 grit and left bare.
This simple project proves to me the quality and efficiency of Steve's technique.
[attachimg=1]
[size=8pt]
[member=761]Steve Rowe[/member]
Attachments
stvrowe
Member
- Joined
- Jan 27, 2007
- Messages
- 811
Nicely done, those boxes look nice.
Here is another use of the technique without the jig. This is a mid-panel joinery connecting the lower frame of a dresser to the side panel. The domino's reside on different planes so the method helps considerably with alignment.
[attachimg=1]
Here is another use of the technique without the jig. This is a mid-panel joinery connecting the lower frame of a dresser to the side panel. The domino's reside on different planes so the method helps considerably with alignment.
[attachimg=1]
Attachments
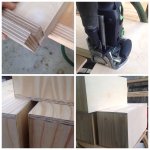
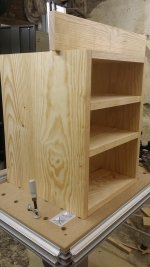
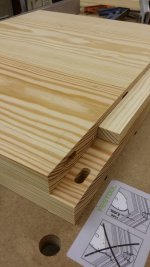
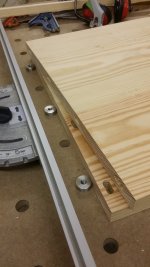
Thanks Steve, I had found your video a while back just before starting on these cabinets made from 28mm yellow pine. Im quite new to the domino so it really helped.
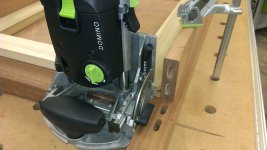
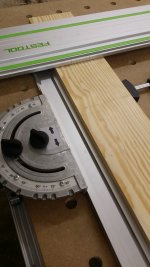
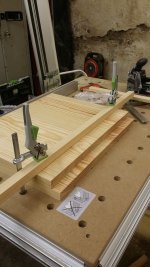
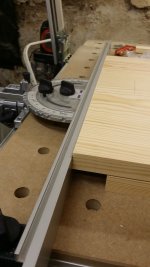
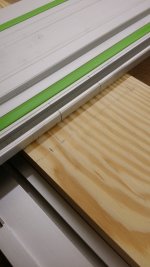
Here is a way I tried using the mft and some parf dogs. I thought it was worth a try as I had six of these to make.
[attachthumb=1]
[attachthumb=2]
[attachthumb=3]
[attachthumb=4]
[attachthumb=5]
[attachthumb=6]
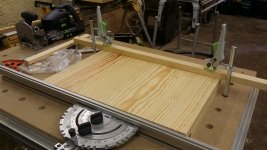
This was an attempt using the guide rail for the mid sections..not sure the best way to do this generally.
[attachthumb=7][attachthumb=8]
Thanks again!
Here is a way I tried using the mft and some parf dogs. I thought it was worth a try as I had six of these to make.
[attachthumb=1]
[attachthumb=2]
[attachthumb=3]
[attachthumb=4]
[attachthumb=5]
[attachthumb=6]
This was an attempt using the guide rail for the mid sections..not sure the best way to do this generally.
[attachthumb=7][attachthumb=8]
Thanks again!
Attachments
Similar threads
- Replies
- 5
- Views
- 3K
- Replies
- 4
- Views
- 6K
- Replies
- 1
- Views
- 4K
- Replies
- 8
- Views
- 4K
- Replies
- 60
- Views
- 21K