I had the chance to get down and dirty (or lack of dirt) with my new Festool Planex and CT36 Auto Clean. I wanted to share some of the tricks I learned very quickly while removing texture from a client's ceiling.
Nasty stuff:

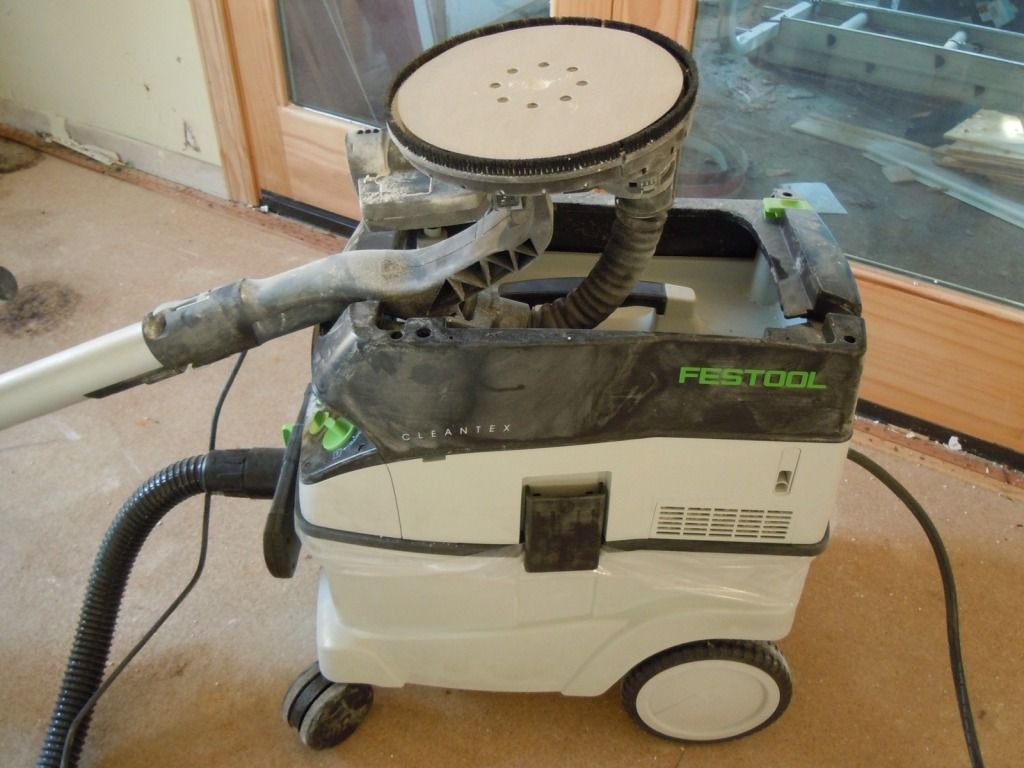
To start off let's take a look at the CT36:

When removing a large amount of material such as a textured ceiling I found turning the Auto Clean knob (on the left) all the way up seemed to work best to keep the dust disappearing into the dust collector. I also kept the suction knob (middle knob) at close to full power to help. The right knob is of course set to auto when using the Planex. You will also notice that I added the optional blast gate, after using it though I use the work optional very lightly. To use the blast gate for a full clean you do so by turning the Planex off, reaching down shutting the gate and turning the power know down to "AC". The collector will turn on give a few cleaning "knocks" and shut back off. Just remember to open the blast gate back up before starting to sand again. (Believe me I did it only once! [scared]) I found that doing a deep clean every 10-15 minutes seemed to greatly increase the amount sucked into the collector.
Next let's take a look at the Planex:

I found that putting the sander head on the ground to put the sections together worked best. The sections slide together and two metal levers clamp them together, then the electrical connection slides in and clips down.

At the handle the hose slides in and the "keeper" rotates up to hold the hose on. Take note of the green release button, I missed it the first time I opened it.

Just above the handle is the on/off switch with the speed control just above it. I found 5-6 worked best for the texture removal. On either side of the handle is the suction control. For regular drywall use this can really make a difference in the perceived weight of the tool, I did not notice much of a difference when sanding the rough surface. But setting it at max seemed to help with the debris collection.

Last but not least is the sander head. The front edge of the brushes can be removed for sanding right up to corners but more importantly is another green switch. This controls the source of suction either middle of the head or around the edges. For textured ceilings the edge setting will pick up the larger debris.
So now let's get down to business:
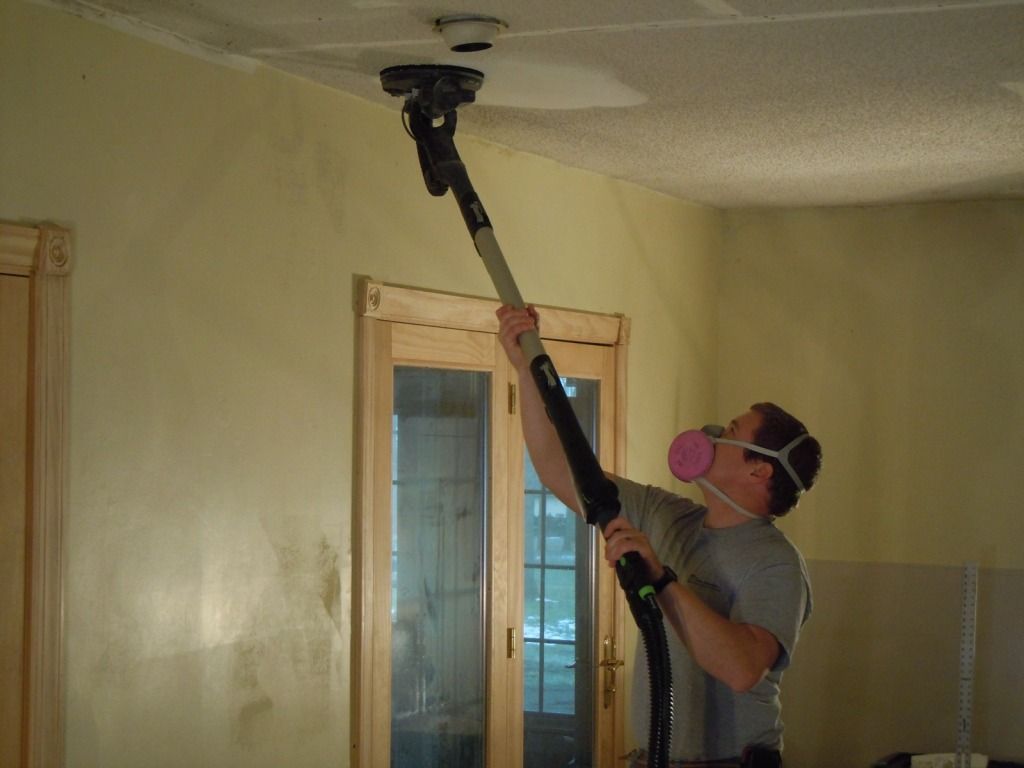
Fire the Planex up and start sanding! I found that the sander head wants to "hang" down towards you when it is held up near the ceiling. If you try to gently have it make contact the far edge of the head wants to dig in, but if you "flop" it on to the ceiling in a somewhat quick motion it has no problems.
While the sander is comfortable to use over head I don't think I would want to sand a whole ceiling holding it over my head, so I also picked up the harness:

I tried a few different variations of positioning it and you can see the way I found it to be most comfortable. Adjusting the "pocket" that the pole rests in was key, moving it as high as possible allowed freedom to move around the room. As for sanding the ceiling I found that working the sander head forward and back worked better then side to side. Side to side the front edge of the head wanted to dig in, moving the other way produced superior results. Also pulling the sander head gently away from the surface when stopping or moving to another spot seem to really let the collector suck up the dust.
One tip that I found to be a pleasant surprise:
The hose garage can be used to hold the sander upright to change abrasives! For this ceiling I used 150 grit and the texture came off very easy, in another room I had to use 80 grit. Seems like less is more though so you don't tear into the paper.
The finished product:

The ceiling came out smooth and ready for paint. (Or at least the areas that the drywall tape had not pulled earlier)
I pulled out my "drywall" systainer and got a good first coat of mud on. It already looks better!

I hope you all enjoyed this demonstration, let me know if there are any questions!
Brian
[ Edited to correct spelling of "Planex" - Shane ]
Nasty stuff:
To start off let's take a look at the CT36:
When removing a large amount of material such as a textured ceiling I found turning the Auto Clean knob (on the left) all the way up seemed to work best to keep the dust disappearing into the dust collector. I also kept the suction knob (middle knob) at close to full power to help. The right knob is of course set to auto when using the Planex. You will also notice that I added the optional blast gate, after using it though I use the work optional very lightly. To use the blast gate for a full clean you do so by turning the Planex off, reaching down shutting the gate and turning the power know down to "AC". The collector will turn on give a few cleaning "knocks" and shut back off. Just remember to open the blast gate back up before starting to sand again. (Believe me I did it only once! [scared]) I found that doing a deep clean every 10-15 minutes seemed to greatly increase the amount sucked into the collector.
Next let's take a look at the Planex:
I found that putting the sander head on the ground to put the sections together worked best. The sections slide together and two metal levers clamp them together, then the electrical connection slides in and clips down.
At the handle the hose slides in and the "keeper" rotates up to hold the hose on. Take note of the green release button, I missed it the first time I opened it.
Just above the handle is the on/off switch with the speed control just above it. I found 5-6 worked best for the texture removal. On either side of the handle is the suction control. For regular drywall use this can really make a difference in the perceived weight of the tool, I did not notice much of a difference when sanding the rough surface. But setting it at max seemed to help with the debris collection.
Last but not least is the sander head. The front edge of the brushes can be removed for sanding right up to corners but more importantly is another green switch. This controls the source of suction either middle of the head or around the edges. For textured ceilings the edge setting will pick up the larger debris.
So now let's get down to business:
Fire the Planex up and start sanding! I found that the sander head wants to "hang" down towards you when it is held up near the ceiling. If you try to gently have it make contact the far edge of the head wants to dig in, but if you "flop" it on to the ceiling in a somewhat quick motion it has no problems.
While the sander is comfortable to use over head I don't think I would want to sand a whole ceiling holding it over my head, so I also picked up the harness:
I tried a few different variations of positioning it and you can see the way I found it to be most comfortable. Adjusting the "pocket" that the pole rests in was key, moving it as high as possible allowed freedom to move around the room. As for sanding the ceiling I found that working the sander head forward and back worked better then side to side. Side to side the front edge of the head wanted to dig in, moving the other way produced superior results. Also pulling the sander head gently away from the surface when stopping or moving to another spot seem to really let the collector suck up the dust.
One tip that I found to be a pleasant surprise:
The hose garage can be used to hold the sander upright to change abrasives! For this ceiling I used 150 grit and the texture came off very easy, in another room I had to use 80 grit. Seems like less is more though so you don't tear into the paper.
The finished product:
The ceiling came out smooth and ready for paint. (Or at least the areas that the drywall tape had not pulled earlier)
I pulled out my "drywall" systainer and got a good first coat of mud on. It already looks better!
I hope you all enjoyed this demonstration, let me know if there are any questions!
Brian
[ Edited to correct spelling of "Planex" - Shane ]