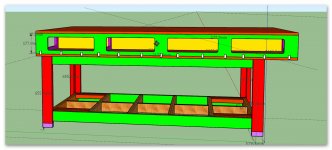
Hi all, building an outfeed table for my SawStop and the top will similar to a Paulk design. New to using dominoes. There will be a sheet of plywood on top and bottom, and you can see the vertical risers. These are approximately 178 mm tall and need to be joined to each piece of ply. I plan to use 5-30 dominoes and space out such that there is a domino under each solid area and two under each opening, spaced appropriately. My question is should i make the mortises between the ends the same size top and bottom or keep the vertical portion at min setting and lower portion at second width setting
You are using an out of date browser. It may not display this or other websites correctly.
You should upgrade or use an alternative browser.
You should upgrade or use an alternative browser.
DF 500 Questions
- Thread starter bohaiboy
- Start date
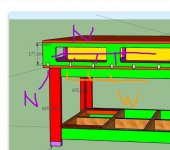
Top/vertical mortises: All narrow (N), purple
Bottom/lower: 1st mortise narrow (N), the rest in middle setting (W), orange.
The first two narrow mortises will align the mating pieces flush.[attachimg=1]
If you have the cross stop and learn how to use it, you can cut all the mortises without making any pencil lines (the mortise width settings, however, will be different from what I suggest in the sketch).
Attachments
Thanks Chuck, yes I have the cross stop. I guess I need to adjust its settings to accommodate the extra width of the mortises? I think for instance if I wanted the center line of the bottom toline up with the C/L of the vertical peice I need to adjust 3 mm, ie, if I set the Narrow setting lets just say at 20mm then when I do the wider mortises I need to adjust 3 mm to center it or am I over thinking this.
This is how I use the cross stop:https://www.festoolownersgroup.com/...s-and-improves-precision/msg642004/#msg642004
Please see if or how the procedure can be adapted.
Please see if or how the procedure can be adapted.
In regards to the Domino Cross stop accessories. I understand the principal of it, you set it at say 100mm, then locate the pin on the inside of the previous mortise and plunge, then repeat the process to the subsequent mortises are complete. In a scenarios where the first top and bottom are set to the smallest width mortise, there is a centerline established. So if I want the top mortises to be spaced 100mm apart, it is simple. But if I want the bottom mortises to be on the same centerline as the top, then the 100 mm spacing no longer applies. As an example, I am illustrating 4 mortises, each registered to the previous mortise at 100 mm. By the time I get to the 4th mortise, the centerlines are now 6mm apart, making for a mis alignment. Am I correct in assuming the larger mortises must be offset an amount to say 94 to make all of the centerlines matchup?
Attachments
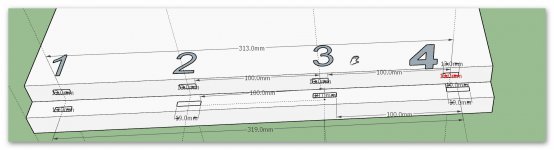
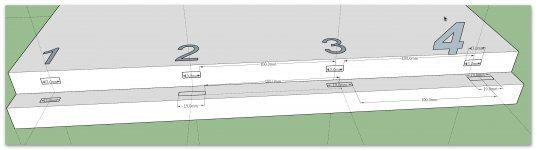
Chuck, This is just for illustration purposes. The example sets the spacing at 100mm from the previous mortise. But if you dont mark centerlines and use the the stops for medium holes on the bottom and small holes on top, after about 3-4 mortises there is no alignment.
Except for the first mating mortises which are milled in the narrow setting for alignment purposes, all mortises are cut in the wide setting. Only one narrow mortise on the top and one narrow mortise on the bottom, everything else wide (middle setting).
Please refer to my sketch given in the other thread quoted above. You can try it on two scraps. No marking of centerlines or, for that matter, any lines are required. One of the reasons we use the cross stop is to dispense with marking placement lines.
Please refer to my sketch given in the other thread quoted above. You can try it on two scraps. No marking of centerlines or, for that matter, any lines are required. One of the reasons we use the cross stop is to dispense with marking placement lines.
ChuckS said:Except for the first mating mortises which are milled in the narrow setting for alignment purposes, all mortises are cut in the wide setting. Only one narrow mortise on the top and one narrow mortise on the bottom, everything else wide (middle setting).
Please refer to my sketch given in the other thread quoted above. You can try it on two scraps. No marking of centerlines or, for that matter, any lines are required. One of the reasons we use the cross stop is to dispense with marking placement lines.
ChuckS, your picture above in your first posting shows Narrow mortises on all of the cuts on the top board. The bottom board has a Narrow mortise for the first cut and wide/middle mortises on all of the bottom cuts.
Your sentence above contradicts your first post. Above you state Narrow on first mortise in both boards. Wide/middle mortise on all other cuts.
Your statement in the first post and in the post right above do not agree.
I understand what the person asking the question above is saying. If you use the cross stop off the wider mortise hole, then you keep moving 6mm or so further right every time you use the cross stop. After a few times using the cross stop, you will be 3mm, half, further away every time and eventually the tenon and the mortise will not align at all. So it seems to me you would need to adjust the cross stop down by 3mm or so if you are running it in wide/middle mortises. So the above Narrow cut mortise and tenon align in the middle of the wide/middle mortise.
Thanks, Russell. Now I understand the confusion the OP has.
The mortise width suggestion given in the color sketch in THIS thread is for milling mortises with pencil lines.
The handdrawn sketch given in the other thread is for the cross stop. (That's why I noted in the first post that "If you have the cross stop... the mortise width settings, however, will be different from what I suggest in the sketch"). I hope this clarifies the discussion.
Regarding original question, personally I've head great success using narrow mortises on one side and middle setting on the other board to be joined. (Everyone will have their own opinion on this BTW)
Often I cut the narrow slots on the wood I consider "weaker" which might be due to grain orientation, stock thickness or plywood vs solid stock.
Old video series by Half Inch Shy (3 or 4 total videos) were very helpful when I first got my Domino:
Also the supplemental manual is good to have:https://studylib.net/doc/18565223/domino-supplemental-manual-by-rick-christopherson
Some time with above and a bit of practice on some scrap and you can determine your own best work flow.
Dongar
Member
I have not done this in years and do not remember all the details but I answered this in the last reply in this thread.
https://www.festoolownersgroup.com/...s-of-slots-with-the-domino/msg45656/#msg45656
https://www.festoolownersgroup.com/...s-of-slots-with-the-domino/msg45656/#msg45656
Similar threads
- Replies
- 9
- Views
- 980
- Replies
- 76
- Views
- 8K