How Square Does "Square" Have To Be???

Blade deflection can be a problem depending on the plate thickness. I have a Felder diamond blade made by Leutz and it noticeably deflects on any cut that is not totally perpendicular to the material being cut. It is meant for cutting Melamine and Veneer without chip out and not using a scribing blade from what information I have been able to find on it and does an excellent job but so it should for $800 AUD!
 
I didn't count on blade deflection when I was setting the fences on my slider and using 18mm MDF for the five cuts.  I tried to be conservative with the MDF and barely trim the edges as I made my way around the sheet.  The results varied and no matter what changes I made to the fence, I couldn't zero in on the setting.  Once I started making full cuts for each of the first four sides, I was able to set the fences after one or two iterations.
 
Decades ago, I built my first crosscut sled by putting a piece of ⅛" masonite between the head and bar of my miter gauge. That didn't last long (hole for the miter head pivot wore quickly), so I rebuilt it with ¼" masonite. That necessitated me adding a front fence for support, and I added a block with a wood screw as a 90º stop. That wasn't so great either as my miter bar had a tiny bit of play. This is for an Inca 2100, so my miter bar isn't the standard size.

Then, several years ago I got ambitious and built a whole new crosscut sled from ½" MDF with a ⅛" whiteboard under lamination. I made my own runner from HDPE, and I used a simple "L" bracket from Incra (not Inca!) on a ¼" steel peg for the head that attached to one of Incra's fences that takes their dual stop block. I also used 2 of Incra's T-slot panel connectors to provide slots for both hold-downs and to secure the far end of the fence as it pivoted. The whiteboard lamination saved me the trouble of routing under slots for the Incra connectors and let me have a ⅝" thick sled instead of ¾".

I didn't know it at the time, but I had made an overly complicated Dubby. Many people don't know about the Dubby, but they do know about Rocker's cross-cut sled clone/copy.

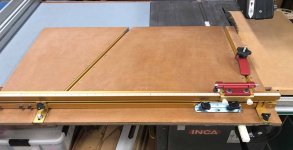
Here's what it looked like:
[attachimg=4]

And when cutting angles:
[attachimg=5]

And a close-up of the left side 90º stop:
[attachimg=6]

That sled was pretty good for many years. I liked the Incra fence with stop block as I could dial in cuts to the mm (although at the time these photos were taken I was still using lousy Imperial) with darn good accuracy and excellent repeatability. Just the other day I added a micro-adjuster to the stop block after doing the same on my miter saw.

Then I got an idea for a way more accurate angle sled. I started working on that, and ended up modifying my sled to accommodate my new design. In the process of designing my new super-duper angle-master sled, I bought a couple different miter gauge fences to try out. Turns out they're not as compatible with my design as the Incra. Well, it's all still under development, but the unfortunate side-effect of Frankenstein-ing my sled is that I no longer had a good standard cross-cut sled.

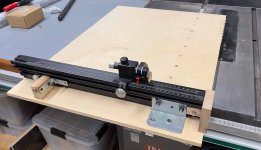
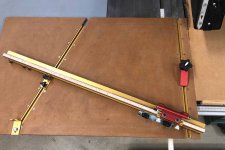
But, instead of building yet another complicated sled, I decided to go somewhat simpler. I decided to not worry about other than 90º for now, but had liked having a real fence with flip stop, and I now had two other aluminum fences with flip stops just sitting around. So, I built a new cross-cut sled around the fence for the Hongdui miter gauge that some people rave about.

[attachimg=1]

As you can see, it's still a one-side sled. I don't like two-sided sleds as then you have to deal with the center getting cut up from blade tilt use. Since my blade tilts right, that doesn't affect this sled. It's also why my rip fence goes to the left, whereas most people run it to the right.

My miter slots are 20mm wide. I bought some 1mm thick HDPE tape and put that on one side of the aluminum miter bar, then used the wheel thingies to adjust the fit. It's kind of nice having HDPE/plastic on both sides of the miter bar where they contact the slot. I used ½" baltic birch for the base. Much lighter than the MDF I was using before. I didn't bother with the panel connectors, and this doesn't have T-slots.

I used an L-bracket that I had to re-drill to line up with the location of the T-slot on the back of the Hongdui fence, and bolted through the top into one of the threaded holes on the miter bar. Since the L-bracket wasn't perfectly square (actually, not close at all), I had to shim where it attaches to the aluminum fence. I also bolted through the sled bottom into the miter bar at every threaded location. I had also drilled out holes so I could access the adjustable wheel thingies without taking the sled apart.

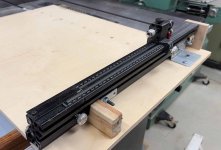
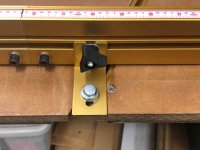
Then I put a stop block with a pan-head wood screw at the left.
[attachimg=2]

You can't see the wood screw, sorry. If you go back to the first photo, you'll see there's another horizontal L bracket from the stop block to the back of the fence. This actually holds the fence against the wood screw coming out of the stop block.

At the cutting side of the fence, I added a piece of MDF for a sacrificial end. if you look closely, you can see there's a 10mm domino coming out the back of the MDF, and that's how the MDF is bolted to the fence.

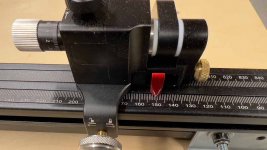
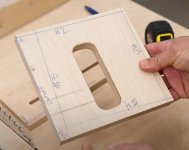
The Hongdui fence is pretty nice in most ways, but has some quirks. First, the main ruler on top is not adjustable side to side. Instead, there's a brass screw to move the red cursor:
[attachimg=3]

The cursor is nicely machined with sharp edges, and I used a white fill-in marker on those edges to make the point visible. EDIT: Turns out the secondary ruler for the telescoping fence use is adjustable, so I've removed my comments on that.

Now, while the cursor is adjustable, it's got a limited range. As a result, I ended up attaching a 10mm block to the stop block so that I could position the fence far enough from the blade to have the MDF not fall apart when cut. The flip stop has threaded holes for 4mm bolts, so that worked out pretty easily.

After building the sled, it was time to align it. I removed the sacrificial fence end, then cut off the right edge of the sled with the blade at 90º tilt. Then took my best square and adjusted the fence to be perpendicular to the cut edge. This was done via the stop block wood screw. Tightened everything down and did a 5-cut.

I was off by 0.41mm over about 500mm (that's better than 0.012º so my square and setup with it is quite good). Ran the numbers through the calculator and adjusted the wood screw protrusion using a digital caliper, then re-tightened and re-5-cut.

The two ends of the off-cut were off by 0.01mm.  I couldn't believe it, so I remeasured and got a 0.02mm different. My thumb pressure on the caliper's wheel mattered. That was astounding. I then cut a piece to a 150mm length via the cursor and checked that with the caliper and it read 150.3mm. Done.

I was going to do a few other things in the shop, but decided to end the day on this high note. I've done many 5-cut setups but never got it dialed in this good, and on the first try!
 

Attachments

  • Sled1.jpg
    Sled1.jpg
    64.9 KB · Views: 190
  • Sled2.jpg
    Sled2.jpg
    67.9 KB · Views: 189
  • Gauge.jpg
    Gauge.jpg
    65.8 KB · Views: 188
  • OldSledOverview.jpg
    OldSledOverview.jpg
    52.1 KB · Views: 190
  • OldSledAngle.jpg
    OldSledAngle.jpg
    67.6 KB · Views: 184
  • StopAngle.jpg
    StopAngle.jpg
    71.6 KB · Views: 186
Regarding partial kerf cuts.

There's more than blade deflection at play. If the blade isn't perfectly sharp, the teeth can push the cut. If you're not using a stop, the push is more than your hands can resist. Again, we're talking about very small variations. It's less likely to do so if there's material on both sides of the blade.

I don't "5-cut" every time I check my setup, but I do check my setup anytime I am getting ready for a critical cut, even if I haven't moved it off square and back. I noticed inconsistent results with partial kerf cuts several years ago, and have made it a habit to make test cuts with material on both sides of the blade.

I'm of the opinion that eyeballing a square is square enough for the work I do.
 
smorgasbord said:
First, you're cutting a pretty small piece - less than 4" square. Ideally you should be cutting something at least a foot square.

Agreed.

For the OP, --- don't feel bad on going back and forth on the adjustments --- that's par for the course.
I have built e few sleds and have learned to build them with a pivot point on one end, and long enough that the other end overhangs the table top enough that I can hold the front cross-piece in place with a C-clamp, rather than turning my sled into a pin-cushion as I make adjustments trying to find "square".
 
Katz-Moses tried addressing "how square is square enough" in this video:
=apRO4bEMqjKkn7hx

He compared against combination squares, so that assumes you think they're square enough. His TL;DW answer is:
Anything under .05 degrees of error is super square. If you get an error of .02 over a fence greater than 24” long you are super square.

I don't think that's wrong, but I also don't trust my BCTW combination square for setup when doing large work. They're fine for tenon shoulders, but not for 24" deep plywood cab sides.

After decades of cross-cut sled usage, the biggest problem (at least for me) is miter bar fit/wear, which Katz-Moses doesn't address well.

Al Ladd, who occasionally posts here ( [member=75145]alladd[/member] ) has an super interesting short video on making your own miter bars with a built-in spring mechanism. The idea is to mill the bars just slightly oversized (like 0.5mm too wide), then cut 1-2mm wide slots a few mm's from one side and about 50mm long, spaced whatever (approx 75mm seems OK), and then shave away the outside of the miter bar where the slots aren't, to fit with the tiniest of room. The idea is the part of the bar that's just .5mm too wide has some room to be pushed into the slot and so acts like a spring. And because that part of the bar is 50mm long it doesn't wear out near as quickly as the wheels aftermarket bars use, which essentially have only point contact with the slot.

I made the slots using an oscillating tool plunged in from the top, and milled the outside of the bar down with a straight bit just slightly proud of the fence on my router table, and got a wood bar that behaves quite well. I then tried it in HDPE and made a mess. For now, I'm using an aftermarket aluminum bar in my sled (mostly because of the threaded attachment holes), but because of potential wear issues (heck, the bar manufacturer includes extra wheels I assume for precisely this reason), I'm hoping to eventually go to a variant of Ladd's innovative spring bar once I find the right material and process for making them.

EDIT: I think it's worth acknowledging that Woodpeckers makes an aluminum bar with nylon leaf springs that would solve the wear issue. But, it's only 25.5" long, which isn't long enough for my crosscut sled use. At $70 a pop, it's also not inexpensive. And given I have to modify all aftermarket bars anyway to fit my Inca's 20mm wide slot (why did they do that? ugh) I'm resigned to making my own.

 
jeffinsgf said:
I noticed inconsistent results with partial kerf cuts several years ago, and have made it a habit to make test cuts with material on both sides of the blade.

Thanks to all who replied to my query.

That said, the mechanisms for error here do make sense. This does mean that "sneaking up" on a final cut where things are critical, is more problematic. Better to cut that square edge to length perfectly the first time - if you have to trim off a half mm, then you might lose some squareness - and if that's also critical....

So, sharp blades & workpiece clamped down seem to be essential for critical work. My saw has a 12" blade so maybe it's more susceptible to blade deflection, but my saw has very large flanges for holding the blade. Maybe, however, blade stabilizers are worth the extra effort? I do use my 4" depth of cut quite a bit, so wouldn't want to lose that and swapping out the stabilizers seems a pain.
 
Also, from my experience, make sure to clean the edge that was cut (that goes against the fence). Small wood dust/fragment is enough to throw you off.
 
A good method for checking square is to cut a widish board and then turn over the board and check if the cut faces still meet with no gap. Doing that doubles the error and doesn't require a square of course. Using a shooting board is most probably the most accurate when it can be done.
 
Mini Me said:
A good method for checking square is to cut a widish board and then turn over the board and check if the cut faces still meet with no gap. Doing that doubles the error and doesn't require a square of course. ...

Depending on what accuracy you require, sure. But, the board's sides being parallel and the surface on which they're resting being straight can both affect the check adversely even if the actual cut is square.
 
smorgasbord said:
Mini Me said:
A good method for checking square is to cut a widish board and then turn over the board and check if the cut faces still meet with no gap. Doing that doubles the error and doesn't require a square of course. ...

Depending on what accuracy you require, sure. But, the board's sides being parallel and the surface on which they're resting being straight can both affect the check adversely even if the actual cut is square.

Yep. Everything counts.
 
I should have added: That's why the 5-cut method is so good - you're using one tool, an accurate caliper, to directly measure what's coming off the blade, combined with compounding any error 4X.

But, one other thing you can do is put your good square on the first corner you cut, since that's now been half recut from the other direction.

From the KM video I linked above, showing an exaggeration of the errors:
[attachimg=1]

He's cutting on the right side of the blade, and the piece is oriented for the final, 5th cut. That will create the cutoff with "A" and "B". If you don't have calipers (I don't know why not today since decent ones can be bought on sale for $20), you can put a good square on the corner made by cuts #2 and #5 (top left in the photo). This also has the compounded error, so your actual error on any single cut is ¼ what you see there.


Attachments

  • square.jpg
    square.jpg
    35.3 KB · Views: 92
Back
Top