DF700 for tables: legs and stretchers

aCircle

Member
Joined
Nov 24, 2020
Messages
45
Hey FOG! Two questions for you this morning about the DF700.

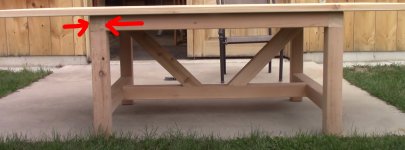
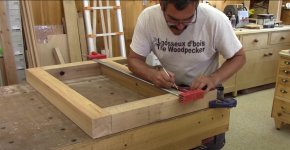
I’m making a version of the table featured in the (delightful) Woodpecker episode 194.  Link.

I’ve got the DF500 and managed somehow to convince myself this project would be the start of a beautiful thing and I needed the DF700 as well. There are two techniques I can’t quite figure out.

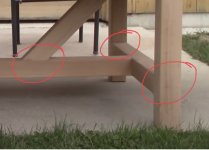
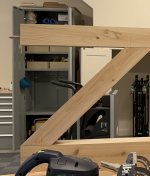
First: the stretchers used to brace near the bottoms of the legs. Since I’m putting two 12x100 dominos in each leg, I need to figure out how to accurately space both mortises in the middle of the leg. I know there must be an easier way to do this, but I can’t quite figure it out myself or get the phrasing right to find a video that shows the technique. Thoughts?

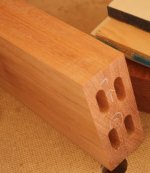
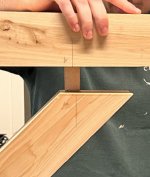
Second: placing dominos perpendicular to each other at the top of each leg. The issue here is that the mortises for attaching the legs to the apron/stretcher (?) intersect in the middle of the leg. As far as I can tell, Alain puts in one set of dominos, lets it dry, then cuts the second set — through part of the now-glued dominos. My questions are (1) is that the technique here, and (2) if so, is it a recommended technique, and (3) are there other ways to do this?

My material for the base assembly is some gorgeous 4x4 Maine cedar from a nearby mill, milled up to 3-3/8” x 3-3/8”.

Curious to hear the thoughts from the group. Thank you for the help!
 
First of all, that is a great looking table and an excellent video.  Second of all, I couldn’t imagine tackling this project without the DF700. 

I have both the DF500 and DF700.  I sold my 500 after getting the 700, then realized I missed the 500 and bought another one.    They are both amazing tools !

Good luck with the table build. 

Brian
 
Forget the DF700 - I want a full-time helper in my shop!  [big grin]
No serious, I own/like the DF700, but the way this base is way-over-constructed you can might even get away with shallower/narrower dominos.

1) Mortising for the stretchers. I assume you're talking about what he's marking at 1:14 in the video. In which case, isn't that self-explanatory? Maybe I'm missing something.

2) Not sure what you're talking about. Maybe provide a timecode for the video or do a screen capture??

Not that you care about my opinion, but I personally dislike seeing the apron endgrain, visible along the long side of the table, as I've highlighted here:
[attachimg=1]

This is easily fixed with a small modification of the design: Have the apron run between the legs (like the stretchers do). The legs then run all the way up to the bottom of the tabletop and then there's no apron endgrain to be seen anywhere. Besides eliminating the apron endgrain, I think visually the table will look better with the legs looking like they directly support the tabletop.
 

Attachments

  • Apron.jpg
    Apron.jpg
    309.8 KB · Views: 787
smorgasbord said:
Snip., but the way this base is way-over-constructed you can might even get away with shallower/narrower dominos. Snip.

The DF700 is sure a good fit for this project, but I agree that the smaller dominoes (8 x 50) with the DF500 can handle the demand of the table as well given the material (3-3/8") and aprons/stretcher construction, provided twin and double dominoes are used:

[attachimg=1]

I also don't think the diagonal structure necessary unless the table is meant to be pushed or rocked around in use for some reason, or some extreme load is expected on the table top.
 

Attachments

  • double twin tenons.JPG
    double twin tenons.JPG
    30.9 KB · Views: 728
Thanks all! Couple of things.

First, the table is ridiculously overbuilt and that’s partly what I love about it. It’s also the first table I’ll have ever built so I’m much happier with more than less.

And speaking of that… I’m well aware that it’s possible to do this sort of project either with the DF500 or even no domino at all! If I had either more skill or patience, or maybe a bit less lust for new tools, I’d be a different man.  [wink]

[member=77266]smorgasbord[/member] great tip on the legs! Appreciated. On the stretchers, I’m sure I’m using the wrong word. I’ve circled the areas I’m talking about. It’s basically the mid-board joints I can’t quite figure out.


Attachments

  • 53FE94B8-C8FC-493E-A0BC-7DEC97E4E31E.jpeg
    53FE94B8-C8FC-493E-A0BC-7DEC97E4E31E.jpeg
    638.7 KB · Views: 229
aCircle said:
On the stretchers, I’m sure I’m using the wrong word. I’ve circled the areas I’m talking about. It’s basically the mid-board joints I can’t quite figure out.

Here's a screen grab from the video:
[attachimg=1]

Seems pretty self-explanatory. Dry fit, mark both pieces (and do it on both sides), then cut at the marks using the same fence height setting.
 

Attachments

  • markingstretchers.jpg
    markingstretchers.jpg
    409.9 KB · Views: 592
Good catch! That part I could guess at, but the issue for me is sighting for the DF700.

As you can see from the photos it's less than intuitive versus the DF500. I see the side of the fence where I can sight from but it just seemed to me like there might be a more clever way to do it.
 

Attachments

  • IMG_0177 Large.jpeg
    IMG_0177 Large.jpeg
    218.8 KB · Views: 204
  • IMG_0178 Large.jpeg
    IMG_0178 Large.jpeg
    220 KB · Views: 208
Tilt the fence to 90 degrees and use the fence height to control the offset for both cuts from the co-planer surface. As long as the fence height is not changed all the mortises will be the same distance from the outside surfaces and thus line up perfectly (assuming the stock is all the same thickness).

Just to be uber-clear, here's one of the legs with the mark:
[attachimg=1]

Here's the Domino lined up with the mark (ignore parallax):
[attachimg=2]

Here's the Domino at the end of the stretcher, also aligned with the mark:
[attachimg=3]

And here's a close up:
[attachimg=4]
 

Attachments

  • IMG_0923.jpg
    IMG_0923.jpg
    1.3 MB · Views: 555
  • IMG_0922.jpg
    IMG_0922.jpg
    1.9 MB · Views: 563
  • IMG_0920.jpg
    IMG_0920.jpg
    1.9 MB · Views: 575
  • IMG_0921.jpg
    IMG_0921.jpg
    2 MB · Views: 564
I couldn't possibly  add  anything to the suggestions/advice. However, I  don't think "overbuilt"  is a term which best describes  this table. I believe the table is designed the way it is because it looks great to the original maker. The diagonals aren't there for strength although I suppose they add a lot of strength. They are a design choice. Not all components of any piece are just for strength or stability. Some are included just because they look good as part of the finished product. I wish I was better at that part of making furniture. About the best I can do is take a design and make some modifications to better suit my tastes.
 
Got waylaid by work, but [member=77266]smorgasbord[/member] this makes a ton of sense. Thank you! I hadn't realized that the move was switching to a relative reference (the line) and then using fence height instead of referencing opposite faces.

Still leaves me wondering how you might use a DF700 to plunge into a mid-board join like you would with the DF500 on a middle board of a cabinet. Jason Bent has a good description of that here with the DF500. Maybe it's just not as relevant for the DF700.
 
Can you explain why what you're talking about is easier on the DF500 than the DF700?  Assuming size doesn't matter, of course. [wink]

Just to ultra-clear, what you're referencing isn't a difference in the two tools, it's a difference in the stock being joined. One is 4x4 material, the other is panels.  The techniques for joining them are different, but do not vary based on DF500 vs DF700.

Think about how you want the mortises/tenons oriented in your application and that will determine how the tool is positioned on the stock.

For panels, you have no choice but to have "horizontal" mortises since the panel's thickness is much less than the mortise width.  You then use the side stops to set the distance from the edges.

For the 4x4 stretchers, you could have vertical or horizontal mortises. My technique gives you vertical mortises, which I think are stronger, and you can fit two of them in a 4x4, maybe even more. If you wanted horizontal mortises, then you could use the panel technique orientation, but you'd be moving the clamped panel for the second set of mortises and so getting the distance between them to be exactly the same on both pieces to be joined will be more difficult.

Think about the accuracy of what you're doing and how the domino is designed (kind of like biscuits) to have locked-in accuracy in one direction and the allowance for play in the other.

 
aCircle said:
Snip.
Still leaves me wondering how you might use a DF700 to plunge into a mid-board join like you would with the DF500 on a middle board of a cabinet.
Snip.
I think yes, but you need to verify it with some 3/4" scraps to be sure as I don't have access to the DF700 in the foreseeable timeframe.

In the test, you'll need to orient the face of the mid-panel probably because the center point of a cutter in a DF700 is 15mm from the baseplate rather than 10mm in a DF500, which nicely is in line with the mid-point of a 3/4" board. This from the DF500 manual:

[attachimg=1]


Attachments

  • df500 mid panel.JPG
    df500 mid panel.JPG
    69.1 KB · Views: 413
Hey all! Thank you for the replies. Got buried in work again and it took me a while to get back to the project.

First off -- yes, the method for mid-panel joinery with the DF700 I suppose would be the same as with the DF500. The only issue is that using the bottom plate of the tool as a reference leaves a tiny amount of material between the domino and the side of the piece. I suspect this is much less practical than it is with thinner stock on the DF500 where you're closer to the middle and using thinner dominos.

Second, the method we wound up using for the 3-1/2" square stock was to strike a reference line as described earlier in this thread, cut the first mortise in each piece using the positive stop of 20mm, then switch the fence to 50mm using the ruler on the piece and cutting all of the second mortises. Worked great. Thank you!

Also, for the 45º supports, instead of using the fence set at an angle we used the same technique of striking a line but referenced the square sides instead of the angled face. Worked great.

Photos supplied for anybody else who winds up in this thread later. All set on my end now! Thank you again all!!
 

Attachments

  • IMG_0898.JPG
    IMG_0898.JPG
    1.1 MB · Views: 167
  • IMG_0897.JPG
    IMG_0897.JPG
    901.4 KB · Views: 165
  • IMG_0896.JPG
    IMG_0896.JPG
    1.1 MB · Views: 156
Back
Top