Dining Room

neilc said:
That trim makes it look like it was meant to be part of the room!  Nice job!

Thanks neil! The only thing that's kinda bugging me is the filler is going to land flush with the cabinet box, not with the doors/drawers, which is my preference. I just couldn't come up with a way to get the baseboard to wrap the room and the cabinets and be flush with the overlay doors/drawers. I don't think it's going to matter to anyone but me but it would've been nice to have everything flush. When I do the uppers I will make those flush as the crown molding will wrap around the upper cabinets.
 
i-2pVJKVk-X3.jpg


Counter top guys came and installed this morning. I had a contractor come in Monday and paint all the trim and ceiling. I have all my measurements for doors and drawers and will be ordering those soon and prepping to paint the upper cabinets/shelves/doors/drawers.

Stay tuned

Matt
 
Michael Kellough said:
Trim looks great!

Thank you Michael. I like to casually drop when people come over that I made this, that, that. .the shutters here were one of my first woodworking 'for the house' projects that I felt good about:

i-ZZ98gkp-X3.jpg


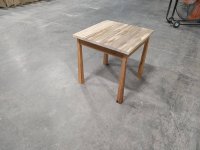
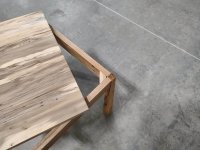
This table was a request from my wife last winter:

i-CqbTXTP-X3.jpg


I'll probably do the crown molding on the room myself too. Not because I enjoy it but more so I don't have someone I trust to do it right.

Matt
 
I forgot about the shutters and didn’t know the table was in there.
Nice to have a room you can really be proud of.
 
DynaGlide said:
I'll probably do the crown molding on the room myself too. Not because I enjoy it but more so I don't have someone I trust to do it right.
 

Matt, you might want to download a copy of Tague Lumber's Moulding Guide to guide your selection.  I was going to suggest Smoot's catalog, but they shut down last year.  [sad]
 
DynaGlide said:
Michael Kellough said:
Trim looks great!

Thank you Michael. I like to casually drop when people come over that I made this, that, that. .the shutters here were one of my first woodworking 'for the house' projects that I felt good about:

i-ZZ98gkp-X3.jpg


This table was a request from my wife last winter:

i-CqbTXTP-X3.jpg


I'll probably do the crown molding on the room myself too. Not because I enjoy it but more so I don't have someone I trust to do it right.

Matt

Great job Matt, everything in the room works together really well. I also recall the shutters thread from years ago, & remember thinking you were a better man than I to tackle that project.

This brings back childhood memories, pretty high tech at the time...

[attachimg=1]

RMW
 

Attachments

  • Image.png
    Image.png
    439.8 KB · Views: 479
DynaGlide said:
I've been making steady progress and will do a separate post later. The focus now for me is this ~32"x 51" cabinet w/ a 1/4" MDF back set in the thickness of my 3/4" nailers. I'm finding the two sides are bowed but in the same direction. I think I saw it during cutting and assembly but waited to see how it would shake out.

I've edited to exaggerate.

i-Z3CzbPj-X2.jpg

Revisiting this and I've come up with my plan. The cabinets are getting applied end panels on one side each. I like to overdo things when possible so I rummaged through my scraps from my workbench build and I have just enough soft maple to mill my own dead flat stile/rail pieces for the frame and panel applied ends. I'll rabbet in a 1/2" MDF panel into the domino butt joint frame after I assemble and glue the MDF in place. When it gets attached to the cabinet side with screws from the inside (or Lamello. .TBD), it'll pull the cabinet side nice and flat.

i-xpsnnhS-L.jpg


The opposing cabinet side will get pulled flat by the filler scribe between it and the wall.
 
The first thing I would try would be to rest the ends of the bow on some 3/4” stock, and then put a modest amount of weight on the center of the opposite side and give it a day or two to see if gravity will correct the problem.

I am trying to understand how that happened. 

I have accumulated several picture frame corner clamps.  When I am assembling cabinet boxes, I use 8 clamps and I clamp all the corners square.  But joining the corners square does not seem to be the issue here.

Do you know how this happened?  Was the ply not flat when you started?
 
Crazyraceguy said:
The table, for the wife, is great. I really like that style (and building tables in general)

Thank you. I kinda hate tables. Or any furniture that require mortises in close proximity on adjoining faces.
 
My expensive solution to a problem I face arrived:
i-fcdj3Vn-X2.jpg


I want to spray in the garage but I hate overspray on my stuff and I don't want to fabricate something every time I need to do it. So after a lot of internal debate I bought the Paintline portable jobsite spray booth and blower. Not cheap but I ran the amount of built ins I have planned for this house through my head and decided it was worth the expense. I might consider doing stuff for others as well once I feel more comfortable. Not shown but I picked up a 2qt pressure pot to go with my Fuji setup. I've been using the 3M PPS and it's just so awkward balancing all that weight on your wrist when spraying panels flat.

In the past I'd spray on the driveway but that has too many issues for me. Bugs, wind, pollen, weather, etc.
 
DynaGlide said:
Crazyraceguy said:
The table, for the wife, is great. I really like that style (and building tables in general)

Thank you. I kinda hate tables. Or any furniture that require mortises in close proximity on adjoining faces.

Hating tables is better than hating wives . . .
 
[member=65062]DynaGlide[/member] that's a pretty cool set-up, even covers the floor. Pressure pots are a lot nicer to do the actual spraying, but they tend to increase the clean-up time. If you do big projects (or at least a lot of parts at once) the stopping to refill a regular gun gets old. That kind of offsets the cleaning too.

If you hate closely spaced adjacent mortices, the little side table I made for myself last year would drive you up a wall. I did it with the leg taper essentially upside down of everything I have ever seen. They are tapered on the outside, thick part as a foot. That means that the top of the leg, where the mortices go, is only about 7/8" square. I offset the legs from the front, making them flush to the back of the aprons.
I had to miter the Dominos for them to fit, since the mortices intersected.
 

Attachments

  • Tableside2.jpg
    Tableside2.jpg
    357.2 KB · Views: 97
  • Tableside4.jpg
    Tableside4.jpg
    251 KB · Views: 94
I don't know what I expected but the booth setup reduces the overspray. .doesn't eliminate it. I still find a fine dusting on things in my garage.

Spraying the upper cabinet parts went about as I expected. I got 2 coats of KA+ Surfacer down easily enough. Sanded well as has always been my experience.

The KA+ top coat however gave me fits. I switched to the 3M PPS cup since I like to mix in some GF extender and it just makes things easier. The 2 QT pressure pot I knocked over a few times doing the primer and I didn't want to deal with it. I'll have to come up with a stand for it inside the booth to hang it from.

The top coat can was sealed/unopened but likely 3 years old. I didn't go through with my normal routine since I don't have as much free time. Skipped some prep steps, didn't use my mil gauge to check how thick I was going on just went by past experience of what looked right. The finish has a lot of tiny pinholes that only show under a light. You really can't see it unless you go looking for it. A quick google search showed it can be caused by 20 different things so I didn't sweat it. 2 top coats and done.

When I get to the doors/drawers/shelves I'm going to switch over to SW Gallery which is what I originally planned on using. I'll be extra careful to check my progress on the bottom of the shelves first and see if I'm happy with the results before I move onto any show faces (top of shelves/doors/drawers). I will be using the mil gauge and not skipping any steps. I might even move my drying rack inside the house to avoid any contamination issues. I only spray every few years so I don't beat myself up over when stuff isn't going perfectly.

Spraying finishes is such a moving target unless you're climate controlled and even then you might get a bad can every now and then. I just try to adapt as I go. Early morning vs afternoon, gun gets clogged if you are going too long and have to strip it down and clean it, etc. I know I can get there if I put the time in. When I did my office cabinets a few years back I got really good results.

Really, really love the Zeta P2 for painted cabinets.

Matt

i-gnzPw42-XL.jpg


i-7xdXBtf-XL.jpg


i-rmMwbKQ-XL.jpg


i-Z7VhXMZ-XL.jpg
 
Shelves are done and in. I shot them with KA+ Surfacer (2 coats), SW Gallery 20 sheen white (2 coats top side, 1 coat bottom) through my Fuji MM5, 1.3 cap/needle thinned with water and GF extender. No surprises, checked thickness with mil gauge and was somewhere around 3-4mil wet for top coats. It looks orange peely until it dries which I expected based on all the research I did:

i-Vrb6dJX-X2.jpg


Next up I'm prepping to tackle the applied end panels. I could just do them with a regular plywood sheet but I want to make it look nicer. Plan is to do frame and panel shaker style to mimic the doors/drawer fronts. The problem is when you set out to make a scribed shaker panel, what to do with the stile that gets scribed. If you do nothing it ends up skinny. I measured an approximate 1/2" gap at the bottom so figured a 1/2" scribe should do. Rather than risk my assumptions on the finished product I cut up a leftover piece of ply I have to the dimensions I think I need and scribed it in and wrote the dimensions on the back before cutting. Scribed off 1/2" and it lands almost perfectly at 3/4" reveal to land flush with the doors. These are all assumptions as I'll need the doors mounted to verify but I'm close enough to know how to make the applied panel. If I do the scribed stile at 2 3/4" instead of 2 1/4" it'll taper from 2 1/4" to 2 1/2" after scribing and look almost identical to the other stile and rails.

i-jVgWgKv-X2.jpg


i-vDhCBMg-X2.jpg


i-hR6jsws-X2.jpg


i-ZSF8wmk-X2.jpg


Matt
 
Here's one of the applied end panels after glue up:

i-9m4DPtt-XL.jpg


I made the left stile (facing wall) ~1/2" wider than the other stile/rail so I can scribe off that amount for a flush fit with the front of the doors after they're hung on the cabinet.

The maple frame was milled to 3/4" and a 1/2" MDF panel rabbeted to fit into a 1/4" groove. It was a pain to setup for this on my table saw. I will be adding the sawstop inline router table in the near future. The reason I went through the extra steps is I wanted the panels to be flat:

i-2849j5H-XL.jpg


Doors/drawer fronts are in and next up I'll be boring hinges, test fitting, scribing the applied panels, then off to paint:

i-Lmjpnqt-XL.jpg


Eagle Woodworking made all the drawers/doors/drawer fronts and they came out perfect.

i-JBHzT5D-XL.jpg


I don't think I'll be making doors in the future unless it's a small batch or I want a specific species of wood (i.e. rift white oak).

Matt
 
Looking great!  I think the scribes will look fine given the extra compensation you built in. 

Any visitors that go into the room with a tape measure should be kicked to the curb!
 
Back
Top