dog kennel

HowardH

Member
Joined
Jan 23, 2007
Messages
1,572
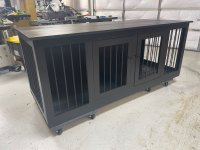
The lady who cuts my hair also knows i do some woodworking so she asked me to build this kennel for her two dogs. Note to self.  The plans called for using dimensional hardwood.  I should have used cabinet grade plywood. I would have gone together a bit better and been easier to finish. 

[attachimg=1]

[attachimg=2]

I posted this on FB and as it turns out, an old workmate of mine, posted this version that her daughter and SIL built.  I don't have the heart to tell them what's wrong...

[attachimg=3]

I used some Soss 101 hinges with creating the mortices with a Shape Origin and they came out perfect. 


Attachments

  • IMG_3519.jpeg
    IMG_3519.jpeg
    1.3 MB · Views: 590
  • IMG_3521.jpeg
    IMG_3521.jpeg
    1.1 MB · Views: 536
  • dog kennel.jpeg
    dog kennel.jpeg
    105.2 KB · Views: 604
Is that really steel re-bar? That's seriously heavy duty. Ply would have been easier, but likely not less expensive now a days  [eek]

I have no problem with pocket screws. They have their place, and who can resist in saying that the places is on the inside or back or bottom.
 
Crazyraceguy said:
Is that really steel re-bar? That's seriously heavy duty. Ply would have been easier, but likely not less expensive now a days  [eek]

I have no problem with pocket screws. They have their place, and who can resist in saying that the places is on the inside or back or bottom.

As least they could have been consistent. If you notice the inside stiles, they are reversed.  I will die on this hill.  Pocket screws were intended to go on the inside, out of sight.
 
This is one place I'd have used a solid surface material (like Corian) on top of a solid wood base for the flooring, just because critters occasionally have accidents.  [smile]
 
HowardH said:
I should have used cabinet grade plywood. I would have gone together a bit better and been easier to finish. 

I used some Soss 101 hinges with creating the mortices with a Shape Origin and they came out perfect.

Looks good. Pretty heavy duty.
Tim
 
Now that’s a classy kennel. Bet she was thrilled! She can put down a rubber mat or liner to protect the floor. Something that’s easy to remove and hose off is ideal.

I’m with you on pocket screw orientation. If they must be outward facing, then at least use the Kreg plugs to fill the holes. Not just for looks but to prevent water (or dog slobber) from collecting in there.

One of my first furniture projects was an outdoor table made w cedar 2x6s and a ton of pocket screws. I took it apart about a year ago to repurpose the lumber for other things. It was on a covered deck, and the wood was in pristine condition - EXCEPT for inside the pocket screw holes, many of which were filled with dirt, debris, and spiders nests. So that’s how I learned to always plug the holes, even the non visible ones. No one wants baby spiders crawling out of wood joints.
 
A couple of points (based on my experience building the same type of sleeping crate).

1.  If the dog is a chewer, this will not work.  A chewer will gnaw on the wood.  My dog was not a chewer and it was never an issue.

2.  I finished my crate with oil based poly for durability.  I let it cure for one week before putting it into use.  But my dog would not step inside.  He looked, but backed up.  I was guessing that the smell of the poly was off putting for him.  I waited a second week and got the same result.

I then bought a can of spray shellac and sprayed the interior with that.  The very next day he settled in. 

Mine split between the upper and lower sections.  The upper section had slats as did the full height of the door.  The bottom half was plywood.  I also put mine on wheels and that proved useful. 

I am not sure how to address the chewer issue if it arises.  But the shellac worked great at minimizing odors. 

I sold mine after my dog died and I sprayed the interior again so that the new dog would have a “new” smelling crate. 

My dog would bark at me if I did not put him in the crate at night and close the door.  I think he felt secure in there (though mine was more cave-like than your design).

Nice looking crate.
 
batmanimal said:
Now that’s a classy kennel. Bet she was thrilled! She can put down a rubber mat or liner to protect the floor. Something that’s easy to remove and hose off is ideal.

I’m with you on pocket screw orientation. If they must be outward facing, then at least use the Kreg plugs to fill the holes. Not just for looks but to prevent water (or dog slobber) from collecting in there.

One of my first furniture projects was an outdoor table made w cedar 2x6s and a ton of pocket screws. I took it apart about a year ago to repurpose the lumber for other things. It was on a covered deck, and the wood was in pristine condition - EXCEPT for inside the pocket screw holes, many of which were filled with dirt, debris, and spiders nests. So that’s how I learned to always plug the holes, even the non visible ones. No one wants baby spiders crawling out of wood joints.

Agreed, but it also seems as they have turned the thing into Swiss cheese. I can only assume that the rails have pockets on the inside, to attach them to the vertical styles? That's a lot of holes.
Personally, I would have done it with Dominos for the rails/styles, tabletop connectors for the top (or maybe hinges and a latch?) and a few screws with no glue for the bottom.

I would think it would be hard to chew the wood parts for a dog that is big enough to need a kennel that big? or put the bars closer together? Better yet, leave them something to chew on inside?
 
I did the pocket holes along with dominos. All the holes were plugged but more aesthetic reasons. Didn’t consider the chewer aspects but don’t know what other material I could have used. She’s thrilled with it so that’s what matters. She’s already bought some pads for the bottom. I’m really pleased with the Soss hinges. Would have never attempted them without the Shaper. 
 
Agree with Packard that if a dog is “a chewer” nothing is going to stop them! They can even get through those metal wire crates. (Probably not rebar though)

But I doubt anyone with chewers would commission a beautiful wood crate. That’s just asking for trouble.

My dogs have always loved their crates. Playing crate games and training them as puppies helps, but there is also something instinctively comforting about having a safe shelter. The nice thing about the wood is that is dark and cozy inside. Some dogs hate the wire crates because they feel exposed. I’d always throw a crate cover or towel over it to make it more cozy.

This thread is making me miss my dog. He would run into the crate on command with such force it would scoot across the floor.
 
HowardH said:
I did the pocket holes along with dominos. All the holes were plugged but more aesthetic reasons. Didn’t consider the chewer aspects but don’t know what other material I could have used. She’s thrilled with it so that’s what matters. She’s already bought some pads for the bottom. I’m really pleased with the Soss hinges. Would have never attempted them without the Shaper.

If the customer is pleased, you're golden.
I have done SOSS hinges with the little wooden jigs that they sell. The very first time I did it, I only had one. That is quite a challenge, you have to be dead-on with everything in the layout and measuring. It is far easier with one for each position and a story-stick holding them together....far easier.
You're right though, the Shaper Origin is the easy way to go. The first ones I did with mine were the little jewelry box sized ones that are just one round hole. I think they were 14mm? That helped me get more familiar with placing multiple features in the same edge.
The bigger ones, you just have to keep your depth of cut straight, but you don't have to deal with the spacer screws.
 
I had a Carpatian Shepherd that chewed through the wood around the glass on an exterior door. Mind you, that was hardwood and a seriously thick door (it had an insulating glass pane of three layers, so it had to be). He got through it in one night!  [eek] 

Later we found out there was an escaped dog from a couple of houses further down the road in our garden that night. Those two definitely didn't get along. We were visiting friends and therefore not at home at that moment.

When I built a kennel for him I used U-shaped aluminum with holes drilled in it for the metal bars to protect the wood. Worked a treat!
 
My dog, a Chesapeake Bay Retriever, was not a chewer and I did not worry about that.

I made the door frame using glue and butt joints with pocket screws.  My slats were applied to the surface.  They were 1/4" x 1-1/2" lattice.  I applied glue and pinned the slats to the surface.  This amounted to a very considerable amount of surface area being glued.

After the glue dried, I set my table saw at 45 degrees and trimmed the ends all around so that both the slats and the frame were appeared to be chamferred.  I applied stain and poly afterwards.  It ended up being stronger than mortise and tenon because of the larger glue area.

I did the same on the sides and back, though the sides were just half height.  It was fast, easy and strong.  The appearance was very much in the craftsman style.  I copied this construction from the tables at Barnes and Noble.  If it stands up in a retail environment, it is pretty nearly bullet proof. 

I had to make it in two halves (top/bottom) because I wanted full height for the dog standing and full height when he slept on his side.  That would have made it larger than any of the door openings in the house. 

I used a single 3/4" thick foam "horse mat" for the floor.  I could take it out and hose it down if I needed to.  I only did that when it came time to sell it.  I pretty much just got my materials cost from the sale.  (It went to a Chesapeake Bay Retriever breeder, an odd coincidence).

You can see the construction in the image below.  Note the door.  (My cats missed the dog when he died and took up residence in his crate for a while.)


Back
Top