domino 45 end to face miter

ChadRat6458

Member
Joined
Nov 24, 2015
Messages
4
What is the best way to cut a domino for a joint like this? It is for a flag case box. Not sure how to reference the face part. Thanks.


Attachments

  • endface.png
    endface.png
    11.2 KB · Views: 350
I've got form for getting this wrong, but isn't this very easy to do and in fact how you've drawn the domino going into both pieces?
 
Can't you put the Domino from one of the sides as shown and sand it done if necessary?
If you choose the Sipo version it makes a nice contrast with the wood of the case box.
[attachimg=1]
 

Attachments

  • endface.png
    endface.png
    11.9 KB · Views: 859
Turn the A piece upside down and reference of the same side as part B.
The disctance to the side is pretty much the same in both parts?
I do like neeleman's solution though
 
You can also make the cut in part A on a certain distance and cut it off when attached to part B.
[attachimg=1]
 

Attachments

  • endface (1).png
    endface (1).png
    11.6 KB · Views: 772
The picture shows splines cut to the width of the boards. Instead of splines, I want to use dominoes. I can set my fence to do the 45 one. I not sure how to refence it for the face side. I will cut them a little long so the base will be flat. I am thinking do the top 45 first and have the sides a little long. Slide the base in until it is flush. Domino the base and sides. Trim up sides.
 

Attachments

  • flagbox.png
    flagbox.png
    32.6 KB · Views: 355
I'm looking at the domino from a different plane. You're saying that's the side view (of the domino), I'm looking at it as thought it's the top view (of the domino) in which case it's simple?

Wouldn't know where to start to do it the orientation you are talking about though.
 
To do that you would need miters in all corners. Try this, otherwise you will probably need to build a fixture to position the domino.


Attachments

  • flagbox.PNG
    flagbox.PNG
    141 KB · Views: 347
blaszcsj said:
To do that you would need miters in all corners. Try this, otherwise you will probably need to build a fixture to position the domino.

Nakatomi Towers has hit the nail on the head. Or do what I was suggesting if there's enough room, but one near the top and one near the bottom?
 
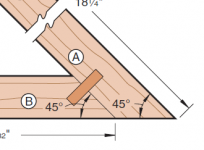
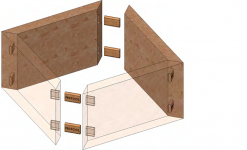
From what I understand, the challenge is not so much the mechanics of the actual plunge, but rather how to position the machine, particularly on board A, such that the joint lines up as flush as possible.  Since the plunge on B will be with the fence set at an angle, but the plunge on A will be without the fence engaged, you are worried about misalignment of the joint.

You could do some test cuts on some scrap boards to approximate the offset you'll need, knowing that the distance from the bottom of the machine to the center of the mortise is 10mm, and thus can set an appropriate guide/edge against which the machine will rest when doing the plunge on A.  I like the idea of keeping the A board a bit long, and then trimming away the excess once you've done the mortises.
 
I ended up doing kind of what Edward suggested. Instead of using the middle I used the bottom of the domino hole. Made some test cuts to figure out the offset. Worked out good. Here is a pic before I glued it up. I trimmed the sides down before the glue up. Each angle has 2 4mm dominoes. Thanks guys.
 

Attachments

  • flagbbox.jpg
    flagbbox.jpg
    4.1 MB · Views: 422
The fence at 90 degrees make a specific distance from the right-angle corner for the horizontal part.

Then keeping the same fence height...
Tilting the fence for the angle part also make the distance the same from the obtuse angled corner for the angled piece.
 
Back
Top