Domino Dilemma aka is this joint possible with a Domino...?

Stevenski

Member
Joined
Jun 1, 2024
Messages
120
Location
Warsaw, Poland
I am sure there is a way to do it but as a total novice to the Domino, it has me beat at the moment. Can someone help? Please? :)

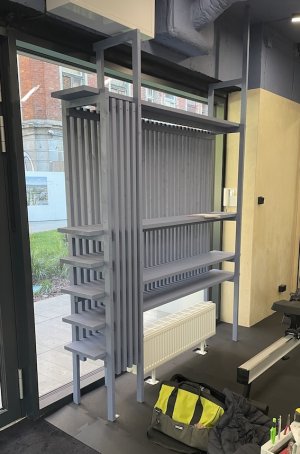
I am making a newer version of this shelf system in plain pine and have decided to use dominos for the first time to obtain invisible joints.

domproject.jpg

Since this my first project using dominos I have started with a mock up of all the individual joints to get my bearings before going 1:1
I started with one of the main frame modules

dom0.jpg

So far so good but now I have hit my first brick wall. I simply cannot figure out the correct positioning and references for attaching the horizontal stretchers to the vertical frame :(
The joint I am trying to achieve is shown in the yellow circle. I've stuck some blue tape to show what I am using as my reference face.

dom1.jpg

dom2.jpg

My problem is how on earth do I cut the mortice in the dark blue circle so that it will match with the mortice in the yellow circle?
I simply cannot figure out how to set up and position the domino machine on the slat to make the cut and get a matching hole :(

dom3.jpg

I'm feeling a bit stupid at the moment and am sure I am not seeing something that is probably blindingly obvious but that's where I am. Confused :)

The only thing that I can think of at the moment is that I will have to reference these mortices from the other side ot the vertical frame but that can't be right surely...?

Could an experienced "Dominator" help me out here?

dom4.jpg

Thanks in advance and sorry for the long post but hopefully it illustrates my problem
 

Attachments

  • domproject.jpg
    domproject.jpg
    176.7 KB · Views: 6
You are on the right track with your postulation.

The reference face has to be the underside of that horizontal member.

The other reference face has to be the bottom of the vertical member.

Then the depths of the mortises will be the same, as measured from the ground-to-the-sky.

The Domino’s Fence (the one that can angle) sits on those reference faces.
 
That last pic is easy, you are very close. You just need another line, to reference, since you can't see the line you are trying to cut. That second line needs to be 10mm below the other.
The main thing to be aware of is not to get ahead of yourself. Be sure of all of your joinery, before you glue anything together. You can end up with an assembly where there isn't enough clearance to get the DF500 into.
 
Great idea to make mockups. Once you get it, it will make it so much easier. And when you do bore the mortise in the wrong place, you can simply glue a domino in that mortise and cut it off with a hand saw - this will give you a "clean" surface to adjust your placement and bore again. And sometimes: again and again*.

*Ask me how I know!
 
And when you do bore the mortise in the wrong place, you can simply glue a domino in that mortise and cut it off with a hand saw - this will give you a "clean" surface to adjust your placement and bore again. And sometimes: again and again*.

*Ask me how I know!
Great tip - thanks (y)

Sounds like you've been there, done that... but did you get a t-shirt?? :ROFLMAO::ROFLMAO:
 
Great tip - thanks (y)

Sounds like you've been there, done that... but did you get a t-shirt?? :ROFLMAO::ROFLMAO:
Another quicker way of plugging a mortise is to cut a domino to length (i.e. slightly shorter than the mortise is deep) and, after applying glue, hammer the precut domino (good end on the outisde) home and flush with the surface. No sanding or sawing (with a flush cut saw) needed.

As an advanced application, you can even use this technique to hide a milling mistake with a tenon made out of the same wood species of your project. Or, with a patch like this: https://festoolownersgroup.com/thre...mortises-in-a-walnut-chair.58684/#post-571651
 
Last edited:
Unless you are absolutely married to the Domino, you could easily through dowel that joint. No jig required. I would assume two (2) 3/8” diameter dowels per joint.

1. Before clamping the piece to be joined in place, drill 2 holes all the way through in 3/8” diameter.
2. After clamping the part in place, drill into the mating piece an additional 1” to 2”. No need to drill all the way through.
3. Glue the holes and the part into place and then tap the appropriate length piece of 3/8” dowel stock into the holes.
4. Wait until the glue sets, then trim flush. (There can be a hydraulic effect pushing the dowel back out a bit, so wait until the glue sets.)

I estimate that two 3/8” diameter dowels will equal about one Domino. In any case, this is fast and easy. No dowel jig is required. Sand smooth after trimming the dowel and you are ready for paint.

Of course if you are dowel-adverse, ignore the above.
 
I really like the look of that shelf. I believe it would be outstanding done in quarter sawn white oak or walnut.

Ron
Thank you - that's very kind of you!

I'm sure you are right but I don't have access to that kind of material and wouldn't be able to mill it anyway. I'm afraid I am constrained in the box of ready dimensioned construction lumber.

The original shelf unit was a nice idea but the final result looks awful in situ. It has not been finished well and is rougher than sharkskin, they grey paint was a nice idea but makes it look heavy and there are so many visible screws (badly set) it looks like it was peppered by Al Capone's Tommy gun! 🤪 It really doesn't fit in well with the otherwise sleek and modern quality finish of the gym.

My plan is to make something similar - but better and in keeping with the slatted benches I posted a couple of weeks ago and the plywood cladding on the walls.

I'm also planning to add some upgrades. I'm thinking embedded wireless phone chargers, inset matting for shoes. Maybe some LED lights (but probably not).
 
I used to find some very nice 1-1/2” x 1-1/2” pine at both Lowes and Home Depot.

I’m not sure what kind of pine this is, but all the pieces were dead straight and entirely free of knots. Very nice to work with and with a very fine grain that took paint nicely.

I applied General Finishes “Milk Paint” which is actually a modern acrylic exterior rated paint. They claim that no primer is required (and I did not use any primer). The nicest thing about this paint is, when dry, there are no visible brush strokes. The brush marks all disappear while drying. Looks sprayed on. G-F recommends a foam brush but I have used bristle and foam and find little difference. I will post an image when I get home.

I assembled my structures using a single 1/2” x 3” dowel per joint, but I am certain a Domino would work as well. I used a self-centering dowel jig. The joints all seemed strong, and strong enough for shelves, desks or benches. The square cross section simplifies design and planning.

Note: I made a dedicated marking jig, long since lost. But it takes about 5 minutes to replace, so not a problem. It speeds up the process.
 
Unless you are absolutely married to the Domino, you could easily through dowel that joint. No jig required. I would assume two (2) 3/8” diameter dowels per joint.

1. Before clamping the piece to be joined in place, drill 2 holes all the way through in 3/8” diameter.
2. After clamping the part in place, drill into the mating piece an additional 1” to 2”. No need to drill all the way through.
3. Glue the holes and the part into place and then tap the appropriate length piece of 3/8” dowel stock into the holes.
4. Wait until the glue sets, then trim flush. (There can be a hydraulic effect pushing the dowel back out a bit, so wait until the glue sets.)

I estimate that two 3/8” diameter dowels will equal about one Domino. In any case, this is fast and easy. No dowel jig is required. Sand smooth after trimming the dowel and you are ready for paint.

Of course if you are dowel-adverse, ignore the above.
I am definitely not dowel-averse. In fact, I am a huge fan and enjoy the process and the final result. I have a good jig which really helps.

However, I am married to Dominos for this project because I justy bought my first DF500 specifically for this project. I'd feel a right idiot if I didn't use it now 🤪
My thinking is that even if it is not ideal for the job, the very process of making it work will teach me a lot about the Domino and it will have been a valuable learning exercise ... or not ;)

I made this walk-in wardrobe last year exclusively using dowels and Ikea-style cam fittings. Not a single drop of glue so it can be disassembled if I ever sell the house (there's even time capsule hidden for someone to find one day). I had never in my life made anything like this before but anything is possible with YouTube, dowels and a stubborn streak of perfectionism 🤪:ROFLMAO:

1.jpg

2.jpg

3.jpg

4.jpg

5.jpg
 
… I'm thinking embedded wireless phone chargers … Maybe some LED lights (but probably not).

I replaced a few electrical outlets that had USB plugs embedded in them. Then the industry (and Apple) changed to USB-C. 🤦‍♂️

I decided to stay away from embeding technology into furniture, nor into the house.

Prior to that episode, I put Lutron’s smart switches in most places to make a Smart Downstairs for Siri to be at our command.

If you do install LED strips, then design it for all the components to be easily replaceable. Those things are doomed to fail at some point.

Yay! on making great progress on the current project. The closet project came out terrific!
 
I am definitely not dowel-averse. In fact, I am a huge fan and enjoy the process and the final result. I have a good jig which really helps.
What made the dowel project nice was the very nice pine. It was available in the pine lumber section at Home Depot, not in the stud and rafters section.

The grain was straight and true, the 1-1/2” x 1-1/2” lumber was available in 6’ and 8’ lengths so very little waste, not warped and nicely planes. No knots (especially nice).

I don’t know what kind of pine it is. Pine usually is peppered with knots. These sticks were totally knot-free.


I made a foot rest for my breakfast bar using this material and it went together quickly and easily. If it is available near you, I highly recommend it.

 
Last edited:
If you do install LED strips, then design it for all the components to be easily replaceable. Those things are doomed to fail at some point.
Thanks - very sound advice! I will bear that in mind (y)

I think I have the vertical lattice work figured out with regards referencing etc. Some challenging layout calculations still to resolve to ensure I get an even row at the precise height I want - I'll just need to be careful and double-check

vert slat.jpg
 
What made the dowel project nice was the very nice pine. It was available in the pine lumber section at Home Depot, not in the stud and rafters section.
very nice stock! :love: I can only wish... ;)

Luckily I cocked up when I was calculating how much I needed for this project and I bought twice as much as I needed and so have a lot to choose from and weed out the particularly bad pieces.
 
Back
Top