You are using an out of date browser. It may not display this or other websites correctly.
You should upgrade or use an alternative browser.
You should upgrade or use an alternative browser.
Domino 500 and thin stock
- Thread starter jbmhs220
- Start date
Sparktrician
Member
I would be concerned about blow-through, even if you hold the domino very close to the inside corner. On the other hand, you could hold the domino closer to the outside of the corner so that the domino actually protrudes on both sides of the joint, then chisel and sand the protruding parts flush as a "feature". If you chose that route, you could use the 5mm sipo mahogany dominoes to get a nice contrast.
semenza
Member
Hi,
A quick graph paper sketch shows that it will fit if kept to about 2mm from the inside. But even that close to the inside will put one corner of the domino within 1 - 2mm of the outside , side. Pretty close for comfort. I think you are asking for trouble. Can you move to 5/8" thick material?
Seth
A quick graph paper sketch shows that it will fit if kept to about 2mm from the inside. But even that close to the inside will put one corner of the domino within 1 - 2mm of the outside , side. Pretty close for comfort. I think you are asking for trouble. Can you move to 5/8" thick material?
Seth
NYC Tiny Shop
Member
- Joined
- Sep 12, 2013
- Messages
- 926
I have tried this with mixed success. The end grain of the ply will chip out occassionally, and sometimes it won't. With a good glue-up it will hold. I have seen some guys throw in a few brad nails.
stvrowe
Member
- Joined
- Jan 27, 2007
- Messages
- 811
I have done 1/2" thick side mitered boxes with the 4mm Domino. Like others have indicated, there is not much margin for error. Additionally, you really can't adjust the fence down far enough to get close enough to the inside of the miter to not blow through the outside. I seem to recall some folks had ground the stops off the fence to get it to go lower but I didn't do so. I ended up using a 1/8" sheet of plexiglass with double stick tape to the fence to get the proper position. It isn't ideal and it would be nice if Festool were to offer some clip-on spacers to enable users to accomplish this task with greater ease.
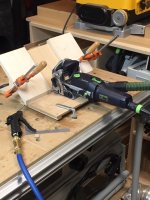
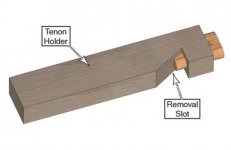
Thin stock and miter box joint with Domino 500. I saw a good video online describing how to make a face plate attachment to get around the problem of blow through on the show face of thin stock.
However, I wanted something that would safely and accurately hold my small box parts in perfect alignment with the machine without the bending over and squinting.
[attachimg=1]
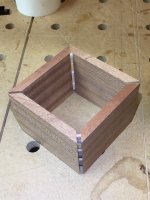
I have made over 60 boxes with this jig using 1/2" stock with 3 -4 dominoes per corner. That adds up to over 1500 mortises. I have saved a ton of time and back ache using this jig.
I would be happy to make a more detailed post on the jig construction if anyone is still interested in this topic.
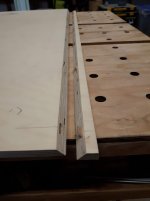
[attachimg=2]
[attachimg=3]
However, I wanted something that would safely and accurately hold my small box parts in perfect alignment with the machine without the bending over and squinting.
[attachimg=1]
I have made over 60 boxes with this jig using 1/2" stock with 3 -4 dominoes per corner. That adds up to over 1500 mortises. I have saved a ton of time and back ache using this jig.
I would be happy to make a more detailed post on the jig construction if anyone is still interested in this topic.
[attachimg=2]
[attachimg=3]
Attachments

Peter Durand
Member
- Joined
- Jul 5, 2008
- Messages
- 208
Oh, yes please. I would appreciate details of that jig.
Thanks, Peter
Thanks, Peter
Sparktrician
Member
Joe Felchlin said:Excellent idea/work.
I too, would be very grateful if you provided “detailed post on the jig construction”.
Thx ahead.
Joe
Me, too.
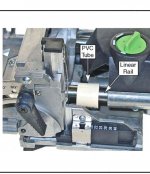
I found the hack to avoid over perforation on the 45deg. angles on 12mm. Russian veneer...Its at page 19 of the DF500 Owner manual.
01 : You have to put a plunge depth spacer that you install on the ( linear rail/tube ).
02 : Place the ( Horizontal Position Gauge ) lowest position = no digit...
03 : Shorten your 4 mm. dominos a bit...not shure of the exact leinght.
04 : Run some tests on scrap wood
And voila!!
01 : You have to put a plunge depth spacer that you install on the ( linear rail/tube ).
02 : Place the ( Horizontal Position Gauge ) lowest position = no digit...
03 : Shorten your 4 mm. dominos a bit...not shure of the exact leinght.
04 : Run some tests on scrap wood
And voila!!
Attachments
Thanks so much Jaco77!!. I had not sen the new users manual. I attached relevant pages at end.
I have also cut shallower mortises and trimmed the tenons and this works very well for many situations like what you have shared in your photo.
I suppose my application is fairly specific, so that solution still did not get me the results and ease of use that I was looking for.
View attachment 1
View attachment 2
View attachment 3
Attachments

Similar threads
- Replies
- 95
- Views
- 6K
- Replies
- 12
- Views
- 786
- Replies
- 11
- Views
- 734