Domino 500 beginners Question ...

Gunso

Member
Joined
Feb 28, 2018
Messages
18
Expecting delivery of a domino tomorrow. I'm all prepared to start work on a large bookcase.

One question though! Is it possible to use the domino midway down a panel? I hope this photo helps explain better!


Attachments

  • FJRX22YJB6UCQIG.LARGE.jpg
    FJRX22YJB6UCQIG.LARGE.jpg
    148.8 KB · Views: 508
Gunso said:
Expecting delivery of a domino tomorrow. I'm all prepared to start work on a large bookcase.

One question though! Is it possible to use the domino midway down a panel? I hope this photo helps explain better!

Yes, the basic method to do this is to clamp the shelf where the top or bottom of the shelf goes.  Mark where you want your dominos in the shelf and the bookcase side.  Plunge vertically down into the bookcase side, registering against the shelf you clamped.  Then plunge Horizontally into the shelf.  You'll reference off the base of the DF500 for each of the pieces, making sure the shelf is aligned the way you'd like it.

I've found that now that I have a domino almost every joinery question is answered by it.  It just makes everything super easy.
 
Sure is! I built this 11' x 4' shelf to sit on a built-in in my basement... all dominos. I was able to dry fit the whole thing, bring it inside, glue it up and put it in place. I used the YT videos posted above, namely half inch shy's. The thing to be careful about is to know exactly which side is "up" or "down" at all times - in my case it was left and right as well. In 3/4" ply the domino is off-center so you don't want dominos that don't line up!
 

Attachments

  • domino_shelf.jpg
    domino_shelf.jpg
    1,011.7 KB · Views: 573
My workflow is in this recent thread:
http://festoolownersgroup.com/festool-how-to/df500-use-with-15mm-melamine/

Since you want to be able to match the holes to the shelf as well as the carcass/cabinet you need to match the markings. If you want recessed shelves it can be a good idea to make the holes before trimming the shelves. This takes away the confusion of referencing the Domino.

The easiest way is to make a spacer as per the thread above and then use another spacer or a sliding carpenters square you can lock down. You simply slide the Domino base up to the square after you have backed it up against the spacer. As long as you reference from the same side (i.e. back/inside or front/outside) on your left and right sides of the carcass you can't really go wrong.

Using that back spacer ensures a parallel row of holes and that square or side spacer ensures the same distance for all mid board holes.  Some people use the middle setting on the Domino for the mid board hole - I usually don't as I prefer to file down the Domino a mm if needed to ensure a snug fit but usually it fits fine. 

I would suggest making all the shallow plunges first - so you don't risk going through the material and then do the deeper plunging o the shelves. No mistakes there. :)
Writing this very fast so hopefully I didn't miss anything vital. Once you've done it you will get the simplicity of it all and will be well prepared for next time. :)
 
Brilliant - I appreciate the help!

Hurry up Fedex I want to get started  [cool]
 
Halfinchshy has a great video on calibration of the 500 cursor. It’s a smart thing to do first.

Also, I’d practice with the machine on scrap before cutting into your project wood. It’s amazing what you learn from a couple of practice runs.

I’ve used both the 500 and 700 on many projects and still double check vacuum connection, cutting depth, mortise width, and fence lockdown tightness before cutting.
 
Henrik R / Pingvinlakrits said:
I would suggest making all the shallow plunges first - so you don't risk going through the material and then do the deeper plunging o the shelves. No mistakes there. :)

This is why I tell everyone to use 30mm dominos - it makes life so much simpler. 15mm in each piece... you can't screw anything up no matter what you do, if all your sheet goods are 18mm
 
Well I made a start! I am sure if someone showed me physically it would take 10 seconds to learn, but I was too nervous to use the Domino on my project today. I don't quite understand 'reference surfaces' on 90 degree joins yet. I am sure it will click soon!

I laid up all the bits and components today and Festool has done me proud. Nothing more than half a mm out. Even that discrepancy was frustrating and I traced it back to the stock not being square! I should have sacrificed a few mm before I started measuring and cutting to ensure I was working with straight edges and 90 degree corners.

 
Gunso said:
I don't quite understand 'reference surfaces' on 90 degree joins yet.
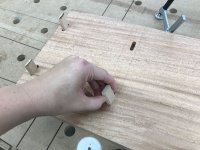
When you hold (or clamp together) the two pieces you want to join together in the intended configuration:
The two surfaces where they are touching are the ones where the mortices will have to be made, these are the reference surfaces (where the business end of the domino, where the drill will push out, will reference against).
Pick two edges (one on each piece) parallel to each other (preferably directly and flush touching each other), these are your reference edges (where the corner between the business end and the fence, set to 90°, of the domino will register against).
The other reference surface will be the one where the fence will register against.
Draw a line across the two fence reference faces, perpendicular to the reference edge, to mark the position of the mortice.

Separate the two pieces, reference the domino to your reference surfaces (leading to it being snug against the reference edge), align the sight gauge center line (seehttps://service.festoolusa.com/media/pdf/Domino_DF_500.pdf page 22) to the line you drew (keeping the fence and business end both flat against the reference surfaces), hold the domino in place with the fence handle and then do the plunge, slowly. Repeat with the other piece, dry fit a domino to check if all is well.
 
If you are like most of us veteran Domino users, you will have a few misplaced mortises. I fix them by glueing in a Domino tenon and sawing it off with a flush cut Japanese saw. If the mortise is a wider one, I split two tenons so that, together, they fill the mortise.

Two mistakes I made early on were (1) not getting the fence lock down tight and (2) having the Domino base rest on my bench top. Error one creates a series of mortises each lower than the last. Error two results in the mortises being too high.
 
Thanks for all your help. Really appreciate it!

Everything worked out perfectly. Just assembled it without glue so far.

 
Awesome - good to hear!

About the Domino being off due to the sheet goods not being square... I have learned the hard way too - don't trust a sheet being square "enough" for a shelving unit. Always cut your own reference and check. Any error will creep along and sometimes magnify.
 
Back
Top