New to Domino 500. Trying to use it on mitered edges at 45 degree setting in walnut. Sometimes the mortises are inconsistent. They're not always the exact same distance from the edge, even though I've set it so that the mortise is nearer the inside edge. I'm using 5/30 tenons because the stock is a bit less than 3/4". What might I be doing wrong? Thanks for any input.
You are using an out of date browser. It may not display this or other websites correctly.
You should upgrade or use an alternative browser.
You should upgrade or use an alternative browser.
Domino 500 slight variation of mortises in mitered edge
- Thread starter sybildelg
- Start date
Try checking a few things first:
1) The mitres (bevels) are properly cut -- check the angle (the bevel even across the face?) as well as the squareness to the edge
2) The machine fence bottoms out on the depth gauge and the fence angle is correct at 45*
It's also possible that you might apply different pressures during holding and pushing the machine, hence changing the registration during different cuts. If possible, have someone stand on the opposite side to see if you move anything during your plunging.
The size of the dominoes used should have no bearing here. I cut the bevels that were verified as at 45* by my reference combo square.
One last thing: did the slight variations affect the assembly? Dry-fitting/clamping might show little effect on the joinery after all...if the variance was small.
Attachments
Birdhunter
Member
- Joined
- Jun 16, 2012
- Messages
- 4,144
I’ve had the same results and I have been using the Domino for many years.
I ended up making jigs for mitered mortises. That’s the only way I could get perfect miters.
I bought a Mafell DDF40 dowel machine. I get perfect miter joints without jigs. Amazing machine.
I ended up making jigs for mitered mortises. That’s the only way I could get perfect miters.
I bought a Mafell DDF40 dowel machine. I get perfect miter joints without jigs. Amazing machine.
Thanks for the advice. It may be that I'm not holding the handle down tightly enough. I'll try that. In order for the problem mortises to work, I think I'd have to try to replicate the incorrect mortise on the matching mitered side. Not sure I can do that accurately, since the first one was done accidentally.
Thanks also to Birdhunter. Do you have any photos of the jig you made for miters?
Thanks also to Birdhunter. Do you have any photos of the jig you made for miters?
Birdhunter
Member
- Joined
- Jun 16, 2012
- Messages
- 4,144
I am in Spain until Thursday. Will post pictures once home.
junk731
Member
- Joined
- Sep 10, 2008
- Messages
- 923
You say your new to the Domino. How many plunges have made? With the Domino make sure the unit is setup properly and practice helps. I've been using the Domino since 2008 when they came out. Yes I had a few problems when I first started but practice and observing what went wrong is key. Holding the unit properly and smoothly plunges are key. Make up some test pieces, make sure they are secure on your surface so they cant move, make sure the domino is tight and flat to the material edge then plunge smoothly. I've done hundreds of these and the problem isn't the tool but the person operating it. You don't need jigs the Domino is a portable jig in itself. Practice a dozen test joints on scrap to get your technique down.
kcufstoidi said:... You don't need jigs the Domino is a portable jig in itself. Practice a dozen test joints on scrap to get your technique down.
I was with you right up to this point. That's like saying a router doesn't need a table. Yes, you can do a lot of things with a router without a router table, but many things are much easier and more accurate with one. I've had many small components that were easier to mortise once I put them in a jig that held the part securely and gave the Domino a larger reference surface.
Thanks for the advice. I did lots of test cuts on plywood miters before trying the oak and I thought I had it pretty well figured out. The cuts were OK. Then, the first cut on oak was slightly off—too high, about 1/16” above where it should have been. I’m sure it’s not the tool, so I’ll go back to practicing before I mess up more nice stock!
junk731
Member
- Joined
- Sep 10, 2008
- Messages
- 923
jeffinsgf said:kcufstoidi said:... You don't need jigs the Domino is a portable jig in itself. Practice a dozen test joints on scrap to get your technique down.
I was with you right up to this point. That's like saying a router doesn't need a table. Yes, you can do a lot of things with a router without a router table, but many things are much easier and more accurate with one. I've had many small components that were easier to mortise once I put them in a jig that held the part securely and gave the Domino a larger reference surface.
Whatever works in your world Jeff, I have never found the need for Domino jig for small or large components. If a jig works for you go for it, I prefer proper setup and technique. I also don't have a router table, got rid of that 10 years ago but my shaper does work rather well when needed.
sybildelg said:Thanks for the advice. I did lots of test cuts on plywood miters before trying the oak and I thought I had it pretty well figured out. The cuts were OK. Then, the first cut on oak was slightly off—too high, about 1/16” above where it should have been. I’m sure it’s not the tool, so I’ll go back to practicing before I mess up more nice stock!
Hi,
Welcome to the forum! [smile]
I am sure the members here will help get it sorted out.
Some pictures of your set up and use showing the different miters and how you are placing the Domino might help.
Seth
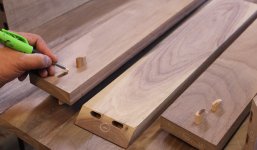
Here are some photos of the mis-aligned mortises.
1. Practice on plywood
View attachment 1
2. First attempt on walnut scrap (looks OK)
View attachment 2
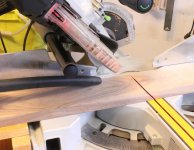
3. Attempt on walnut cabinet side. Note that second mortise from right is approx. 1/16" higher than others.
View attachment 3
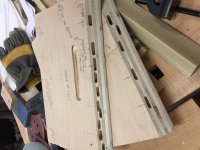
4. Wider shot of above
View attachment 4
1. Practice on plywood
View attachment 1
2. First attempt on walnut scrap (looks OK)
View attachment 2
3. Attempt on walnut cabinet side. Note that second mortise from right is approx. 1/16" higher than others.
View attachment 3
4. Wider shot of above
View attachment 4
Attachments
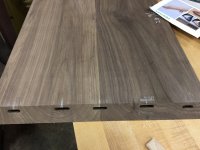
Re the three mortises in the centre on the 3rd pic (the 4th not showing up) -
Could you put a straight edge to confirm that the surface of the board (the one facing up in the photo) where you registered the angle fence of the DF500 against is flat across.
If the two mortises of the three mentioned here on the left aligned with each other but not with the one on the far right, and no changes were made to the machine settings, the cause(s) should not be machine-related.
I’ve only just started using the domino as well but I noticed a couple things that might help. I find that “choking up” on the tool with your plunging hand will help minimize any wiggle. I see a lot of the you-tubers holding the very back of the machine where the air vents are. I’m pretty sure blocking those with your hand is not a good idea. Also on those mitered joints, concentrate your pressure down and in directly at the short point of the angle so you are getting even pressure to both reference faces of the machine. This is not a bisquit joiner. Those machines let you get away with murder in the slop department comparatively. I hope you find the technique that works for you. I’m finding it to be a fantastic little tool
Thanks to all who have responded to my "mis-alignment dilemma." I'm sure I need to practice, practice and practice, until there are no variations in the alignment on mitered edges and I am certain about just exactly how I'm holding and operating the tool. StevoWevo's suggestion to choke up on the tool makes lots of sense, so I'll try that as well.
Hint: If you hear the rough chatter noise as you plunge, you're probably plunging it too fast. Also, needless to say: use the machine with suction. You'll get there...this is an addictive machine (at least for me).
Edit: Not sure if this might be helpful to you (Reply #37) -
https://www.festoolownersgroup.com/...omino-in-middle-of-board/msg575156/#msg575156
Edit: Not sure if this might be helpful to you (Reply #37) -
https://www.festoolownersgroup.com/...omino-in-middle-of-board/msg575156/#msg575156
Similar threads
- Replies
- 38
- Views
- 4K
- Replies
- 22
- Views
- 10K
- Replies
- 66
- Views
- 16K