Domino Connector System Question

gold5237

Member
Joined
May 25, 2017
Messages
5
I am making a knock down closet system and have what I think is a simple question. Set up: I want to fasten a vertical outside support to a horizontal bottom (all material is 3/4" Birch Ply laminated with Wilsonart laminate) with the DF 500 panel connectors. Question-Do I need to mortise exactly in the middle of the boards? and if so how do I find the middle? My concern is having the horizontal bottom sit proud or shy of the bottom of the vertical support or carcass member.

Thanks in Advance
 
No need to cut the mortises dead centered whether using the connectors or regular beech dominoes, as long as you set the machine on the reference face properly (e.g. the outside faces of the bottom board and the vertical boards).
 
Agreed, they do not have to be centered. Plus with plywood you have more strength than a cheap product like melamine.  However if you do want to center them its a pretty simple process with a caliper.  Also if its a mortise that will be bearing a load such as a shelf I would try and keep the thicker portion of the offset to the top just for a little extra insurance.  This is probably less of an issue with a closet but things like garage cabinets where considerable weight might be stacked on a shelf I think its good practice if they are offset.
 
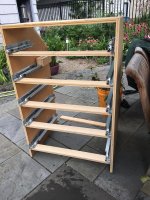
I'm building 4 of these, one's installed and the 3 other ones are in various stages of completition. Here's the frame and the stretchers temporarily assembled before the Dominos were machined in.

[attachimg=1]

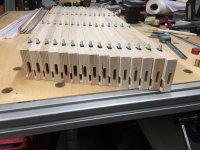
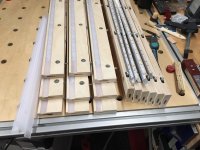
Here are the stretchers with the Festool 8/50 connectors installed.

[attachimg=2]

[attachimg=3]

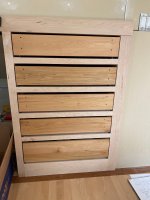
Here the first cabinet is temporarily installed in the knee-wall while the face frames are attached to the cabinet sides and the stretchers with Domino 8/50 connectors.

[attachimg=4]

The only thing remotely critical is the centerline distances between the Dominos, as I wanted all of the joints between the face frame pieces to be absolutely flush and without any spaces.

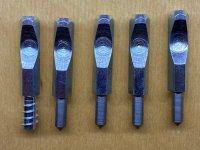
I took these standard Festool items and turned them down to a sharp point. Assembled them in the stretchers, squared them up with a small machinist square and then used them to mark the placement of the centers in the face frames...it worked well. There is a small amount of lateral adjustment with fasteners, maybe +/- .5 mm.

[attachimg=5]
 

Attachments

  • 4318.JPG
    4318.JPG
    527.4 KB · Views: 1,049
  • 6823.JPG
    6823.JPG
    318.3 KB · Views: 1,041
  • 6831.JPG
    6831.JPG
    340.6 KB · Views: 946
  • 9321.JPG
    9321.JPG
    680.3 KB · Views: 953
  • 9948.JPG
    9948.JPG
    378.8 KB · Views: 952
ChuckM said:
No need to cut the mortises dead centered whether using the connectors or regular beech dominoes, as long as you set the machine on the reference face properly (e.g. the outside faces of the bottom board and the vertical boards).

On a sample piece I had to flip the bottom around to flush up the vertical member and the bottom. I probably referenced side of the vertical piece.

Thanks
 
afish said:
Agreed, they do not have to be centered. Plus with plywood you have more strength than a cheap product like melamine.  However if you do want to center them its a pretty simple process with a caliper.  Also if its a mortise that will be bearing a load such as a shelf I would try and keep the thicker portion of the offset to the top just for a little extra insurance.  This is probably less of an issue with a closet but things like garage cabinets where considerable weight might be stacked on a shelf I think its good practice if they are offset.

Good tips, I'll break out the calipers if I decide to center. My thought is with lots of pieces if its centered I don't have to worry about referencing the correct sides.
 
Cheese said:
I'm building 4 of these, one's installed and the 3 other ones are in various stages of completition. Here's the frame and the stretchers temporarily assembled before the Dominos were machined in.

[attachimg=1]

Here are the stretchers with the Festool 8/50 connectors installed.

[attachimg=2]

[attachimg=3]

Here the first cabinet is temporarily installed in the knee-wall while the face frames are attached to the cabinet sides and the stretchers with Domino 8/50 connectors.

[attachimg=4]

The only thing remotely critical is the centerline distances between the Dominos, as I wanted all of the joints between the face frame pieces to be absolutely flush and without any spaces.

I took these standard Festool items and turned them down to a sharp point. Assembled them in the stretchers, squared them up with a small machinist square and then used them to mark the placement of the centers in the face frames...it worked well. There is a small amount of lateral adjustment with fasteners, maybe +/- .5 mm.

[attachimg=5]
Slick idea to locate face frame mortises. I don't get the rabbit for the LED strips?
 
gold5237 said:
Slick idea to locate face frame mortises. I don't get the rabbit for the LED strips?

The LED’s are mounted on their own individual heat sink, that significantly increases bulb life and it’s also the easiest way to mount them and replace them if any go out.
The rabbit holds the LED assembly and the frosted plastic lens flush with the bottom of the stretcher so as not to catch on clothing.
 
gold5237 said:
afish said:
Agreed, they do not have to be centered. Plus with plywood you have more strength than a cheap product like melamine.  However if you do want to center them its a pretty simple process with a caliper.  Also if its a mortise that will be bearing a load such as a shelf I would try and keep the thicker portion of the offset to the top just for a little extra insurance.  This is probably less of an issue with a closet but things like garage cabinets where considerable weight might be stacked on a shelf I think its good practice if they are offset.

Good tips, I'll break out the calipers if I decide to center. My thought is with lots of pieces if its centered I don't have to worry about referencing the correct sides.

I am one of the few around here that routinely centers his mortises.  I have a post on here about my process if you do a search of my posts but basically The cutter C/L is 10mm from the base. So I use a 6" caliper and get an accurate measurement of my stock which is usually slightly less or more than the stated size.  Just as an example I will use a odd dimension of 17.27mm. Divide that by 2 = 8.635 then add back the 10mm for the height from the base. Now zero out the depth bar on the caliper. Then set it to 18.635mm (half the stock thickness plus the 10mm).  Butt the tail end of the calipers body to the bottom of the dominos base and then adjust the fence so it just touches the depth bar on the caliper.  Its quick and easy and has always got mt to within a couple thousands.  I know most here dont center but I usually do unless there is a need not to. 
 
Interesting, I need to decide whether to try your method or leave the factory setting as is and flip the tops and bottoms around. For some reason when I flip the reference sides outside the unit instead of inside the unit I am perfectly flush. I like your method so there is one less thing to worry about since the reference sides are interchangeable.
 
Calculator works well for the math impaired to divide the material in half when working down to the thousandths adding the 10mm is pretty easy even for me.  Its probably more accurate than most need or care but it works well and at this point my math skills are better than my eyes.  Do it right and its pretty much full proof and results in super flush joints. 
 
The Rockler gadget or its equivalents work great in theory but in practice...not 100% all the time because it depends on the pencil (perfect size & fit) and lead point (dull vs sharp) for marking center lines (long vs short). Look at the comments rated for one star (use the filter to find and read the lowest rated remarks). This kind of marking tool is good for carpentry type of work, but its quality of marking varies among users. In other words, its consistency cannot be compared to that of a calculator or marking gauge.
 
Back
Top