Domino DF 500 - Carcase Butt Joints

Shand

Member
Joined
Dec 1, 2013
Messages
3
Hello,

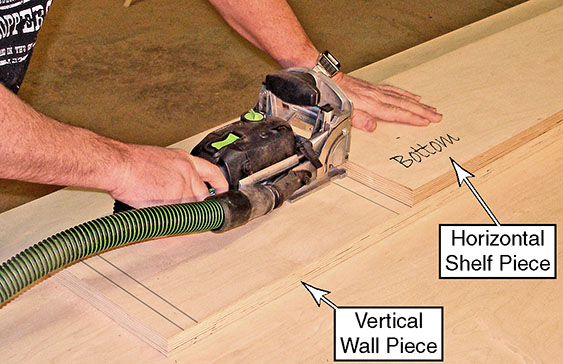
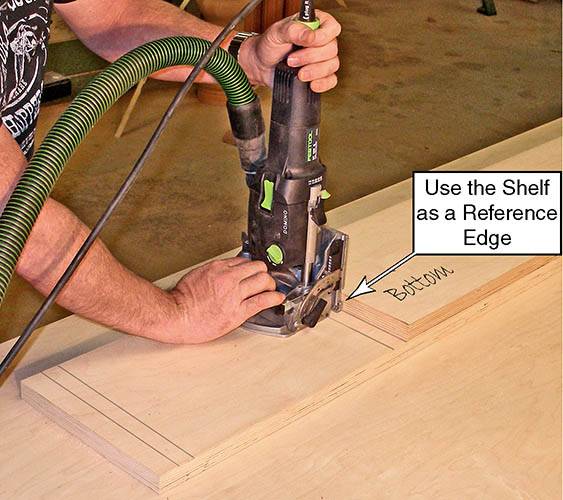
I'm new to the DF 500. Following the instructions on page 17 of Tenon Joiner Supplemental User's Manual for carcase butt joints I find that the mortice holes are far too near the edge on the horizontal shelf piece. I failed to follow the underlined instruction: "Do not use the fence for height positioning". Duh! I now understand that after fiddling about with a ruler that the height measurement is from the fence down not the base up.

So my question is. When making carcass butt joints and when you want the mortice hole in the center and you can't use the height positioning what do you do?  I can get there by trial and error but I thought being Festool there may be a better way.

Thanks
 
I use the fence.

No problems.

I do find that the domino takes some time to get used.

There is a very distinct learning curve to it.
 
Hi,

Welcome to the forum!  [smile]

If you are close to the center that is good enough. Not readjusting the fence between cutting the face mortises and the end mortises, and consistency is more important than dead center. Set the fence height as  close to the center as you can. Make sure you register the fence against the outside of the cabinet box for both cuts. Fence against the end for the face mortises (that extra support piece is useful here). When you make the end mortises be sure you have the fence on the surface that will be the outside of the cabinet. If you place it against the surface that will be the inside of the cabinet you may be off if the setting is even a smidgen off center. By doing it this way (assuming the fence has not been moved) you are guaranteeing  the same spacing.

Also avoid double plunging the mortise. Very tempting but that can enlarge the mortises allowing for play when the pieces are brought together. Smooth steady and zero up down wiggle will help too.

Seth
 
Here's a picture of the method I use.

Jack
 

Attachments

  • P1000814(1).JPG
    P1000814(1).JPG
    326.7 KB · Views: 1,665
jacko9 said:
Here's a picture of the method I use.

Jack
simple , effective  but for the other side -- how to set-up ?
, just like that I'd guess but the other board & opposite end of the vertical board  [blink] I'd have to mark each side A & B & then Left & right, up down as well  ,  so not to confuse myself .
I haven't gotten to use my dominio much yet  [sad]
 
Try these


I made the mistake of editing this out, it is important;


Tom
 
Slappy said:
jacko9 said:
Here's a picture of the method I use.

Jack
simple , effective  but for the other side -- how to set-up ?
, just like that I'd guess but the other board & opposite end of the vertical board   [blink] I'd have to mark each side A & B & then Left & right, up down as well  ,  so not to confuse myself .
I haven't gotten to use my dominio much yet  [sad]

Slappy,

Yes you have to mark every board with the cabinet makers triangle and I also mark every interface.  Start slow with small projects and you'll gain confidence and be able to execute larger case work.

I have used both of my Dominos (500 and 700) to make small and large cases out of solid wood and as you gain experience, it goes real fast.

Let me know if you have any questions as you proceed along.

Jack
 
The OP (Shand) is referring to the method shown in the two images below. This is where you use your horizontal partitions (shelves) to register the locations for the mortices. The mortices are therefore 10mm up from the intersection where the two pieces are stacked.

Not only is it not necessary for your mortices to be centered vertically in the shelf, but you actually don't want them to be. Your joint will be stronger if the tenon is placed toward the bottom edge of the shelf. This leaves more wood above the tenon, and all of your weight is pushing down across it. In the picture below, I labeled the "bottom" side of the shelf. This should be facing up when you have 20mm or thinner shelves. But for thicker material, then you would want to have the top side facing up, and everything would be reversed for your layout lines. (The double pencil lines indicate where the shelf will be when you assemble the carcase.)

DF500-39-lo.jpg


DF500-40-lo.jpg
 
jacko9 said:
Slappy said:
jacko9 said:
Here's a picture of the method I use.

Jack
simple , effective  but for the other side -- how to set-up ?
, just like that I'd guess but the other board & opposite end of the vertical board   [blink] I'd have to mark each side A & B & then Left & right, up down as well  ,  so not to confuse myself .
I haven't gotten to use my dominio much yet  [sad]

Slappy,

Yes you have to mark every board with the cabinet makers triangle and I also mark every interface.  Start slow with small projects and you'll gain confidence and be able to execute larger case work.

I have used both of my Dominos (500 and 700) to make small and large cases out of solid wood and as you gain experience, it goes real fast.

Let me know if you have any questions as you proceed along.

Jack
thanX Jack I'm about get started on the set-up redo of my shop with all new tools like a TS55 & domino, a custom Incra LS MFT Router table maybe a sawstop pcs ts  if Santa likes me
I already have a floor drill press  miter saw
 
Hi Rick,

That's very helpful. Thanks. I was thrown by the diagram on the left of that page which appears to show the location of the mortice holes in the center of the finished shelves.

I'm not actually making shelves but some bedside cabinets that have a plinth base and top with the sides, back and front set back 20ml from the base and top edges. This seemed like the nearest method. I'm ignorant about joint strength. Prior to the Domino I used a biscuit joiner and nothing has fallen apart, well not yet....

I'm think I probably shouldn't be using this method?

Shand
 
Shand said:
This seemed like the nearest method. I'm ignorant about joint strength. Prior to the Domino I used a biscuit joiner and nothing has fallen apart, well not yet....

I'm think I probably shouldn't be using this method?

Shand

I didn't create this method. It has been around for decades for biscuit joiners. I just adapted it for Domino. The graphics you were referring to are just computer generated from SolidWorks, so they weren't intended to show real-life placement.

The only difference in the rules between biscuits (splines) and tenons, is that the Domino tenon is typically stronger than your plywood substrate, so you try to maximize the strength of the substrate. The plywood will delaminate before the tenon breaks. That's why you are better off moving the tenon lower in the joint so you put more of the substrate above the mortise location. But for 3/4" (19mm) material, you will be close to center anyways.
 
Hi Rick,

I think I caused some misunderstanding there. I didn't mean that I wouldn't use that method when constructing shelves I was questioning if I should use it for the cabinets as they are just a box with an over sized top and base. Sorry for any confusion.

Shand
 
Back
Top