Domino inaccuracies on mitres

sai1

Member
Joined
Oct 17, 2021
Messages
17
Hello everyone,

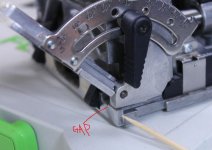
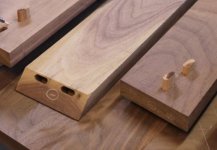
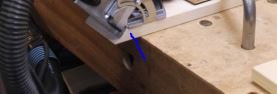
I'm doing a lot of training with my new Domino with scrap pieces and everything is working pretty well except mitres. The height of the Domino mortises varies slightly on every second or third mortise I make, but I don't know why. I register the side pin first then slide the machine forward until it hits the edge, then apply pressure to the fence handle. With the other hand I apply the force to plunge inline with the machine. Still I get variations so often. Is there a secret tip or something to get consistent results?
 
I do it just the opposite, registering from the bottom of the material.
Depending on the width of the pieces, it may be registering for the paddles, or from pencil marks, but I usually reference the bench top rather than the top of the piece. This gives a much more solid reference point, no tipping or tilting.
With really thick parts I use a spacer/shim under the DF500, either to get the mortice more centered or to cut double rows of them.
 
Oh sorry, I got my terminology mixed up. (english is not my native language)
I'm talking about beveled pieces, like for a drawer for example. So referencing off the table is not possible.
 
sai1 said:
Oh sorry, I got my terminology mixed up. (english is not my native language)
I'm talking about beveled pieces, like for a drawer for example. So referencing off the table is not possible.

Beveled? for drawers? I'm confused
So you are talking about a mitered box, rather than flat like a picture frame?
 
Crazyraceguy said:
sai1 said:
Oh sorry, I got my terminology mixed up. (english is not my native language)
I'm talking about beveled pieces, like for a drawer for example. So referencing off the table is not possible.

Beveled? for drawers? I'm confused
So you are talking about a mitered box, rather than flat like a picture frame?

Exactly.
 
It'd help a lot if you could include some photos.

Regarding bevels, I assume you bottomed out the fence before mortising (red arrow). There shouldn't be any gap there.

Check before you make each cut that the machine is in good contact with the stock's bevel edge (blue arrow - bottom pic).

There's another way to mill mortises on the bevel. I'll add the link here when I find it.

Edit: Please see replies #8 & #10 -https://www.festoolownersgroup.com/...n-domino-support-bracket/msg653939/#msg653939
 

Attachments

  • DF bevel fence not bottom out.JPG
    DF bevel fence not bottom out.JPG
    52.1 KB · Views: 370
  • DF bevels - miters.JPG
    DF bevels - miters.JPG
    30.9 KB · Views: 378
  • DF bevel registration.JPG
    DF bevel registration.JPG
    12.3 KB · Views: 351
ChuckS said:
It'd help a lot if you could include some photos.

Regarding bevels, I assume you bottomed out the fence before mortising (red arrow). There shouldn't be any gap there.

Check before you make each cut that, the machine is in good contact with the stock's bevel edge (blue arrow).

There's another way to mill mortises on the bevel. I'll add the link to here when I find it.

I set my angle first, then bottom out the fence and lock both levers all the way and both settings stay solid. But the mortises creep up and down a bit, so my 2 pieces connected end up twisted a bit. Although it feels like the machine is pushed up against the piece, it probably isn't. This is the only reason I could think off why this happens.
But I definitely can't feel the misalignment then. Before plunging I was always sure the machine is completely pushed in all the way against the working piece.
 
Worth a try: To avoid fence drifts, bottom out, lock the fence, then set the angle and lock the bevel.
 
I experienced this as well when first doing mitres with the domino.  The main issue is that it is a bit more difficult to sense that the machine is fully seated when the fence is at 45 -- what sometimes happens is that the face of the domino has creeped up ever so slightly when aligning it to an angled face.  For me this was happening because I was applying some additional lateral pressure with the hand that was holding down the fence knob, when instead I should have just used only enough downward pressure on the knob to hold the machine in place.  Now I just try to double check that I'm correctly positioned every time I reposition the machine on a mitre plunge, and let the hand guiding the plunge do most of the work.

Keep in mind too that slight inconsistencies in the wood will also throw off alignment, and that even when we think we have milled our wood straight, there's always some surprises. 
 
ear3 said:
...
For me this was happening because I was applying some additional lateral pressure with the hand that was holding down the fence knob, when instead I should have just used only enough downward pressure on the knob to hold the machine in place.  Now I just try to double check that I'm correctly positioned every time I reposition the machine on a mitre plunge, and let the hand guiding the plunge do most of the work.
...

I'll keep an eye on this.
Also my mortises seem to be more consistent, when I turn off the machine before repositioning it. Seems like with the machine vibrating it's harder to position it correctly.
 
Just came back from my garage. ear3 you were right on point. I was applying downward and forward pressure to the fence handle, when I should just be applying pressure downwards after the Domino is in position. Everything turned out perfect now.
Also tried out the plastic support piece for the first time to use the narrow paddles. They are a tiny bit off in terms off centering, but I'll sand that down at some point.
 
Try putting the pieces back to back. You then have a 90 degree angle and a great surface to register. As long as the edges are lined up you should get the same when you turn them around and marry them.
 
Awesome [member=76743]sai1[/member] Happy mortising.

sai1 said:
Just came back from my garage. ear3 you were right on point. I was applying downward and forward pressure to the fence handle, when I should just be applying pressure downwards after the Domino is in position. Everything turned out perfect now.
Also tried out the plastic support piece for the first time to use the narrow paddles. They are a tiny bit off in terms off centering, but I'll sand that down at some point.
 
greg mann said:
Try putting the pieces back to back. You then have a 90 degree angle and a great surface to register. As long as the edges are lined up you should get the same when you turn them around and marry them.

This works too. I have done it a few times with odd angles.
 
sai1 said:
Also tried out the plastic support piece for the first time to use the narrow paddles. They are a tiny bit off in terms off centering, but I'll sand that down at some point.

Are you suggesting sanding down the paddles a bit? Be careful with that as you could open a can of worms if done improperly. Before doing anything to the paddles, verify the source of the misalignment first. Each machine also comes with another set of paddles for alignment purposes. Do some research on that topic.
 
Good advice above on checking paddles.  You may also want to go through cursor calibration procedure as a way to get more intimate with the machine:


From:
http://www.halfinchshy.com/2011/10/calibrating-festool-domino-cursor.html
 

sai1 said:
Just came back from my garage. ear3 you were right on point. I was applying downward and forward pressure to the fence handle, when I should just be applying pressure downwards after the Domino is in position. Everything turned out perfect now.
Also tried out the plastic support piece for the first time to use the narrow paddles. They are a tiny bit off in terms off centering, but I'll sand that down at some point.
 
Back
Top