ear3
Member
So I had to build this small ladder for a child's bunkbed, and deciding to go the domino route, I needed to come up with a way to place a pair of dominoes at a 14.5 degree angle in matched rows on the rails.
I'd seen some demonstrations on the FOG for louvered windows, where the domino itself serves as the spacer, so I decided to adapt the concept and create a single spacer that could be used on both the left and right rails of the ladder.
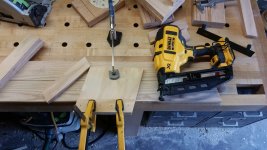
So I ripped some plywood to the desired inter-rung spacing (9 inches), and then cut it rhombus shaped on the miter saw to width, with the miter angle still dialed in to the 14.5 degrees I had used for the ladder rails. I cut it about 4 inches wider than the rail, so it would accommodate the two 1 7/8" fences that allowed the jig to butt up against the side of the rail.
Since the angle was the same as the rail, I simply lined up each fence along the edge of the jig, clamped it, and secured it with a nailer:
View attachment 1
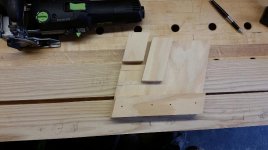
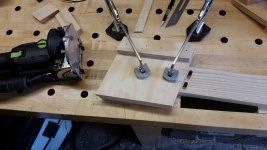
Because I'm using a single jig for both rails, the fences go on opposite sides of the spacer (one on top, the other on the underside). The other important part to getting consistent domino placement was to use small spacer blocks to mark on each side of the jig the mortise center line:
View attachment 2
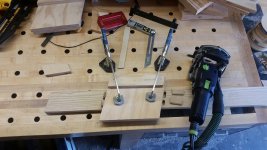
I actually made two jigs, a smaller one to set the first rung from the bottom of the rail, which was done by simply lining up the edge of the jig with the bottom of the rail:
View attachment 8
And then a larger one to set the spacing of the subsequent rungs. Doing the other rungs was straightforward. Once the first mortise were in, I inserted dominoes and butted up the bottom of the jig against them as well as the jig fence to the side of the rail, clamped it down, and plunged the next row of mortises:
View attachment 3
Rinse wash repeat for the remaining rows, then flipped the jig over to do the other rail:
View attachment 4
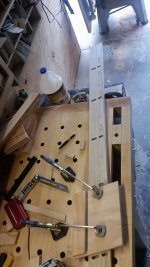
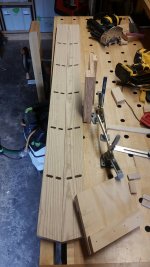
With the completed rails side by side you can see that the mortises line up (both jigs can be seen next to the rails):
View attachment 5
The rungs were parallel to the floor and evenly spaced when I dry fit the parts:
View attachment 6
So I clamped it up and am now just waiting for the glue to dry.
I'd seen some demonstrations on the FOG for louvered windows, where the domino itself serves as the spacer, so I decided to adapt the concept and create a single spacer that could be used on both the left and right rails of the ladder.
So I ripped some plywood to the desired inter-rung spacing (9 inches), and then cut it rhombus shaped on the miter saw to width, with the miter angle still dialed in to the 14.5 degrees I had used for the ladder rails. I cut it about 4 inches wider than the rail, so it would accommodate the two 1 7/8" fences that allowed the jig to butt up against the side of the rail.
Since the angle was the same as the rail, I simply lined up each fence along the edge of the jig, clamped it, and secured it with a nailer:
View attachment 1
Because I'm using a single jig for both rails, the fences go on opposite sides of the spacer (one on top, the other on the underside). The other important part to getting consistent domino placement was to use small spacer blocks to mark on each side of the jig the mortise center line:
View attachment 2
I actually made two jigs, a smaller one to set the first rung from the bottom of the rail, which was done by simply lining up the edge of the jig with the bottom of the rail:
View attachment 8
And then a larger one to set the spacing of the subsequent rungs. Doing the other rungs was straightforward. Once the first mortise were in, I inserted dominoes and butted up the bottom of the jig against them as well as the jig fence to the side of the rail, clamped it down, and plunged the next row of mortises:
View attachment 3
Rinse wash repeat for the remaining rows, then flipped the jig over to do the other rail:
View attachment 4
With the completed rails side by side you can see that the mortises line up (both jigs can be seen next to the rails):
View attachment 5
The rungs were parallel to the floor and evenly spaced when I dry fit the parts:
View attachment 6
So I clamped it up and am now just waiting for the glue to dry.
Attachments
-
 2017-06-22 07.03.34.jpg324 KB · Views: 1,578
 -
 2017-06-22 07.04.14.jpg47.4 KB · Views: 973
 -
 2017-06-22 07.05.34.jpg1,018.6 KB · Views: 864
 -
 2017-06-22 07.06.03.jpg1,007.7 KB · Views: 879
 -
 2017-06-22 07.06.26.jpg1 MB · Views: 1,029
 -
 2017-06-22 07.06.48.jpg1.1 MB · Views: 1,024
 -
 2017-06-22 07.04.59.jpg963.3 KB · Views: 1,094
 -
 2017-06-22 07.04.59.jpg963.3 KB · Views: 326