Domino question

NEW2FES

Member
Joined
Feb 22, 2012
Messages
96
  I currently use dowels and really have no issue expect speed is a bit slow. The main issue I have is securing the dowel jig so it does not move around while drilling hard woods. There are some inaccuracies that can multiply on pieces with multiple joints.

When using the Domino is the movement? Does it effect the joint? I guess the hardest joint would be building say a table top and having misalignment of face edge to edge. I don't have planer or sander to do larger tops to correct surface misalignment. Yes a plane can do it but want a more accurate start then the Jessem jig I am using now.

Thanks
 
The Domino is only as accurate as you make it. It does a great job of aligning panels. There is a feature to open up the mortise to allow some mis alignment down the length of a board. So what you do is make your the mortise on one. Lard tight on all the joints and on the mating board only the first mortise would be tight and the rest would be loose. I hope I explained that clearly.
 
There is a wealth of information on the Domino on Halfinchshy's YouTube videos. He goes through calibration and usage. With practice, you can get extremely well aligned surfaces. When I need a larger drum sander than the one I own, I take the piece to my Woodcraft store. They run it through a large sander and the cost is nominal.
 
There is no clamping so there is a possibility of movement if your technique is poor. You need hold the face plate of the tool still and when one pushes the tool to cut one cannot raise or lower the tool and the speed of the insertion needs to be slow enough to allow for the extraction of the waste. Dust collection is absolutely necessary. If too much saw dust or chips builds up within the mortise the bit will rise or fall and could possibly even break.

The tools have guide pins and accessory guide pins that can  help with the alignment of mortises.

Since this is hand held tool, there is the possibility of movement.

It is even possible to go back and fix some bad cuts like making them deeper or possibly even wider as needed.

 
Hi Newtofes,

I use the Domino a huge amount and am quite confident in telling you that it is an accurate and reliable method of jointing. Loads of people use the wider slot sizes to make an easy fit - I never do (except where expansion/contraction is required) as the whole process is just so spot on accurate.

I have made countless videos where I even amaze myself how easily and perfectly square things come together. The Domino is a key component in that .

The Domino is a game changer and is a delight to use.

Peter
 
NEW2FES said:
  I currently use dowels and really have no issue expect speed is a bit slow. The main issue I have is securing the dowel jig so it does not move around while drilling hard woods. There are some inaccuracies that can multiply on pieces with multiple joints.

When using the Domino is the movement? Does it effect the joint? I guess the hardest joint would be building say a table top and having misalignment of face edge to edge. I don't have planer or sander to do larger tops to correct surface misalignment. Yes a plane can do it but want a more accurate start then the Jessem jig I am using now.

Thanks
This- table top jointing- is an operation I have done several times and the result using a domino is as good as you can expect from the best of power tools. You will probably still need to clean up the joint with a plane, scraper or sanding block but the stock removal will be tiny. I prefer to use a domiplate (search the forum for more on this) for the most reliable and secure faceplate registration on the domino.

Incidentally, the discrepancies in the edge joint are usually more to do with flatness issues in the two boards than the domino machine or technique itself. Also it's very important that your edges are square as the domino cannot correct this error.
 
Properly jointed stock is important for any joinery regardless of method. 

The domino is a great tool, but it does have a learning curve.  Reading as much as you can will shorten the learning curve.  Mistakes that I made/game changing revelations include:

1. plunge slowly to minimize movement in the tool
2. plywood casework: insert and bottom out the dominoes in the shelf rather than the narrow sides to avoid blowouts
3. sometimes it's easier to ignore the fence and register off the bottom of the tool where the bit is always centered 10mm from the bottom edge
4. make sure your registration surface is ALWAYS the same even if your set-up is in theory centered
5. I don't have a Domiplate, but I have experienced drift, so check your settings frequently to make sure they haven't moved. 
6. if using the fence for height, make sure the domino body is not making contact on a work surface that could lift the mortise even a little

I'm sure there's more but that's what jumps to mind
 
I forgot to mention that the Domiplate is a wonderful addition to the Domino. It totally eliminates fence drift that can happen if you don't have the fence lock really tight. I bought some other aftermarket Domino add-ons when I bought the Domino. Never use them.
 
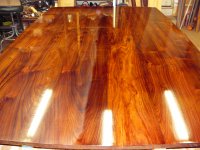
The Domino is perfect for joining up table tops.  I recently made a rosewood table where the table top boards were badly twisted in 4/4 rough stock.  I joined one surface and skipped planed the bottom barely yielding 3/4".  With the Domino referencing off the top "joiner surface" I was ably to glue together the 46" x 74" surface with only very minor sanding with my ETS 150/3.  If you look at the lower left of the picture you might be able to see where I had use epoxy to fill in the uneven bottom surface.  Without the Domino it would have been very difficult to yield the top thickness on that table.

I have made many solid wood tops with my Domino and there is almost no sanding required with proper plunging technique.

Jack
 

Attachments

  • P1010116(1).JPG
    P1010116(1).JPG
    2.3 MB · Views: 731
jacko9 said:
The Domino is perfect for joining up table tops.  I recently made a rosewood table where the table top boards were badly twisted in 4/4 rough stock.  I joined one surface and skipped planed the bottom barely yielding 3/4".  With the Domino referencing off the top "joiner surface" I was ably to glue together the 46" x 74" surface with only very minor sanding with my ETS 150/3.  If you look at the lower left of the picture you might be able to see where I had use epoxy to fill in the uneven bottom surface.  Without the Domino it would have been very difficult to yield the top thickness on that table.

I have made many solid wood tops with my Domino and there is almost no sanding required with proper plunging technique.

Jack
That is a beautiful top, love the grain, what did you finish it with?
 
adsjoin said:
jacko9 said:
The Domino is perfect for joining up table tops.  I recently made a rosewood table where the table top boards were badly twisted in 4/4 rough stock.  I joined one surface and skipped planed the bottom barely yielding 3/4".  With the Domino referencing off the top "joiner surface" I was ably to glue together the 46" x 74" surface with only very minor sanding with my ETS 150/3.  If you look at the lower left of the picture you might be able to see where I had use epoxy to fill in the uneven bottom surface.  Without the Domino it would have been very difficult to yield the top thickness on that table.

I have made many solid wood tops with my Domino and there is almost no sanding required with proper plunging technique.

Jack
That is a beautiful top, love the grain, what did you finish it with?

Thank you, I sealed the rosewood with 4 very thin coatings of super blonde shellac flakes dissolved in alcohol and let it dry for 24 hours.  I then diluted General Finishes Arm-R-Seal Oil & Urethane Topcoat Satin varnish with mineral spirits (15%) and applied it with a soft cotton rag wiping with the grain.  I applied two coats diluted and 4 coats full strength.

I have to admit, that it took some getting used to applying the varnish this way and I actually restarted the process (sanding back to wood) three times because of bubbles, specks of dust, etc.

One thing I discovered about half way through the process is that once a layer of varnish is cured, the next layer doesn't dissolve into that layer so, if you sand too heavy handed between coats you will see the multiple layers at low angles.

The finish is tough and very durable when done and it looks a lot like a natural oil and wax finish.

Jack
 
Thanks for the info.

I love my Jessem dowel jig but the biggest flaw is how they mfg'd the body. Th clamping pad is small and where it is at 90deg there is a radius that makes the clamp want to move. You have to use a small pad an seven then have to make sure it is on the flat surface. It is fast but it gets old spending 3 minute to make a 30 second dowel hole.
 
With the Domino promotion you might see if there is a live demonstration in your area that you could attend. You can see the tool in action and the presenter should provide information how to best use the product. You can also ask questions and talk to others there that have the tool.
 
Question, say you are joining two pieces of 3/4" plywood at a 90 degree butt joint.  In this application, I have heard that you make one mortise tight and the rest in the medium setting so you can have a little help with alignment.

For illustration picture two 36" long 3/4" panels that you are joining.  So a domino every 6" means 6 dominos (12 mortises {6 in each board}).  My question is do you only plunge one of the 12 mortises tight and the other 11 medium.  Or do you also plunge the mating hole of the "tight" one if that makes sense (so both sides of the one tenon are tight).  I've always understood that you plunge just one side of the tenon tight and the rest of the 11 plunges in this example would be the medium setting.

Is that correct?

Also, how far horizontally from the edge of your joint do you want to place your first and last domino?

Don T said:
The Domino is only as accurate as you make it. It does a great job of aligning panels. There is a feature to open up the mortise to allow some mis alignment down the length of a board. So what you do is make your the mortise on one. Lard tight on all the joints and on the mating board only the first mortise would be tight and the rest would be loose. I hope I explained that clearly.
 
Grasshopper, no all 6 mortises on the first board would be cut on the tight setting along with the first mortise on the second panel then the final 5 mortises should be cut on the medium setting. Common sense would indicate the mortise on the second panel to cut on the tight setting would be at the edge most critical to be aligned on the edge. This practice will hold the alignment flush from the reference surface the dominoes fence was placed on while allowing enough side to side play to assist on assembly. Just remember to account for the medium setting if you are trying to register your mortise spacer off from each other. ie:The mortise edge from the medium setting will be something like 3 mm wider than they would be on the tight setting so your subsequent mortises will get further and further apart. Jim.
 
Thanks for the reply.  I called Festool this morning to ask them what they recommend. 

I was told that what they teach in their Domino class is as follows:

In the case of my project, the first mortise will be tight on both sides of the "alignment" Domino.  They rest would be in the medium setting:

In other words, if I am doing 12 plunges with 6 tenons, the top one (top left and top right) would be tight for alignment on both sides of the tenon.  The remaining 10 (the 5 below my alignment mortise on both sides) would be set to the medium setting.

I had mentioned that I have played with other methods, like just one mortise tight and the remaining 11 medium for maximum adjustability.  Ultimately, they said that would be OK too, as it would still be as strong once the glue sets.

Sounds like much of this can boil down to preference (and whether or not you want some adjustability down the road for assembly).  Thought I'd pass on what I learned.
 
Grasshopper said:
Thanks for the reply.  I called Festool this morning to ask them what they recommend. 

I was told that what they teach in their Domino class is as follows:

In the case of my project, the first mortise will be tight on both sides of the "alignment" Domino.  They rest would be in the medium setting:

In other words, if I am doing 12 plunges with 6 tenons, the top one (top left and top right) would be tight for alignment on both sides of the tenon.  The remaining 10 (the 5 below my alignment mortise on both sides) would be set to the medium setting.

I had mentioned that I have played with other methods, like just one mortise tight and the remaining 11 medium for maximum adjustability.  Ultimately, they said that would be OK too, as it would still be as strong once the glue sets.

Sounds like much of this can boil down to preference (and whether or not you want some adjustability down the road for assembly).  Thought I'd  on what I learned.

You may have already tested this, but you might want to make sure that the left and right edge dogs/pins on the Domino face (for referencing of the board edge) are evenly spaced.  I was getting a .2mm millimeter offset (7-8 thousandths of an inch), which was visible to both eye and finger.  After swapping out one of the replacement dogs they include with the kit (which is narrower by .006), I got the offset down to less than .002.
 
Edward,

Thanks for the tip.  I actually am a "draw a line" reference kind of guy, never used the pins or paddles much.  I just got the Domiplate, so I draw a reference line on the boards I am joining and line up each plunge on that line.

So far so good!

By the way, I saw the cabinet you posted earlier today and it looked pretty awesome. Nice work!

Edward A Reno III said:
Grasshopper said:
Thanks for the reply.  I called Festool this morning to ask them what they recommend. 

I was told that what they teach in their Domino class is as follows:

In the case of my project, the first mortise will be tight on both sides of the "alignment" Domino.  They rest would be in the medium setting:

In other words, if I am doing 12 plunges with 6 tenons, the top one (top left and top right) would be tight for alignment on both sides of the tenon.  The remaining 10 (the 5 below my alignment mortise on both sides) would be set to the medium setting.

I had mentioned that I have played with other methods, like just one mortise tight and the remaining 11 medium for maximum adjustability.  Ultimately, they said that would be OK too, as it would still be as strong once the glue sets.

Sounds like much of this can boil down to preference (and whether or not you want some adjustability down the road for assembly).  Thought I'd  on what I learned.

You may have already tested this, but you might want to make sure that the left and right edge dogs/pins on the Domino face (for referencing of the board edge) are evenly spaced.  I was getting a .2mm millimeter offset (7-8 thousandths of an inch), which was visible to both eye and finger.  After swapping out one of the replacement dogs they include with the kit (which is narrower by .006), I got the offset down to less than .002.
 
Thanks man.

Grasshopper said:
Edward,

Thanks for the tip.  I actually am a "draw a line" reference kind of guy, never used the pins or paddles much.  I just got the Domiplate, so I draw a reference line on the boards I am joining and line up each plunge on that line.

So far so good!

By the way, I saw the cabinet you posted earlier today and it looked pretty awesome. Nice work!

Edward A Reno III said:
Grasshopper said:
Thanks for the reply.  I called Festool this morning to ask them what they recommend. 

I was told that what they teach in their Domino class is as follows:

In the case of my project, the first mortise will be tight on both sides of the "alignment" Domino.  They rest would be in the medium setting:

In other words, if I am doing 12 plunges with 6 tenons, the top one (top left and top right) would be tight for alignment on both sides of the tenon.  The remaining 10 (the 5 below my alignment mortise on both sides) would be set to the medium setting.

I had mentioned that I have played with other methods, like just one mortise tight and the remaining 11 medium for maximum adjustability.  Ultimately, they said that would be OK too, as it would still be as strong once the glue sets.

Sounds like much of this can boil down to preference (and whether or not you want some adjustability down the road for assembly).  Thought I'd  on what I learned.

You may have already tested this, but you might want to make sure that the left and right edge dogs/pins on the Domino face (for referencing of the board edge) are evenly spaced.  I was getting a .2mm millimeter offset (7-8 thousandths of an inch), which was visible to both eye and finger.  After swapping out one of the replacement dogs they include with the kit (which is narrower by .006), I got the offset down to less than .002.
 
I "cheat" by making all the mortises on one board narrow and all the mortises on the other board the wider width. That way, I get maximal latitude for adjustment. I've never had any problems with this technique.
 
Back
Top