A little salvage project on a dining rom table I built over 30 years ago.
Backstory: For some reason, I chose to use biscuit joints on the table aprons, don't remember why since I did use real M&T on the adjacent side aprons (you can see them exposed in some of the pictures). I probably thought I was being clever and "working smart". Those joints did not survive our move from Colorado to California. They broke apart at some point (not sure if it was the movers or all the jostling). So I tried to do a quick fix by retro fitting in pocket screws to reinforce them. Seemed to work, and it was relegated to being a desk for my son the last 15 years. But when he moved out last week, he asked to take the table with him. When we pulled it out, I found that the the pocket screws had stripped out, and on one joint they had actually broken deep in the leg.
So what to do?
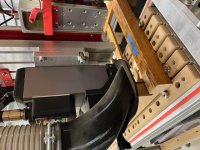
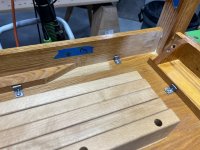
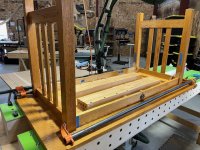
I ended up patching it back up with the CNC machine and the Domino.
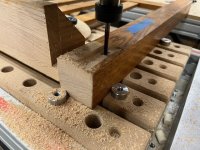
1) Drilled out the remaining screw material on the drill press
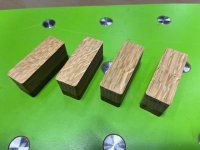
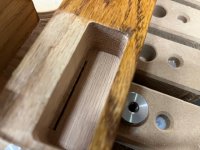
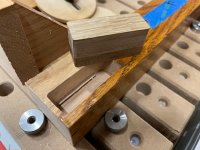
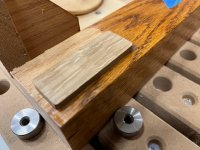
2) Cut custom pockets and matching wood inlays for all four joints to eliminate past scars (biscuits, screw holes)
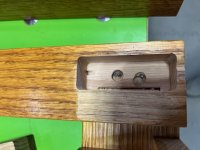
3) Filled old pocket hole pockets with oak pocket hole plugs (in prep for Dominos)
4) Cut in two 8 x 50 mm dominos on each joint (yes, should have used the D700, but I don't have it).
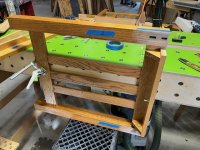
5) added in 12 new table top retention clips to secure it all better while still allowing for that huge solid oak top to expand
Walla! Very solid now. See pics below.
Backstory: For some reason, I chose to use biscuit joints on the table aprons, don't remember why since I did use real M&T on the adjacent side aprons (you can see them exposed in some of the pictures). I probably thought I was being clever and "working smart". Those joints did not survive our move from Colorado to California. They broke apart at some point (not sure if it was the movers or all the jostling). So I tried to do a quick fix by retro fitting in pocket screws to reinforce them. Seemed to work, and it was relegated to being a desk for my son the last 15 years. But when he moved out last week, he asked to take the table with him. When we pulled it out, I found that the the pocket screws had stripped out, and on one joint they had actually broken deep in the leg.
So what to do?
I ended up patching it back up with the CNC machine and the Domino.
1) Drilled out the remaining screw material on the drill press
2) Cut custom pockets and matching wood inlays for all four joints to eliminate past scars (biscuits, screw holes)
3) Filled old pocket hole pockets with oak pocket hole plugs (in prep for Dominos)
4) Cut in two 8 x 50 mm dominos on each joint (yes, should have used the D700, but I don't have it).
5) added in 12 new table top retention clips to secure it all better while still allowing for that huge solid oak top to expand
Walla! Very solid now. See pics below.
Attachments
-
 IMG_8499.jpg166.3 KB · Views: 89
 -
 IMG_8501.jpg104.7 KB · Views: 61
 -
 IMG_8503.JPG211.7 KB · Views: 74
 -
 IMG_8505.JPG225.2 KB · Views: 65
 -
 IMG_8507.jpg116 KB · Views: 55
 -
 IMG_8509.jpg133.8 KB · Views: 58
 -
 IMG_8510.jpg135.9 KB · Views: 48
 -
 IMG_8516.JPG166.8 KB · Views: 57
 -
 IMG_8538.JPG188.6 KB · Views: 64
 -
 IMG_8539.JPG222.9 KB · Views: 67
 -
 IMG_8540.JPG141 KB · Views: 63
 -
 IMG_8542.JPG243 KB · Views: 106