Domino usage question

DynaGlide

Member
Joined
May 16, 2017
Messages
1,697
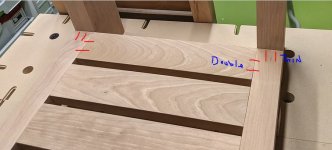
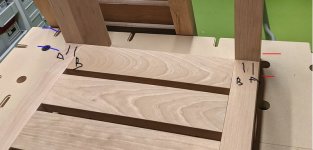
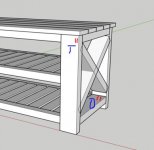
I'm working on a bench and it's coming up on time to do some joinery. I had planned on using the Domino but am having second thoughts.

i-gCHknSL-XL.png


i-MCZ45Zb-XL.jpg


i-R2LQdjf-XL.jpg


The legs are 1.5" or 37mm thick as are the 'rails'. According to the manual a domino at narrow width is 23mm + bit diameter, so 29mm for a 6mm domino or 28mm for a 5mm domino.

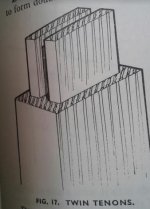
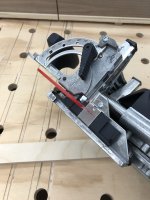
I'm not a furniture maker and anytime someone starts talking long grain to short grain my brain checks out. My first thought was to use the support bracket
aa33058f-245f-11e5-80cf-005056b31774_1600_1066.jpg
which has stops at 20mm and cut a spacer block to rest the support bracket on and support the Domino machine during the plunge on the legs. The mortises would be parallel to the top of the bench in this manner. 20mm in with a 29mm width mortise would only leave a few mm before blowing out though.

Not sure what to do on this one if anyone has any ideas. The last time I did a joint like this I used dowels but I sold my doweling jig after getting the Domino.

Thanks,
Matt
 
Looks to me this is a perfect project for the use of the Domino joinery. I'd use twin and double tenons, probably 8 x 40mm (unless yours is a DF700), in the way suggested in the image. I may even use 10 x 50mm in some places, but I can't be sure as I don't know the dimensions of the bench.
 

Attachments

  • DF twin tenons.JPG
    DF twin tenons.JPG
    47.2 KB · Views: 214
[member=57948]ChuckS[/member] The slats are already joined to the rails where you drew "Double".

So you'd do the tenons sideways (perpendicular to the top of the bench instead of parallel) to join the slat/rail section to the legs?

If I did it that way I could just work off of a pencil line. Line the parts up where I want them, mark a centerline on the rail and adjust the fence to get the 2nd tenon.
 
Like this in the first image. And use the tight setting only for all mating twin mortises for strength.

The stock thickness is 37mm, so with twin tenons, you still have 7mm of space on each side of the 8mm tenons, still in the ballpark of the 1/3 rule.
 

Attachments

  • DF twin.JPG
    DF twin.JPG
    31.2 KB · Views: 189
  • double twin tenons.JPG
    double twin tenons.JPG
    30.9 KB · Views: 172
Okay makes sense. I don't do furniture often so I couldn't wrap my head around it. I need to stop overthinking it and get it done.
 
Here are the suggested registration faces where you mark the placement lines. For max. efficiency, set the depth of the fence for the first (outer) tenons marked A in the image, and mill all legs and aprons. Then set the depth for the inner twin tenons (B), and mill the rest home.

Because you'll be using the scribed line on the sight gauge to align the machine with the pencil lines. it could be possible that some mating mortises don't align perfectly during dry fitting. Simply sand down or chisel one edge of the tenons concerned a hair.
 

Attachments

  • DF reference or registation face.JPG
    DF reference or registation face.JPG
    48.9 KB · Views: 218
Matt think about it this way those joints are in shear. The break away force is down, so you want the strongest alignment of the Domino aligned against that force. Having the dominoes vertical like Chuck suggests puts the strongest section up/down.

Ron
 
Thanks guys. I did my layout and stopped for dinner. I'm not sure how to do the short rails that will go between the legs and want to have that figured out before I do anything I can't undo. Same deal, make them vertical and stack them until I get near the already plunged mortises from the above picture [member=57948]ChuckS[/member] edited?
 
Assuming short rails are short aprons, the same twin (T) & double (D) tenons can be used.
 

Attachments

  • DF twin & dble.JPG
    DF twin & dble.JPG
    27.1 KB · Views: 189
[member=57948]ChuckS[/member] [member=3192]rvieceli[/member]

Success on the first go. I was extremely careful and used the narrow stop guide to line the machine up to my pencil marks on the rails and did both plunges before moving onto the next one. To get repeatability I used the 40mm thickness setting and a 2mm spacer for the lower/deeper of the two plunges. Everything fit together without any fussing.

Now to repeat that process a bunch of times for the rest of the frame pieces. Thank you for the helpful suggestions.

Matt

i-8BrsWxM-XL.jpg


i-xVPvxgX-XL.jpg
 
Looking good. Great for sharing the photos.

Narrow stop guide -- you mean the paddles on the support bracket?
 

Attachments

  • DF support bracket paddle.JPG
    DF support bracket paddle.JPG
    65.3 KB · Views: 159
ChuckS said:
Looking good. Great for sharing the photos.

Narrow stop guide -- you mean the paddles on the support bracket?

No it's that other attachment called the Trim Stop

493487_2__84686.1564598444.jpg
 
DynaGlide said:

Hi Matt, I can see how you would do the top mortise but once done, what changes/steps do you do to get the bottom mortise?  There must be a couple of ways to do this so trying to better understand how you did it.  Thank.
 
Rick Herrick said:
DynaGlide said:

Hi Matt, I can see how you would do the top mortise but once done, what changes/steps do you do to get the bottom mortise?  There must be a couple of ways to do this so trying to better understand how you did it.  Thank.

Sure Rick. Using the trim stop allowed me to keep the Domino in the same position on my pencil line. So I'd do a plunge at 10mm on the fence height which corresponds to the 20mm material thickness hard stop. Then take the machine off, change the fence to 22mm (40mm hard stop for material thickness of 40mm, plus I stuck a 2mm spacer between the hard stop and the fence to get my 22mm), and do the second plunge. The trim stop kept my pencil line location.

If my math is right, a 10mm fence height and a 6mm tenon leaves 10 - 6/2 = 7mm of meat between the first mortise and the edge of the material. The second mortise at 22mm stops at 22mm - 6/2 = 19mm from the face of the material. The first mortise goes from 7mm to 13mm from the face, then there's 6mm gap before the second mortise which is what the Supplemental manual calls for in terms of spacing when stacking Dominos in this manner.

Hope this helps
Matt
 
The Dominoes will make your bench nuclear proof! [big grin]...and done in one tenth of the time of dowels (exagg.)!
 
Thanks Matt, I have used the trim stop numerous times and I like it.  So you make the first plunge, reset the height and plunge again.  Simplest is best.  [smile]  I understand the concept of the spacer but can't visualize exactly where you put it.  When doing the bottom plunge, does the spacer go on top of the stock so that your fence now sits on the spacer, instead of the stock?
 
Rick Herrick said:
Thanks Matt, I have used the trim stop numerous times and I like it.  So you make the first plunge, reset the height and plunge again.  Simplest is best.  [smile]  I understand the concept of the spacer but can't visualize exactly where you put it.  When doing the bottom plunge, does the spacer go on top of the stock so that your fence now sits on the spacer, instead of the stock?

Oh, I should just take some pictures. You know the hard stops on the Domino for different thicknesses? 20, 22, . . 40, etc? I just stick a 2mm spacer there before pushing the fence down. Tighten it up, take out the spacer. Kind of what you'd do to set the depth on a router.
 
Ok, I think I get it now.  Again, simplest is best.  I use these FastCap shims a lot.  Looks like another use for them.
 

Attachments

  • domino-spacer1.jpg
    domino-spacer1.jpg
    145.3 KB · Views: 209
  • domino-spacer2.jpg
    domino-spacer2.jpg
    130.9 KB · Views: 190
That looks great Matt. The whole piece is coming together nicely. Thanks for the pics.

Ron
 
Back
Top