You are using an out of date browser. It may not display this or other websites correctly.
You should upgrade or use an alternative browser.
You should upgrade or use an alternative browser.
Dormer window
- Thread starter tiralie
- Start date
tjbnwi
Member
- Joined
- May 12, 2008
- Messages
- 7,391
tiralie
Member
- Joined
- Jan 26, 2010
- Messages
- 3,614
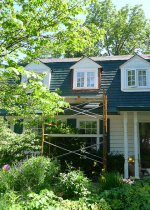
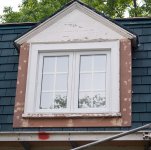
Ok, here is today's effort.
I picked up some brackets (thanks for the reminder Brice) and headed off to the site where I had my scaffolding delivered. I set up the scaffolding after thoroughly tromping the owners garden.
[attachimg=#]
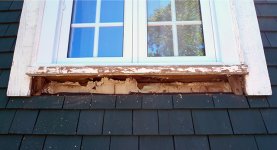
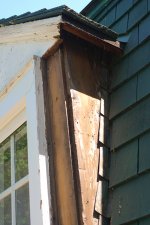
I then pulled off the apron and found this. Doesn't really look too bad. The sill is not in great shape, but a good scraping and some minor repair should get back in shape. No water damage, just a bunch of wasps nests.
[attachimg=#]
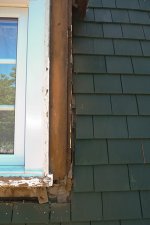
I then pulled off the side casing...and found that the dormer did have some sheeting, well more like boards, but at least that.
[attachimg=#]
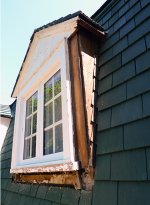
And then removed the side panels (left and right) and found that it was indeed flashed. This looks like it is the original lead based flashing.
[attachimg=#]
Here's a close up of the top. I had to remove the molding at the top to remove the side panel.
[attachimg=#]
I got some Miratec (waterproof MDF) cut it to size and primed it. Ready for installation tomorrow.
[attachimg=#]
Tim
I picked up some brackets (thanks for the reminder Brice) and headed off to the site where I had my scaffolding delivered. I set up the scaffolding after thoroughly tromping the owners garden.
[attachimg=#]
I then pulled off the apron and found this. Doesn't really look too bad. The sill is not in great shape, but a good scraping and some minor repair should get back in shape. No water damage, just a bunch of wasps nests.
[attachimg=#]
I then pulled off the side casing...and found that the dormer did have some sheeting, well more like boards, but at least that.
[attachimg=#]
And then removed the side panels (left and right) and found that it was indeed flashed. This looks like it is the original lead based flashing.
[attachimg=#]
Here's a close up of the top. I had to remove the molding at the top to remove the side panel.
[attachimg=#]
I got some Miratec (waterproof MDF) cut it to size and primed it. Ready for installation tomorrow.
[attachimg=#]
Tim
Attachments

tiralie
Member
- Joined
- Jan 26, 2010
- Messages
- 3,614
tjbnwi said:
Tom:
Doesn't look like we have that here either....I will call them.
You guys down there get all the good stuff.
Tim
tjbnwi
Member
- Joined
- May 12, 2008
- Messages
- 7,391
Tim Raleigh said:tjbnwi said:
Tom:
Doesn't look like we have that here either....I will call them.
You guys down there get all the good stuff.
Tim
Cardboard then (if you can get it), just make sure it is well sealed. [big grin]
Tom
tiralie
Member
- Joined
- Jan 26, 2010
- Messages
- 3,614
Since I am supposed to be doing something else, I thought I would update this post.
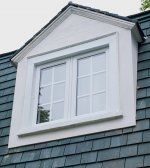
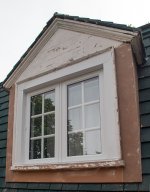
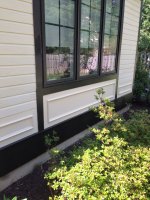
Friday (last) I installed the casing and filled the holes etc.
[attachimg=#]
On Monday I went back and sanded the wood filler with the RO 90
[attachimg=#]
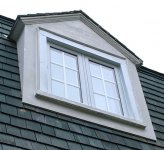
and primed with some SW oil based primer...
[attachimg=#]
...caulked and took down the scaffold...
[attachimg=#]
I am done that one for now. The clients have a bunch of painting on the rest of the house so they just wanted it primed for now.
I will probably go back later in the summer for the other 5. We'll see.
Tim
Friday (last) I installed the casing and filled the holes etc.
[attachimg=#]
On Monday I went back and sanded the wood filler with the RO 90
[attachimg=#]
and primed with some SW oil based primer...
[attachimg=#]
...caulked and took down the scaffold...
[attachimg=#]
I am done that one for now. The clients have a bunch of painting on the rest of the house so they just wanted it primed for now.
I will probably go back later in the summer for the other 5. We'll see.
Tim
Attachments
curt boyer
Member
- Joined
- Jun 8, 2007
- Messages
- 201
Tim
We did a small Sun room rot repair job today, and the star attraction was Boral! It was the first time we used and it went pretty easy. We had to make outside corners which we used butt joints, glued with PL premium, and shot together with gun driven 8d ss ring shank nails. You can nail very close to the edge without blowout. We used normal carbide blades in the miter saws and the tablesaw.
The edges need to be sanded even when using fine blades. When sanding the edges I used my Ro90 on ro mode with 120 it sanded very nice. You'd be tempted to use rotex mode but it doesn't leave the edge straight or smooth. I had the vac on full and it didn't get all the dust.The dust is very fine like baby powder and covered all the saws even with dc. The cut edges are easy to damage so sanding or routing are a good option.
You don't have to prime the cuts like you do with our crappy wood we have today. You aren't limited with paint colors like Azek. You can't paint Azek dark colors. We needed to paint the repaired pieces dark green which isn't a problem with Boral. The Boral is heavy in weight but lays flat on the wall unlike Azek which follows every little bump or valley. It was close to 90 today and we worked in full sun all day with the pieces of Boral sitting on the grass in the sun. They weren't hot to the touch where as the Azek trim pcs were very hot to the touch.
The Boral is available at least for us in 1x4 to 1x12 and 5/4x4 to 5/4x12 , 2xs will be available soon, no sheet stock, and no mouldings yet. Apparently a third party is going to be manufacturing the moulding according to our lumberyard rep. The pricing is 15 to 20 percent cheaper than Azek and you don't have vacuum the lawn to remove the snow pile left over when using Azek. We are doing another repair job tomorrow where we will be making some thick window sills out of Boral and I will let you know how it went.
Here endth the lesson!
Cheers
Curt
tiralie
Member
- Joined
- Jan 26, 2010
- Messages
- 3,614
Thanks Tom.
I will probably go back later in the summer and finish the other five. I will probably use some Duraboard PW instead of the waterproof cardboard.
Gotta get this kitchen project finished...
I called guys at Boral to see if they were distributing in Canadabut no response yet and got a great email from the Director of Sales this AM offering to send me a piece to use on a project.
I have directed him to this board.
I see they have a job posted to rep the south east so maybe some day.
Tim
I will probably go back later in the summer and finish the other five. I will probably use some Duraboard PW instead of the waterproof cardboard.
Gotta get this kitchen project finished...
I called guys at Boral to see if they were distributing in Canada
I have directed him to this board.
I see they have a job posted to rep the south east so maybe some day.
Tim
tiralie
Member
- Joined
- Jan 26, 2010
- Messages
- 3,614
tiralie
Member
- Joined
- Jan 26, 2010
- Messages
- 3,614
curt boyer said:Tim
We did a small Sun room rot repair job today, and the star attraction was Boral!
Curt:
Thanks for the info. Definitely gonna try to use some soon.
Got any pictures of your project? Would love to see it.
Tim
curt boyer
Member
- Joined
- Jun 8, 2007
- Messages
- 201
Tim
I'll post pictures tomorrow. Do you have access to MDO plywood. For small dormers less than 8' in length it's a good option.
Curt
I'll post pictures tomorrow. Do you have access to MDO plywood. For small dormers less than 8' in length it's a good option.
Curt
curt boyer
Member
- Joined
- Jun 8, 2007
- Messages
- 201
Hi Tim
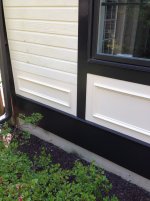
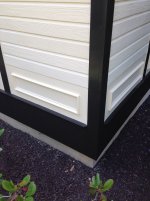
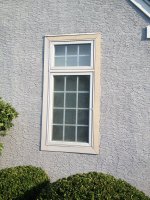
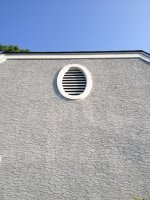
Here are the pictures of the repair work I have been doing lately using Boral. Just got another job repairing trim on a stucco house, third one this week.
Curt
[attachimg=#]
[attachimg=#]
[attachimg=#]
[attachimg=#]
[attachimg=#]
Here are the pictures of the repair work I have been doing lately using Boral. Just got another job repairing trim on a stucco house, third one this week.
Curt
[attachimg=#]
[attachimg=#]
[attachimg=#]
[attachimg=#]
[attachimg=#]
Attachments
CarolinaNomad
Member
- Joined
- Sep 17, 2010
- Messages
- 306
Tim,
I sent you a PM about Borat.
Jeff
I sent you a PM about Borat.
Jeff
tiralie
Member
- Joined
- Jan 26, 2010
- Messages
- 3,614
curt boyer said:Tim
I'll post pictures tomorrow. Do you have access to MDO plywood. For small dormers less than 8' in length it's a good option.
Curt
Curt:
Thanks for the photo's. Looks good.
We have MDO here and I have used it on exterior projects but I don't like to use it if I have an exposed edge.
It will delaminate over time.
Tim
Similar threads
- Replies
- 2
- Views
- 1K