Drill press vises

Michael Kellough said:
“Stripped and oiled”

Long time ago when just starting out with no money I’d go to garage sales religiously to find good quality old tools that didn’t look good anymore so I could buy them cheap. I’d clean the rust off with a wire wheel and wipe the whole thing (handle and all) with plain old boiled linseed oil and set it aside to dry for a few days. Most of that stuff now stays in an unheated metal shed less than a mile from the NY harbor and they haven’t acquired any new rust in the decades since oiled.

That's funny but interesting.
Your first statement really rang true with me...the no money issue...we've all been there and it immediately brings me back to my 1958 Chevy Impala 348 with 3 deuces. Having no pesos and needing new hydraulic lifters, I decided my only viable choice was to clean and rebuild the existing lifters. Unfortunately, ignorance is bliss so I happily proceeded to disassemble all 16 lifters, clean all the parts in a single batch and that's when I found out that each part was originally paired up with its mating part. Well it took me a week to finally find which parts mated with each other.

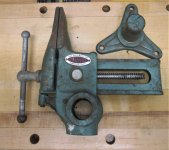
I digress, thanks for that [member=297]Michael Kellough[/member]  as I mentioned, I do like the color and the rawness of the cast iron/steel surfaces on Will-Burt but am not sure how well it will maintain its "Good Looks" when exposed to humidity and my acidic paws. Also, working with Will-Burt today, my hands became slightly oily but more on the black, dirty side. I have qualms about accidentally transferring that combo to the wood surfaces I'm working with.

Does the boiled linseed oil ever "Dry"?
 
Does the boiled linseed oil ever "Dry"?

Yes, but it does take a while. Days to be able to pick the part up without sticking to it. Okay, that’s a little exaggeration but it does stay rubbery for a good while. Even months later there can be a little bit of tackiness when handling the metal part of a tool coated with BLO. Surprisingly it doesn’t accumulate any more dust than anything else.

And I like the slightly olive color it adds to the patina of old steel.
 
Michael Kellough said:
And I like the slightly olive color it adds to the patina of old steel.

I could be all in on the olive tint.  [big grin] [big grin]  It becomes a rather retro artifact.

When handling the item do your hands become dirty, black, do they acquire some type of coating that could be transferred to the wood?
 
Michael Kellough said:
Does the boiled linseed oil ever "Dry"?

Yes, but it does take a while. Days to be able to pick the part up without sticking to it. Okay, that’s a little exaggeration but it does stay rubbery for a good while. Even months later there can be a little bit of tackiness when handling the metal part of a tool coated with BLO. Surprisingly it doesn’t accumulate any more dust than anything else.

And I like the slightly olive color it adds to the patina of old steel.

I've used Tung Oil and it seems to dry much quicker, no tackiness the next day. I used it on a cast iron outdoor bench with wood back and seat slats that sits on our porch about 5 years ago. It's held up well, but it doesn't see much direct sunlight.
 
Tung oil is good stuff. Both tung and linseed (flax seed) polymerize naturally. When dry nothing comes off on your hands, unlike real petroleum oil which never dries. But it’s very difficult to get good quality linseed oil in the states. Instead of nice cold pressed oil we are offered filtered crushed stuff adulterated with driers and other stuff. It also darkens with age. For nice wood projects go with Tung oil but for protecting an old piece of iron blo is perfectly fine.

Pretty sure the stuff I used back then was already old and getting too icky for use on nice wood so I figured there was nothing to loose by coating old cleaned tools with it.

You can get a heavier film with Tung oil if it’s 100% pure, unadulterated with thinners.
 
Versa vise restoration in progress.  Stripped, cleaned, de-rusted.  I really miss Methylene Chloride based paint strippers.  I soaked the parts in acetone for 24 hrs and still had to scrub like crazy with wire brushes.  All I need to do now is a little touch up with the belt sander on the jaw sides, then paint, lube and reassemble.

Before
[attachimg=1]

In process
[attachimg=2]
 

Attachments

  • IMG_4231.jpg
    IMG_4231.jpg
    1.4 MB · Views: 1,221
  • IMGP9369.jpg
    IMGP9369.jpg
    246.4 KB · Views: 1,312
That looks good Dick... [thumbs up]

I'm surprised at how well the handle assembly cleaned up. Just acetone and a scrubbing on the handle?

Nice that you were also able to pull the name plate off.  [big grin]  There's not much room inside to get at the rivets/pins.
 
Cheese said:
That looks good Dick... [thumbs up]

I'm surprised at how well the handle assembly cleaned up. Just acetone and a scrubbing on the handle?

Nice that you were also able to pull the name plate off.  [big grin]  There's not much room inside to get at the rivets/pins.

Thanks Cheese.  The handle cleaned right up with a 4" wire wheel in my drill.  The pins weren't too difficult.  Indeed there isn't much room in that casting to work on pushing the pins out.  I snapped a 0.065" jobbers drill to the right length, then used a pair of opposing cold chisels as wedges to extract the pins just far enough to get a pair of electricians nippers beneath the head to pull them out.  They're in there pretty good as they have knurled bodies and a tight fit in the casting.

[attachimg=1]

[attachimg=2]
 

Attachments

  • Broken 0.065 in jobbers drill for pin removal.jpg
    Broken 0.065 in jobbers drill for pin removal.jpg
    230.4 KB · Views: 1,088
  • Pins extraction started.JPG
    Pins extraction started.JPG
    159 KB · Views: 1,076
Restored the Versa Vise.  Now its time to fab up the MFT and dog mounts shown earlier by Richard/RMW and Cheese.  Thanks for the inspiration.  [big grin]

[attachimg=1]
 

Attachments

  • Versa Vise After Restoration.jpg
    Versa Vise After Restoration.jpg
    632 KB · Views: 1,362
Dick Mahany said:
Restored the Versa Vise.  Now its time to fab up the MFT and dog mounts shown earlier by Richard/RMW and Cheese.  Thanks for the inspiration.  [big grin]

[attachimg=1]

[member=59951]Dick Mahany[/member] she's a beauty!

Gotta admit my initial attraction (aside from the duck-bill jaws) was the curves on the end of the screw handle thingie, it's just a classic look compared to the new, square ones.

I need to meet her cousin with the shorter jaws.

Enjoy.

RMW
 
Continuing this thread, here are 2 different sets of jaw vise inserts that may be of interest to the Will-Burt aficionado's out there.

The first is a set of aluminum based & cork covered inserts that allow tapered items to be held securely while still cushioning the held items. Pretty inexpensive at $18 from Amazon and a currently available item from Shop-Fox. However they do need to be modified to fit the early style Will-Burt vises because of the slight bump-out at the front of the jaw throat.
https://www.amazon.com/Shop-Fox-D31...f=sr_1_2?keywords=d3126&qid=1568645812&sr=8-2

[attachimg=1]

[attachimg=2]

Here's an example of it securely holding a cold chisel.

[attachimg=3]

And here's a set of cork covered jaw inserts fabricated from 6 mm ply that have magnets to secure them to the Versa-Vise jaws for flat/straight items.

[attachimg=4]

[attachimg=5]

[attachimg=6]
 

Attachments

  • 7838.JPG
    7838.JPG
    839.4 KB · Views: 939
  • 7837.JPG
    7837.JPG
    370.9 KB · Views: 888
  • 7836.JPG
    7836.JPG
    420.7 KB · Views: 887
  • 7834.JPG
    7834.JPG
    287.6 KB · Views: 934
  • 7835.jpg
    7835.jpg
    270.4 KB · Views: 944
  • 7830.jpg
    7830.jpg
    462.4 KB · Views: 931
Cheese said:
I think the extended height jaws will be nice for sheet metal fabrication.

Well yesterday I had my opportunity to try that application out.

I was fabricating a rain diverter that needed to be bent at a 45º angle. I was using a long piece of 8020 as a pan brake and unfortunately there was some material slippage. As a result, the bend had a lot of curvature to it. I decided to abandon the 8020 and clean up the bend with the deep jaw Will-Burt vise.

Before

[attachimg=1]

[attachimg=2]

After

[attachimg=3]
 

Attachments

  • 7849.jpg
    7849.jpg
    260.8 KB · Views: 871
  • 7850.JPG
    7850.JPG
    763.4 KB · Views: 846
  • 7851.JPG
    7851.JPG
    767.7 KB · Views: 834
Back
Top