Drilling the first 5mm hole in the middle of a 19mm thick board

Creativemike

Member
Joined
Feb 25, 2019
Messages
12
Hi everyone!  I recently bought the track saw, the router, LR32 and a bunch of other things.

Is there a way to drill the first 5 mm hole half the distance of a typical 3/4” (19 mm) board?

Here in Chicagoland, MDF is typically a hair thinner than 19 mm (3/4”) and melamine is about 1/64” thicker than 3/4”.

Also, does anyone have a jig they made for cross cutting their boards (using the track saw, so they essentially have a stop at every 32mm?
 
It’s difficult for me to understand your question(s) so my answers may be off the mark.

My method for drilling a hole exactly in the center of a board is as follows. I set an adjustable Starrett square to what looks like half the board width and make a mark. I do the same from the other side of the board. I readjust the square until the two lines overlap. If the board is too wide for the Starrett adjustable square, I do, essentially, the same thing with a tape measure.

I always use a center punch to start the hole. This prevents the drill bit from skittering and making the hole in the wrong place.

I don’t understand the question about the cross cutting jig. Sorry.
 
Sorry for being confusing.

When doing say closet systems, there are holes drilled “half” the thickness of a shelf from the end of the panel, assuming a panel is made in 32mm increments. I knowvthe LR32 will drill them evey 32 mm, but rather than drill them every 32mm and then go backwards in steps to cut the final length so the last hole on either end ends up falling “exactly” on the center of say a 3/4” board, is there an easier way?
 
The LR32 comes with two end stops to put on the rails.  Have you looked at those for your spacing from the top/bottom?
 
Mike,  I think I understand what you are looking for.. you want to start the holes at about 3/8" from the end, right? I install a fair amount of closet systems and sometimes have to fabricate a partition or two.  Though not a great answer for production,  I've just cut a spacer block to place between the rail stop and panel to position the rail holes as needed.

I've often thought about just taking one of the  lr32 rail stops and cutting it to the right length for this purpose.  I might do some grinding tomorrow in the shop...
bfced3d931057010071954881fe402c0.jpg


Sent from my SM-T580 using Tapatalk

 
Creativemike said:
Sorry for being confusing.

When doing say closet systems, there are holes drilled “half” the thickness of a shelf from the end of the panel, assuming a panel is made in 32mm increments. I knowvthe LR32 will drill them evey 32 mm, but rather than drill them every 32mm and then go backwards in steps to cut the final length so the last hole on either end ends up falling “exactly” on the center of say a 3/4” board, is there an easier way?

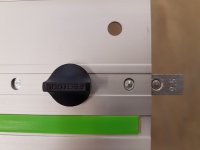
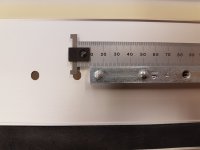
In a word, yes.  Use the guide rail index set to the 9.5mm position.  That will place the first hole 9.5mm from the end of the partition and very close to dead center on the shelf or top.  Once that is set, the remainder of the holes will be on 32mm increments.  If you don't understand, let me know.  I'll get a picture when I head to the shop tomorrow. 
 
See? I need to update my rail stops!!  I just have the old originals without the 9.5. Thanks Spark.

Sent from my SM-T580 using Tapatalk

 
[member=3130]Dan Rush[/member] - When you set up, put the 9.5 marker up and out.  Flip the rail and check measure from the end of the stop to the center of the closest hole in the rail.  You'll get 9.5 mm. 
 

Attachments

  • 20190226_091122.jpg
    20190226_091122.jpg
    3 MB · Views: 388
  • 20190226_091107.jpg
    20190226_091107.jpg
    3.7 MB · Views: 383
[member=7493]Sparktrician[/member]

Thanks Sparky,

I wondered what the 9.5 was for. I learned something today
 
Another thing to remember is that when you're designing your casework, design the sides to an increment of 32mm and add 19mm to that.  This will allow you to lock in your indexes on the holy rail at the correct overall length of the casework sides such that the top and bottom shelves (permanent) will be flush with the top and bottom of the sides (respectively).  [smile]
 
Can someone point to a picture of a closet system where this would come into play? I'd like to understand more about where/why a hole at 9.5mm is desirable. I've never built or worked with one so it may be obvious to those that have.
 
Here's a picture of one I'm installing today. 
6777049851a48903edcd85b3984934de.jpg


Sent from my SM-J337V using Tapatalk
The top of the cabinet sits between the two uprights in the first pin,  3/8" or 9.5mm.
 
Dan Rush said:
Here's a picture of one I'm installing today.

Can you provide any more info regarding the plastic upper attachment hardware? I haven't seen anything like that before and they look interesting.
 
It's a pretty typical connection for RTA furniture and closet systems.  These are Titus series 6 brand connectors,  almost identical to Rafix 20.
The top pic shows the connectors installed and one loose. Second shows the pins, one installed.  In our first example,  the top shelf is lowered onto the pin, then the connector screw is turned 1/2 turn to tighten. There are some good you tubes showing how they work.
0349a8d6593f5f534c509e272a4abfcb.jpg
275bf136f0a6c3e82c4c66be92f26e6c.jpg


Sent from my SM-J337V using Tapatalk

 
[member=7493]Sparktrician[/member] and [member=3130]Dan Rush[/member], thanks much for the information.  I have been contemplating building a closet system and need to look into these.  I'm sure they are more economical than the Festool connectors.  [smile]  I like the second anchor stud for increased strength.
 
Back
Top