DW735 Planer and Byrd Shelix Head Cutter

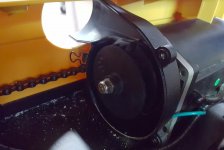
The blower is mounted to the motor shaft.  One side of the fan cools the motor, the other side blows the chips.  Some guys simply remove the fan all together and see a sizable noise reduction.  I wouldn't do that though because it offers an access point for chips into the motor if you ever forget to turn on the dust collector. 

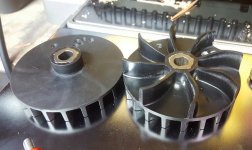
Instead what I did was purchase a replacement fan and had a machinist friend remove the blower side fins.  The motor is protected and cooled but the blower no longer functions.  You absolutely have to use dust collection though because it will clog without it.

I ended up selling my DW735 shortly after I had the fan made.  I used it on the machine maybe 2 weeks before I purchased a 1960's Powermatic 100 12" and sold the Dewalt.

If someone is interested in the fan I'll sell it for what I paid.  I take no responsibility for whatever happens to your machine by installing it though.  It is for sure a warranty voider.  That said, it worked very well for me.    $20+shipping (~$3-5). PM Me if you're interested. 


Attachments

  • Screen Shot 2018-11-09 at 6.14.14 PM.jpg
    Screen Shot 2018-11-09 at 6.14.14 PM.jpg
    118 KB · Views: 378
  • Screen Shot 2018-11-09 at 6.14.05 PM.jpg
    Screen Shot 2018-11-09 at 6.14.05 PM.jpg
    178.5 KB · Views: 409
I have always believed that the reason my cyclone did such an efficient job of dust/chip collection with the 735 is the blower. I used the same cyclone with a Delta table top planer before I owned the 735 and the collection was not as good. Because of this, I don't believe the blower is redundant. Plus, why mess with a good thing. Just wear hearing protection. That's a great idea regardless of whether it would reduce the sound level or not.
 
grbmds said:
…Plus, why mess with a good thing. Just wear hearing protection. That's a great idea regardless of whether it would reduce the sound level or not.

A few reasons:

[list type=decimal]
[*]For the cat and dog - they like to hang out in the shop with me and I like their company. For some reason they don't leave when I turn the machines on. Don't ever try to put earmuffs on a cat. Trust me on that one.
[*]For the neighbors, I hate their leaf blowers, don't imagine they will be to fond of my planer.
[*]For me, even with earmuffs the noise is unpleasant.
[/list][*]And, last but not least, because I'm a hacker by nature and I love figuring out how to make things better.
[/list]
 
About 18 months ago I installed a Shelix cutter in my DW735 planer. It was a pretty easy conversion and only took 90-120 minutes. The biggest issue is to partially disassemble the unit to make sure you have the proper snap ring pliers on hand.

Since that time I've planed fir, aromatic cedar, Ambrosia maple and more recently Birds-eye maple. Recently, I noticed quite a few small lines in the birds-eye.

The original plan was to locate the damaged inserts and then rotate them 1/4 turn. Upon opening up the planer it became obvious that it wouldn't be quite as simple as that.

Inserts with large or medium chips are easy to spot, however on some of the inserts the small chips can really only be felt by using your finger nail. And then there were the cracked inserts, difficult to see when looking inside the planer.

I decided to remove them all, clean up the seats, inserts, screws and reinstall all of them. It took about 60 minutes.

On this photo left to right:
Broken insert, cracked insert, large chip, medium chip & tiny chip.

[attachimg=1]

Here's an enlargement of the tiny chip. The best way to locate these is to run your finger nail along the surface. I found about 8-9 of these once I removed and inspected everything.

[attachimg=2]

Here are the cracked inserts. To locate these you need to run your fingernail on the top surface of the insert as each will have a slight offset that you will be able to feel.

[attachimg=3]

Retorque to 40-45 inch/pounds. For a couple of inserts you can use a simple screwdriver torque wrench. If you're doing more than that, I'd suggest a typical long handled clicker type torque wrench.
 

Attachments

  • 9331.jpg
    9331.jpg
    219.3 KB · Views: 675
  • 9334.jpg
    9334.jpg
    148 KB · Views: 667
  • 9336.jpg
    9336.jpg
    242.7 KB · Views: 727
Cheese, that's a lot of damaged inserts for even a serious hobby (I assume) use over 18 month. Poor carbide quality or over torquing?
 
Svar said:
Cheese, that's a lot of damaged inserts for even a serious hobby (I assume) use over 18 month. Poor carbide quality or over torquing?

Svar, I think it could be a combination of both. I’m going to shoot Byrd an email with some photos.

I purchased the smaller diameter cutter assembly so I did no previous torqueing to the inserts. Maybe they weren’t properly seated when torqued?  Or just a brittle batch of inserts?
 
You're making me think twice about installing my conversion cutterhead. I bought it a while back but decided I would use up the blades I had before making the changeover. SInce I have 3 spare sets of blades and they have two cutting edges each it may be a while, or never, before I change them out for the Shelix cutterhead.
 
Cheese said:
"Retorque to 40-45 inch/pounds. For a couple of inserts you can use a simple screwdriver torque wrench. If you're doing more than that, I'd suggest a typical long handled clicker type torque wrench."

Hi [member=44099]Cheese[/member]  Thanks for the heads up on the inserts.  And sorry you had so much trouble with yours!

I was lucky to find a new shelix cutterhead (small diameter) at an auction for a great price.  I haven't installed it yet, but before I do, I was looking at getting a torque wrench to have on hand in case I needed it.  Based on your experience, it might be wise to recheck the cutters before I install it.  In another thread [member=37411]ear3[/member] recommended the Wera screwdriver type and that looks like a good choice, but I was wondering what other light duty torque wrenches would be good for occasional uses like this.  Are there any that are recommended?

Thanks, Mike A.
 
Cheese said:
About 18 months ago I installed a Shelix cutter in my DW735 planer. It was a pretty easy conversion and only took 90-120 minutes. The biggest issue is to partially disassemble the unit to make sure you have the proper snap ring pliers on hand.

Since that time I've planed fir, aromatic cedar, Ambrosia maple and more recently Birds-eye maple. Recently, I noticed quite a few small lines in the birds-eye.

The original plan was to locate the damaged inserts and then rotate them 1/4 turn. Upon opening up the planer it became obvious that it wouldn't be quite as simple as that.

Inserts with large or medium chips are easy to spot, however on some of the inserts the small chips can really only be felt by using your finger nail. And then there were the cracked inserts, difficult to see when looking inside the planer.

I decided to remove them all, clean up the seats, inserts, screws and reinstall all of them. It took about 60 minutes.

On this photo left to right:
Broken insert, cracked insert, large chip, medium chip & tiny chip.

[attachimg=1]

Here's an enlargement of the tiny chip. The best way to locate these is to run your finger nail along the surface. I found about 8-9 of these once I removed and inspected everything.

[attachimg=2]

Here are the cracked inserts. To locate these you need to run your fingernail on the top surface of the insert as each will have a slight offset that you will be able to feel.

[attachimg=3]

Retorque to 40-45 inch/pounds. For a couple of inserts you can use a simple screwdriver torque wrench. If you're doing more than that, I'd suggest a typical long handled clicker type torque wrench.

Years ago I did this mod. I put the head in tested it and the planer sat for two months before I need to use it. I took the dust cover off and saw debris under the cuter head. It was parts of the inserts! Ends up Byrd had a quality spill and some heads were defective. There were some holes not threaded deep enough.

These are very touchy inserts. When rotated you need to remove them and completely clean them and the seats on the head for debris. I also made sure the screws freely threaded into the holes and had to chase a few. Then when torquing make sure the inserts set flat against the stop and not tilted.

 
[member=49475]patriot[/member] I have owned the 735 for at least 10 years (but have truly forgotten what year I bought it). I think the Byrd heads would be a great upgrade and have always believed that Dewalt should offer that as an option (but, for some reason, they don't value my opinion). I do own a Jet 8" joint with helical head and love it. On straight grain woods the surface isn't any better but on wood which isn't straight, it's much better. Then, of course, you don't have to remove, sharpen, and replace the knives. For me, that's the best.

I have not upgraded to the Shelix head on the 735 for several reasons (specific to me admittedly):

1. My planer is now over 10 years old. While it shows no signs of dying, who knows? If I had to buy new right now, I most likely would upgrade with installation of the shelix head.
2. I would most likely find a local shop to install the head for me as I'm not that mechanically inclined. I've watched the videos and, despite what some say, I personally wouldn't do it. I might be successful, but I might not be (again it's my comfort level). Of course, having the head installed ups the price considerably and, for a 10+ year old planer, it's just not worth it.
3. My experience with the 735 is different than most concerning the factory knives. I've always been able to find new blades at some sort of a discount somewhere, so they are then more affordable. I also found that taking larger bites with the blades gives them a shorter life. I have never believed that benchtop planers are designed to take more than 1/16" at a time. I mostly take less than that. I have found a jig (and there are plans online to make similar jigs) which allow me to hone the knives at least once which means I get at least 2 lives from each set; thus at least half the cost.
4. I'm not a professional cabinet maker, furniture maker, carpenter, remodeler, etc.; just do this as a hobby. Therefore, my use of the planer would be much different than someone who is a professional in these areas. If I were, I would probably think replacement of the steel knives a bigger issue.
5. I don't feel the noise level is a problem. That's what good hearing protection is for.
6. I'm also a firm believer that machines are designed to work best the way they come from the factory. There are definitely exceptions, but the 735, for me, works well as is.

So I'd say that, if you are a professional the upgrade is worth it. Or, if you feel you can justify and afford a jointer/planer with helical head, that is definitely a better option in my opinion. With that level machine you'd definitely be getting a much better machine with a lot of both jointer and planer capacity which is designed to work with the knives it comes with. If I could justify it, I'd go that route for sure.
 
Cheese said:
I also owned the 733, and the 735 is a huge step forward as far as the automatic cutter lock and the chip blower fan goes.

I'm very satisfied with the 735 except for the knives dulling rapidly and it also produces snipe on a more regular basis. [eek] I've tried adjusting the tables numerous times but the 735 is just susceptible to snipe.

I've also been wanting to convert my 735 to a Shelix head but keep going back and forth between carbide blades or Shelix. If I remember correctly, the carbide blades were almost 65% of the price of a Shelix and they still need to be sharpened every now & then.

If you do go carbide, I'd love to hear about your results. At this time I'm still sitting on the fence.  [popcorn]
Have you tried lifting the end of the wood up as you feed it into the planer?  This always worked for me, i would get very little snipe. You only need to do that until it is engaged in the outfeed roller then lift that edge until the wood exits the outfeed roller.
 
"I'm very satisfied with the 735 except for the knives dulling rapidly and it also produces snipe on a more regular basis. [eek] I've tried adjusting the tables numerous times but the 735 is just susceptible to snipe."

Try feeding you stock in at an angle and not square to the blades. Eliminates 99.999% of snipe. Be mindful when feeding pieces
 
mike_aa said:
Hi [member=44099]Cheese[/member]  Thanks for the heads up on the inserts. 
In another thread [member=37411]ear3[/member] recommended the Wera screwdriver type and that looks like a good choice, but I was wondering what other light duty torque wrenches would be good for occasional uses like this.  Are there any that are recommended?

Hi [member=30413]mike_aa[/member]  [smile]  I will be contacting Byrd this weekend because I do think this may be a QA issue about carbide inserts being too brittle or becoming too crystaline over time.  I read the [member=4518]Mike Goetzke[/member] report and he may be right, I don't know as aligning events with a time line that extends for several years is difficult. [smile] I'll report back on their response on this thread when I've received an answer.  [smile]

As far as torque wrenches go, I purchased this Wiha specifically for this purpose. However, after torquing in several of the inserts, this is a solution for fewer than 10 inserts. After that it becomes ridiculous. Think of it as a small handled screwdriver, there is just so much leverage you can apply to drive the screw home before you give up in disgust. There is a reason that Wiha rates this driver as 50 in/lb max...and we're torquing the inserts at 45 in/lb...The Hulk likely wouldn't be able to put more torque into this than 50 in/lb.  [big grin]

I'll post a photo tomorrow on my preferred method.

[attachimg=1]


Attachments

  • Wiha 28506 Torque Vario.jpg
    Wiha 28506 Torque Vario.jpg
    564.3 KB · Views: 595
Don T said:
Have you tried lifting the end of the wood up as you feed it into the planer?  This always worked for me, i would get very little snipe. You only need to do that until it is engaged in the outfeed roller then lift that edge until the wood exits the outfeed roller.

Ya Don I've tried a number of things to reduce snipe, most successful in varying degrees was lifting the end of the piece, only removing .015" (1/64") per pass and arranging the boards so that I could feed the boards continually, end to end so that only the first board  and the last board through the router had snipe.

I'm sure industrial Powermatics and their like don't have these issues. Unfortunately I don't have the space and sometimes this beast needs to be moved outside. That'd prove impossible with a 500# Powermatic.
 
Cheese I have been using my DW735 with Byrd head for 5 1/2 years (just checked amazon for the date) and I have not had to replace or rotate a single insert.  In that time I have run a lot of stock including hard maple, white oak, walnut and quite a bit of ipe.  Your insert issues are quite atypical in my experience.  I did use a torque wrench to verify each insert (I bought the smaller head that comes preloaded) after I installed the head.  I also have a Byrd on my jointer that's a bit older and I think I have rotated 2 inserts and replaced one cracked insert.
 
Cheese said:
Don T said:
Have you tried lifting the end of the wood up as you feed it into the planer?  This always worked for me, i would get very little snipe. You only need to do that until it is engaged in the outfeed roller then lift that edge until the wood exits the outfeed roller.

Ya Don I've tried a number of things to reduce snipe, most successful in varying degrees was lifting the end of the piece, only removing .015" (1/64") per pass and arranging the boards so that I could feed the boards continually, end to end so that only the first board  and the last board through the router had snipe.

I'm sure industrial Powermatics and their like don't have these issues. Unfortunately I don't have the space and sometimes this beast needs to be moved outside. That'd prove impossible with a 500# Powermatic.

I'm always interested in solutions for snipe but, for me, it only occurs sporadically. For the most part, I angle my infeed and outfeed tables at a slight angle so the outer edges are just slightly higher than the bed of the planer. I also put some upward pressure from underneath the board on the outfeed side. This seems to eliminate essentially all snipe (at least to the point that it isn't noticeble after final sanding and finishing) except once in awhile. The problem is that I am not really sure what causes the once in awhile snipe.
 
[member=44099]Cheese[/member] you're supposed to dig the railroad spike out of the wood BEFORE you run it through the planer!  [wink]

Bet you got a bad batch of inserts or something.

Ron
 
As for a torque wrench check out Holbren Precision Cutting Tool’s. $39.95 for a torque wrench already set to 45 inch pounds just for the shelix head cutter.  I found out about it from a guy named Ben Burnick of Chalkstone woodworking.
Rusty
 
I still got snipe after installing the Shelix, but I realized it's really a function of the rollers on the 735.  The method I use now, which has eliminated it almost completely, is to plane the boards in a continuous sequence with no space in between them.  That means I also add sacrificial boards at the front and back ends -- I tend to just use 2x6 offcuts that I keep around just for that purpose.

grbmds said:
Cheese said:
Don T said:
Have you tried lifting the end of the wood up as you feed it into the planer?  This always worked for me, i would get very little snipe. You only need to do that until it is engaged in the outfeed roller then lift that edge until the wood exits the outfeed roller.

Ya Don I've tried a number of things to reduce snipe, most successful in varying degrees was lifting the end of the piece, only removing .015" (1/64") per pass and arranging the boards so that I could feed the boards continually, end to end so that only the first board  and the last board through the router had snipe.

I'm sure industrial Powermatics and their like don't have these issues. Unfortunately I don't have the space and sometimes this beast needs to be moved outside. That'd prove impossible with a 500# Powermatic.

I'm always interested in solutions for snipe but, for me, it only occurs sporadically. For the most part, I angle my infeed and outfeed tables at a slight angle so the outer edges are just slightly higher than the bed of the planer. I also put some upward pressure from underneath the board on the outfeed side. This seems to eliminate essentially all snipe (at least to the point that it isn't noticeble after final sanding and finishing) except once in awhile. The problem is that I am not really sure what causes the once in awhile snipe.
 
Another thing I do to keep snipe waste to a minimum is that I do not trim the ends (usually sealed or painted) until the thicknessing process is done first. 
 

Attachments

  • waste.jpg
    waste.jpg
    759.3 KB · Views: 241
Back
Top