Easiest way to fix this?

Scorpion

Member
Joined
Jan 15, 2014
Messages
587
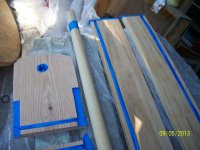
Backstory - I'm a DIY guy that Festool has turned into a much better DIY guy. My wife and I have started doing remodels around the house and my latest project is the master bath.  Cabinets were built with prefinished Baltic Birch and the face frames are red Oak that of been assembled using pocket screws and glue.  The face frames were sealed using general finishes pre-stain conditioner (2 hours rest) and then stained with Minwax oil-based stain to desired color. Finish coat is a water-based oil modified poly. Because this project is been indoors, I've had used to wipe on approach for all of it and I've had to go about four coats to get where I want to be.

In finishing this one (and 88 inch tall vanity), I sanded to a finish that looked good but made a fatal error in that two of the joints were not sanded enough to remove the glue residue. The conditioner didn't show me my mistake but now that I've gotten to the stain I can see two large glue joints where it appears there's almost no stain it all because the glue sealed. 

1e86b3c11f07c743a2c1ccaead28672d.jpg


So here's the question-I could resend the entire thing so that I can refinish the entire thing but that seems excessive. My gut tells me I can do a localize sand and then go back and do a localized stain in but I'm wondering if I'm going to end up having problems at the edges were there already is stain and end up with edges in darkness.. I'm not trying to cut corners, but with the number of cabinets that are already being installed another day is another day.

Any advice is appreciated.

Matt
 
Touching up stain can be done but I have never personally been successful.  Would it be possible to sand the face frame then install with the rest of the cabinets and then finish them in place by protecting the adjoining with tape?

Worst case is that you attempt the repair and if it doesn't look good you go back to the above.

Peter
 
I really don't know anything useful about finishing. But I wanted to mention that your aluminum extrusion table looks very nice.
 
Ouch, I hate when that kind of thing happens to me!

I would probably start first with some stain and an artist's brush to try and touch up just the glue areas and then coat it with finish to seal it in.  You could try mixing in some darker pigment to better help mask it.  The stains may not disappear entirely, but this may help to darken the areas so the eye is not drawn to them.  It's hard to tell from the pictures how well this might work on the type of wood grain you have.

Good luck!

Mike A.
 
It's not uncommon to find a defect when staining that wasn't noticeable beforehand. The problem you'll run across is that your repair typically comes out lighter in color than the surrounding area. But the solution is actually very simple.

Go ahead and re-sand the area locally at 120 grit with your sander. For glue, you need to use the sander, but if this was just a scratched area, skip this step. Don't go above 120 grit.

Next, take some 120 grit paper and dip it in your stain, and then lightly wet sand the area with stain. Keep it wet, and don't over-sand the area. The purpose of this step is that you are not only applying the stain, but roughing the surface at the same time. Let the stain sit for a minute before wiping it off. The darker the color match, the longer to leave it sit before wiping.

If your color match is coming out too light, then use a coarser grit. If it's coming out too dark, then use a finer grit.
 
I like to tape off the glue joints and finish the project first when

possible to avoid said problems. Something to consider and good luck

on your fix.
[attachimg=1]
 

Attachments

  • beall 939.jpg
    beall 939.jpg
    2.3 MB · Views: 589
jafenske said:
I really don't know anything useful about finishing. But I wanted to mention that your aluminum extrusion table looks very nice.

Thanks.  It's 6' x 33" and a multi-purpose table.  I have a piece of foam/insulation the same size that I put on the top when I'm breaking down sheet goods with my TS55.  Works perfectly for goods up to 4 x 8.  Secondary function (like you see it here) is for assembly and finishing.  It's been awesome for the larger cabinets and allows me to do all of the work without bending my back much (don't have the best back).  It's probably a lot stronger than it needs to be given the primary frame is made using the 1.5 x 4.5 80/20 extrusions but given I got it at overstock prices from 80/20 on ebay I couldn't resist.

Rick Christopherson said:
It's not uncommon to find a defect when staining that wasn't noticeable beforehand. The problem you'll run across is that your repair typically comes out lighter in color than the surrounding area. But the solution is actually very simple.

Go ahead and re-sand the area locally at 120 grit with your sander. For glue, you need to use the sander, but if this was just a scratched area, skip this step. Don't go above 120 grit.

Next, take some 120 grit paper and dip it in your stain, and then lightly wet sand the area with stain. Keep it wet, and don't over-sand the area. The purpose of this step is that you are not only applying the stain, but roughing the surface at the same time. Let the stain sit for a minute before wiping it off. The darker the color match, the longer to leave it sit before wiping.

If your color match is coming out too light, then use a coarser grit. If it's coming out too dark, then use a finer grit.

That is a really creative way and sounds like the kind of trick I was hoping to find.  I'll give it a shot and thank you very much.  This combined with Tom's recommendation of using a touch-up pen if I end up with light spots and I bet I'll be beyond it.  Thanks!
 
I would try the touch up pen first. It's quick, easy and you'll know if it works right away. If it doesn't satisfy then move on to the more complicated fix. If the surface is smooth you should be able to blend it in fairly easy.
 
John Beauchamp said:
I would try the touch up pen first. It's quick, easy and you'll know if it works right away. If it doesn't satisfy then move on to the more complicated fix. If the surface is smooth you should be able to blend it in fairly easy.

It's difficult to see in the picture but it's a fairly large spot.  Not sure if I can get away with just using the pen.

5171209ec9e00260e0a797d317d79ca1.jpg
 
Scorpion said:
It's difficult to see in the picture but it's a fairly large spot.  Not sure if I can get away with just using the pen.

That's my concern too. I wouldn't even try to mess with a pen on glue, especially this large and this visible.

The method I mentioned above is tried-and-true that I've been using for close to 3 decades. I first learned of it at an employer's shop, and I carried it over into my own shop. It's not just a cover-up like the pen would be, but an actual repair.
 
Rick, fantastic advise.  Decided to snap some photos as I progressed to show how it worked.  Here's how it looked before I started.

3080268c6180e0817a1abc3b594b2ac4.jpg


As recommended I pooled the stain over the location and began sanding with 220.

7d48d4e6b2fc3e5bcec88e594ed5b503.jpg


My wife handled pictures beyond this point because my hands were full...after 10 or so seconds of light scuffing with light pressure.

20f695639afe64ba8e0bbe6c690400ff.jpg


Re-pool and go again...

d7da13256aaac96e982a44efb2624878.jpg


Almost gone, another pass...

42273693f2600efff6a585ebce85803e.jpg


Done.  Only mistake is I swirled the paper a few times and left some noticeable deep stains against the grain.  Oops...so a fourth pass with the grain and the screw up went away.  Brilliant, brilliant fix.  Less than 5 minutes total and you can't tell no matter how you inspect it.  I repeated this process in the second location and fixed it on the first pass by scuffing a little longer and going with the grain.  10 seconds there.

Rick, thank you for sharing.  That trick is a keeper!
 
I'm glad it worked out, but I just want to explain that this is not exactly what I was describing. (Although it is close.)

You approached it as though you were wet sanding, like you would for automotive paint. That's not the purpose. You can sand normally to remove the glue, and that includes using an ROS sander if needed.

Think of the "wet" part as nothing more than applying new stain over your repair sanding. You are using your sandpaper to apply the stain instead of a rag or brush or some other method. It is during this stain application that you are roughing the surface to make the stain match the previous application.

The repair sanding part kinda-sorta burnishes the surface, and that is why re-application of the stain will typically come out light. The wet sanding part with a coarser grit paper roughs up this burnish-like surface to make the stain apply like it originally did.
 
Rick Christopherson said:
I'm glad it worked out, but I just want to explain that this is not exactly what I was describing. (Although it is close.)

You approached it as though you were wet sanding, like you would for automotive paint. That's not the purpose. You can sand normally to remove the glue, and that includes using an ROS sander if needed.

Think of the "wet" part as nothing more than applying new stain over your repair sanding. You are using your sandpaper to apply the stain instead of a rag or brush or some other method. It is during this stain application that you are roughing the surface to make the stain match the previous application.

The repair sanding part kinda-sorta burnishes the surface, and that is why re-application of the stain will typically come out light. The wet sanding part with a coarser grit paper roughs up this burnish-like surface to make the stain apply like it originally did.

Boy did I miss.  I had to have read it too fast.  I get what you meant now.  The way I did it was so easy though and the color match is almost perfect even up close.  Either way I'll take it. Next time I'll try it the right way.

I actually used 220 which was my finish grit and wasn't going to go more coarse unless it didn't work.  Thy may be why I got lucky.

 
Back
Top