Edge joining reclaimed beams

ear3

Member
Joined
Jul 24, 2014
Messages
4,341
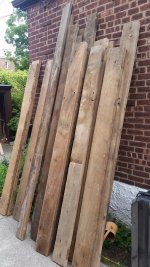
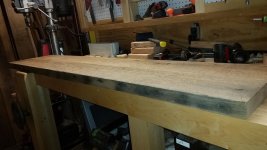
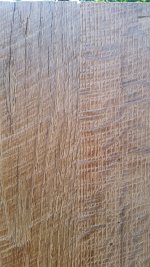
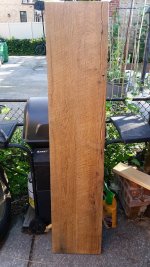
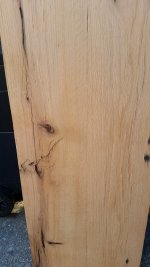
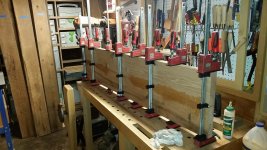
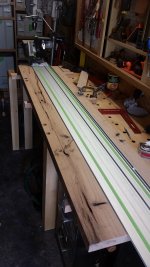
I took delivery yesterday of the reclaimed oak beams out of which I've been commissioned to build some countertop and shelving. They are rough sawn 8/4. I will be thickness planing one side to reach spec-ed thickness of 1 1/2 to 1 3/4 for the various pieces I have to build.

View attachment 2

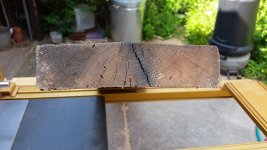
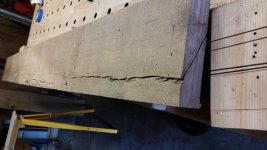
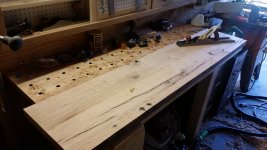
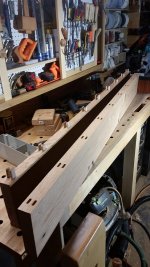
Question: since the beams max out at 2x8, I'm also going to have to edge join to hit the spec-ed depth of the countertop and some of the shelving. So after jointing/planing one face flat and to thickness, I'll rip the edges with the tracksaw and use some dominoes for the glue up.  Many of the beams are reasonably flat, but there are some that have become cupped:

View attachment 1

In terms of which rough side to preserve, does it make a difference for the edge joining and long term stability of the combined plank whether I preserve the convex or concave face of those boards that are cupped? When I domino, I will be referencing off the already jointed edge, so I'm not worried about the cupping messing up my mortise angles. Basically, if I were to edge join two cupped boards, should it look like a "w" or an "m"
 

Attachments

  • 20170630_094339.jpg
    20170630_094339.jpg
    1.9 MB · Views: 323
  • 20170629_180624.jpg
    20170629_180624.jpg
    249.3 KB · Views: 274
As you said, you're going to need to flatten one face on the jointer or perhaps shimmed on a sled with your planer.  This will allow the glued up top to sit flat on the cabinets.

If you leave the opposite face rustic, the difficulty will come from not having run that face through the planer to establish uniform thickness.  My concern is the edges may not be the same height depending on the direction of cupping so be sure to account for that.

Otherwise, I don't think it makes a lot of difference.  I've often heard to alternate the end grain pattern to create stable glue ups.  However, some very respected furniture makers like Kelly Mehler have told me that if the moisture level is 6-9% you should use the best face up regardless of end grain direction.

Keep in mind that if you have any bow or twist, you will not be able to get an even glue up without jointing one face flat and then planing the opposite face parallel.
 
That makes sense, thanks.  I'll make sure to keep an eye out for the consistent edge thickness when I deal with the cupped boards.  Fortunately, I think only one of the beams has a twist in it, but it's one of the long ones so I will get to cut it down anyway and only have to work out the twist on a smaller scale.

deepcreek said:
As you said, you're going to need to flatten one face on the jointer or perhaps shimmed on a sled with your planer.  This will allow the glued up top to sit flat on the cabinets.

If you leave the opposite face rustic, the difficulty will come from not having run that face through the planer to establish uniform thickness.  My concern is the edges may not be the same height depending on the direction of cupping so be sure to account for that.

Otherwise, I don't think it makes a lot of difference.  I've often heard to alternate the end grain pattern to create stable glue ups.  However, some very respected furniture makers like Kelly Mehler have told me that if the moisture level is 6-9% you should use the best face up regardless of end grain direction.

Keep in mind that if you have any bow or twist, you will not be able to get an even glue up without jointing one face flat and then planing the opposite face parallel.
 
Related question. One of the beams has a significant split running down much of its length. I assume the board is otherwise stable since it's lasted so long. I have to include this split, since I need to make the width on the finished pieces. So I'm wondering if it's worth doing a repair on this board. Say a small butterfly at the end? Or do you think that since it has lasted so far it will continue to do s the finished surface will be a top for a sideboard table.


Attachments

  • 20170701_151223.jpg
    20170701_151223.jpg
    1.6 MB · Views: 482
Also--I'm going to Domino the edge joint.  I just recently got an XL, so I have the option of doing a 14mm Domino on what will be 45mm boards when planed down.  Or...does it make more sense from a stability standpoint to stack two 8mm dominoes?
 
Edward A Reno III said:
Related question. One of the beams has a significant split running down much of its length. I assume the board is otherwise stable since it's lasted so long. I have to include this split, since I need to make the width on the finished pieces. So I'm wondering if it's worth doing a repair on this board. Say a small butterfly at the end? Or do you think that since it has lasted so far it will continue to do s the finished surface will be a top for a sideboard table.

Not good.  Can you carefully use epoxy or will it not work with the finish?  If not, you may be able to bowtie from underneath.  A small one on the end sounds like a good idea, too.

Edward A Reno III said:
Also--I'm going to Domino the edge joint.  I just recently got an XL, so I have the option of doing a 14mm Domino on what will be 45mm boards when planed down.  Or...does it make more sense from a stability standpoint to stack two 8mm dominoes?

I would use 14x100mm domino tenons for your glue up.
 
Would it be better to join the boards ,regardless of the cupping,and then router-plane it flat? Maybe both sides?
A sled with a router in what I suggest.
The end result ,to me, would be a flat surface at whatever thickness it ends up 1"3/4 -1"1/2 or ?
Charlie

Sent from my iPad using Tapatalk Pro
 
Edward A Reno III said:
So I'm wondering if it's worth doing a repair on this board.

Put in a couple of dominoes from underneath just short of the top surface to hold the split stable and maybe fill with epoxy.
 
Have these been kilned to eliminate the possibility of powder post beetles ?

That'd be on my mind before I delivered to a client.
 
antss said:
Have these been kilned to eliminate the possibility of powder post beetles ?

That'd be on my mind before I delivered to a client.

Good point.  In my experience, some of the reclaimed wood sellers have no clue (or concern) about proper moisture content and elimination of wood boring insects.
 
So many reasons already posted to confirm my hatred for reclaimed lumber projects.  I hate barn wood and anything related to dirty lumber.
 
I didn't even know about the beetle concern -- I'll ask the lumber yard on Monday.  I really doubt they kiln dried it, though.  Is there any remediation that can be done now?

I ended up doing stacked 8x50mm dominoes.  In my experience, this lessens the tendency of the combined board to cup during glue up:

View attachment 1

View attachment 2

The board ended up staying pretty flat, and the minor cupping was easily worked out with the jointer:

View attachment 3

I had ended up planing them concave side down, so it wouldn't rock going through the thicknesser (as I do with any other board).  Since I dominoed from the planed side, there was a lip in a few areas along the joint.  So I took a sharp chisel and shaved the lip down a bit in those places, then worked with the brush sander to ease the transition between the two boards.  The joint is now mostly only evident from the grain change in the wood:

Underside:

View attachment 4

View attachment 5

Top side:

View attachment 6

View attachment 7

Looking at the combined plank, I kind of wish I had done a better job with the grain matching -- at the joint, the right board is showing quartersawn grain, while the left one is just beginning to go riftsawn.  The transition would have been better had I cut the other edge of the left side board (the one that is mostly face grain).  It's just that I wanted to preserve that visible edge, since that was the one with all the nail holes:

View attachment 8

Oh well.

I'll go back later and address the split with a butterfly or other type of solution -- for now I'm going to work on the shelves (this plank is for the sideboard).

In other news, my TS75 started behaving really strangely yesterday.  It felt like the blade was tracking at an angle to the rail/cut when I was trying to rip the glue joint on the boards, and it started to burn and then eventually would get stuck.  I had just cleaned the blade so it's not that, and the teeth still feel sharp to the touch.  I lost about 3/8" of the board trying to repeat the cut several times.  I eventually just gave up and switched over to my TSC55, which, despite the board being 1.75" did the cut superbly.  I'm going to test the TS75 with other blades later today to see maybe if that particular blade is the issue.  I only have a couple of weeks left on the warranty, though, so I will have to figure out quickly if it's a service worthy issue.


Attachments

  • 20170701_231924.jpg
    20170701_231924.jpg
    138.8 KB · Views: 251
  • 20170702_083914.jpg
    20170702_083914.jpg
    291 KB · Views: 236
  • 20170702_083857.jpg
    20170702_083857.jpg
    262 KB · Views: 215
  • 20170702_083838.jpg
    20170702_083838.jpg
    168.8 KB · Views: 228
  • 20170702_083818.jpg
    20170702_083818.jpg
    232.6 KB · Views: 229
  • 20170702_082003.jpg
    20170702_082003.jpg
    161.3 KB · Views: 221
  • 20170701_204416.jpg
    20170701_204416.jpg
    203.5 KB · Views: 224
  • 20170701_190552.jpg
    20170701_190552.jpg
    207.3 KB · Views: 251
Edward A Reno III said:
I'll go back later and address the split with a butterfly or other type of solution...

FWIW...I don't think a butterfly would look good along that split surface.
I'd consider using a series of long wood screws coming in from the edge of the board if the edge can be hidden. By flipping the board back and forth between the two surfaces, you'll have an idea of how wide the split is in each area that needs to be stabilized. Using a drill press, drill clearance holes for the area closest to the edge while the area after the split gets pilot holes. Countersink the screw heads about 1/4". You may then have to very lightly recut/joint the edge because of movement from the screws acting like little clamps.

Or as Bohdan suggested, use Dominoes from the bottom surface.
 
I see what you mean.  The split runs diagonal to the surface rather than perpendicular.  I'll probably try a fat Domino or two from the underside then.  I'll investigate the screw option as well.  That edge is going to be against the wall anyway, so I wouldn't necessarily have to even plug it.

Cheese said:
Edward A Reno III said:
I'll go back later and address the split with a butterfly or other type of solution...

FWIW...I don't think a butterfly would look good along that split surface.
I'd consider using a series of long wood screws coming in from the edge of the board if the edge can be hidden. By flipping the board back and forth between the two surfaces, you'll have an idea of how wide the split is in each area that needs to be stabilized. Using a drill press, drill clearance holes for the area closest to the edge while the area after the split gets pilot holes. Countersink the screw heads about 1/4". You may then have to very lightly recut/joint the edge because of movement from the screws acting like little clamps.

Or as Bohdan suggested, use Dominoes from the bottom surface.
 
Here's how the table turned out (designer pro idea the base). There was a slight miscommunication and it turns out the sideboard I made is 1/2" too narrow, so I've brought it back to my shoo and will add a third board to it. It's a little more complicated than just trimming existing back edge, since I took advice of  [member=44099]Cheese[/member] and sank a few 5" spax screws through the back to stabilize the split (along with a few 1 1/4") up through the bottom. I plugged them, so I will have to carefully bore out the plug so as to not ruin the scree head and deny my drill bit purchase to back out the svrew. 

Designer and client seem pretty happy with the end result.


Attachments

  • IMG_20170706_165126.jpg
    IMG_20170706_165126.jpg
    524.9 KB · Views: 440
  • IMG_20170706_165020.jpg
    IMG_20170706_165020.jpg
    247.6 KB · Views: 430
"I will have to carefully bore out the plug so as to not ruin the scree head"

A cheap brad point bit does it well.
 
Edward A Reno III said:
Here's how the table turned out (designer pro idea the base). There was a slight miscommunication and it turns out the sideboard I made is 1/2" too narrow, so I've brought it back to my shoo and will add a third board to it.

Table looks great Edward...is 1/2" really a deal breaker? If you just add a 1/2" strip will it look out of place as in a 1/2" sliver of wood was added later?

If you are going to add just a 1/2" strip, why not just do it the same way you used to stabilize the split. You know where the Spax screws are because of the plugs. Just a thought... [smile]
 
Interesting idea [member=44099]Cheese[/member] -- wish I had thought of it before performing the surgery.  1/2" was a dealbreaker, unfortunately.  It's a countertop, and my board ended up being only 1/4" proud of the base cabinets, whereas what was needed was 3/4".  I had been led to believe that I had +/- 1" to play with on the 16" depth.  Lesson for the future to do my own measurements and inspection.  No matter, though, as I'm being compensated for the extra work, and the process of widening the panel proved to be instructive and a good opportunity to test the capabilities of my Makita Wheel sander even further.

The screw removal ended up being pretty simple, despite having taken added security measures to secure the plug with 2P-10 CA glue.  I just mounted the plug cutter on my drill and bored out the wood around the plug -- a couple of them popped off in the plug cutter itself, and the remaining ones were easily pried out with a screwdriver:

View attachment 1

View attachment 2

Screw came out no problem:

View attachment 3

Since I was adding a third board, I decided just to waste away the part of the existing panel that had the split (after all that work, too [crying]):

View attachment 4

TSC55 of course produced a fine cut ready to join without further treatment:

View attachment 5

I took the opportunity to document the rest of the process in a separate thread in my series of posts reviewing the Makitra Wheel sander, since I was able to use the wire wheel to great effect:
http://festoolownersgroup.com/other-tool-reviews/makita-9741-wheel-sander/msg515323/#msg515323


Cheese said:
Edward A Reno III said:
Here's how the table turned out (designer pro idea the base). There was a slight miscommunication and it turns out the sideboard I made is 1/2" too narrow, so I've brought it back to my shoo and will add a third board to it.

Table looks great Edward...is 1/2" really a deal breaker? If you just add a 1/2" strip will it look out of place as in a 1/2" sliver of wood was added later?

If you are going to add just a 1/2" strip, why not just do it the same way you used to stabilize the split. You know where the Spax screws are because of the plugs. Just a thought... [smile]
 

Attachments

  • 20170707_143710.jpg
    20170707_143710.jpg
    238.6 KB · Views: 210
  • 20170707_144427.jpg
    20170707_144427.jpg
    210 KB · Views: 209
  • 20170707_144023.jpg
    20170707_144023.jpg
    185.2 KB · Views: 201
  • Cutting off split end of board.jpg
    Cutting off split end of board.jpg
    297.1 KB · Views: 201
  • Glue joint.jpg
    Glue joint.jpg
    259.3 KB · Views: 207
Back
Top