arso_bg
Member
- Joined
- Jan 6, 2008
- Messages
- 179
Hi everybody!
Recently I had to route some edges on large panels. As a DIY-er I have a tiny workshop about 10x10 feet and there was absolutely no way to put them through my router table. I have two routers only: a small one – a Trend T3 which I usually use for edge work, and the Festool OF 1400. In this case, the T3 would be too week and I decided to go with my OF 1400. An additional complication in this case was that the router bit that I was going to use had no bearing at the end and there was no way to guide the router bit on the edge.
I tried to do the job with my Combination Router Base CRB7. After a few test cuts I discovered that loaded with this heavy router on top, the base is a little bit unsteady and bends when routing at the corners of the workpiece. Unhappy with the result I decided that I needed another solution.
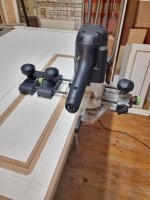
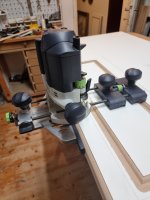
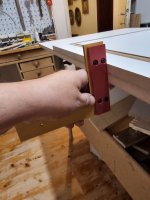
I searched the Internet but could not find almost any information about my case. So after some thinking and experimentation, I came up with a solution that worked fine for me. It appears that to route successfully an edge with the OF 1400 the only thing that you need is the router itself and the parallel fence with some accessories. The setup is shown on the pictures below.
As you can see from pictures 1 and 2 the router is almost perfectly balanced on the edge of the workpiece. Well, when you attach the power cord and the vacuum hose you will need to support the router to prevent it from tipping. But the point here is that you balance the router and glide it along the edge absolutely effortlessly! The depth of cut you can adjust very precise with the knob of the router. The lateral movement is also adjusted very precisely with the knob of the fence.
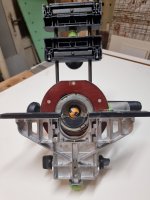
If you have the chip deflector – KFS-OF 1400 (art. No 492732) you can attach it to the router too. This makes the routing practically dust free. But you have to attach the deflector before you put the fence on. The setup you can see on picture 3.
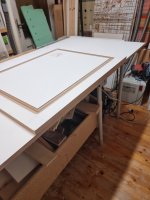
In order to prevent problems when routing near the edges it is a good idea to place a large panel with a straight edge below the workpiece. Then it works as a “straight edge template” – picture 4. Or you can attach a straight piece of material below your workpiece – picture 5. In both cases, you have to align carefully the edge of the workpiece with the edge of the template below – picture 6.
Well, that’s it! It worked fine for me. I hope it will work fine for you too!
Happy routing!
A.G.
Recently I had to route some edges on large panels. As a DIY-er I have a tiny workshop about 10x10 feet and there was absolutely no way to put them through my router table. I have two routers only: a small one – a Trend T3 which I usually use for edge work, and the Festool OF 1400. In this case, the T3 would be too week and I decided to go with my OF 1400. An additional complication in this case was that the router bit that I was going to use had no bearing at the end and there was no way to guide the router bit on the edge.
I tried to do the job with my Combination Router Base CRB7. After a few test cuts I discovered that loaded with this heavy router on top, the base is a little bit unsteady and bends when routing at the corners of the workpiece. Unhappy with the result I decided that I needed another solution.
I searched the Internet but could not find almost any information about my case. So after some thinking and experimentation, I came up with a solution that worked fine for me. It appears that to route successfully an edge with the OF 1400 the only thing that you need is the router itself and the parallel fence with some accessories. The setup is shown on the pictures below.
As you can see from pictures 1 and 2 the router is almost perfectly balanced on the edge of the workpiece. Well, when you attach the power cord and the vacuum hose you will need to support the router to prevent it from tipping. But the point here is that you balance the router and glide it along the edge absolutely effortlessly! The depth of cut you can adjust very precise with the knob of the router. The lateral movement is also adjusted very precisely with the knob of the fence.
If you have the chip deflector – KFS-OF 1400 (art. No 492732) you can attach it to the router too. This makes the routing practically dust free. But you have to attach the deflector before you put the fence on. The setup you can see on picture 3.
In order to prevent problems when routing near the edges it is a good idea to place a large panel with a straight edge below the workpiece. Then it works as a “straight edge template” – picture 4. Or you can attach a straight piece of material below your workpiece – picture 5. In both cases, you have to align carefully the edge of the workpiece with the edge of the template below – picture 6.
Well, that’s it! It worked fine for me. I hope it will work fine for you too!
Happy routing!
A.G.