El cheapo DIY LR32

He uses a stip of holes drilled at 32mm to index the router off of (the long strip with holes in the first picture in the OP.  To make that stip with the holes, he uses the shelf strip. The ones sold in Europe and other metric countries have the slots at 32mm also, so he uses the bottom of one slot to the bottom of the next slot to drill the holes at exactly 32 mm.  In other words, this is just used to construct his jig, not used in the actual "LR32 Jig"
 
Jbmccombe said:
He uses a stip of holes drilled at 32mm to index the router off of (the long strip with holes in the first picture in the OP.  To make that stip with the holes, he uses the shelf strip. The ones sold in Europe and other metric countries have the slots at 32mm also, so he uses the bottom of one slot to the bottom of the next slot to drill the holes at exactly 32 mm.  In other words, this is just used to construct his jig, not used in the actual "LR32 Jig"
[member=41761]Jbmccombe[/member] , thank you!  What I'm still not getting is how the slots are used in the jig to make the strip?  What is the process?  I understand that the slots are spaced 32mm but where does that guide with the pins sticking up come into play? 

Thanks!
 
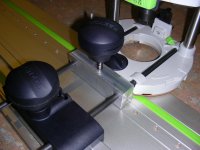
I think the idea is that you tighten the short piece with the screws sticking up on to the far end of your rail, then you place the shelf support over it, butt your router carriage up to the other end of the shelf support, then drill your hole. Move the shelf support one set of holes down (using the screws sticking up for alignment), butt the router carriage up to the end of the shelf support again, drill your next hole. That way each time you move the shelf support and drill a hole, they'll be 32mm apart.

Rinse and repeat until you get to the end and et voila! A row of holes neatly spaced 32mm apart.
 
[member=11629]GarryMartin[/member] Thank you!!  It's glaringly obvious to me now, thank you for the explanation!  I was making it waay more complicated in my mind.  Really looking forward to making one of these in the next week or so.  Thanks again!
 
TheSergeant said:
It's glaringly obvious to me now...

It took quite a while for my head to figure out what was going on too, so you weren't alone!

The method does mean you can create your "jig of holes" for any length you like, and as someone else mentions, there would be nothing to stop you creating your own "rail" using an extrusion of even an MDF board or similar. Lots of options.
 
Here's my take on this using the standard OF1400 rail adapter:
View attachment 1
It's still at the prototype stage and I have yet to assess its accuracy. I drilled my existing rail on the mill/drill, a laborious process and I wish I had thought of the bookshelf support strip ("console rail") idea mentioned above.
 

Attachments

  • DSCN1605.jpg
    DSCN1605.jpg
    431.8 KB · Views: 1,801
I'm not sure what speed to use but couldn't you just use the same idea to make your own 32mm rail?  Full speed seems too fast to use a router bit to "drill" aluminum but at slower speed, it seems like it should work fine.  I like the idea but I seem to end up with too many home made jigs in my little shop.  I wouldn't miss place the guide rails...
 
Brilliant design vajper!

Could somebody who has made this jig post a few pictures.  I would like to tackle this project but a little more info would be appreciated.
 
Back
Top