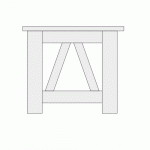
Entryway bench

mino said:
DynaGlide said:
I probably skipped some steps but with young kids and spring break this week I don't have the luxury to take pictures of everything. Very happy with how it is shaping up to this point and I'll do some final tweaking before working on finishing.

Matt
Looks great. I would reconsider dropping the dfecorative X parts. The sides look a bit baren without it, now it is complete.

Or think up some other decorative fill, not have to be X ... maybe even simple vertical "poles" would work out well. The decorative X in the original also "hides" the shoes placed in there when looked from side, makinge the whole think a bit more "woody". Having something "woody" in that area just seems right, me thinks.

You're right and that's been gnawing at me. I don't have the material left to do the X's. I could buy more. I'll give it some thought.
 
Is there a crafty way to get a dead on fit for the "X" pieces on the ends? I took some 3/4" MDF and clamped it where I wanted for the first piece so the corners met, marked the backside, and cut a bevel on both ends as close as I could. It got close but there were gaps on each end.

I can't really think of a better way to approach it. My plan was to get the fit right with trial and error then transfer the MDF angles/length etc to the real material.

i-PmJdtLv-L.jpg


i-tNZ6zpq-L.jpg


i-FVJfKJd-L.jpg


Something like this maybe?

https://www.woodpeck.com/ott-tool-stair-tread-and-shelf-gauge-2022.html

 
In cases like these I like to choose a low-tech approach and make an oversize piece and then snug up to it with a plane. What helps is the Veritas Adjustable Shooting Board I have. I use a bevel square to get the precise angle and set the shooting board to just that angle. To get the angle I do as you did and just clamp the wood to the workpiece. Try to err on the cautious side and be patient while getting close to the size you need. Lots of fitting...
https://www.leevalley.com/en-us/shop/tools/jigs-guides-and-fixtures/110737-veritas-shooting-board
 
hdv said:
In cases like these I like to choose a low-tech approach and make an oversize piece and then snug up to it with a plane. What helps is the Veritas Adjustable Shooting Board I have. I use a bevel square to get the precise angle and set the shooting board to just that angle. To get the angle I do as you did and just clamp the wood to the workpiece. Try to err on the cautious side and be patient while getting close to the size you need. Lots of fitting...
https://www.leevalley.com/en-us/shop/tools/jigs-guides-and-fixtures/110737-veritas-shooting-board

That certainly does seem to be the best way to do this. However it's also a $500 solution  [eek] I'm looking to get into hand tools more but I think a proper jointer plane is next on the list to go with my new planer.
 
If you already own a plane that can be used for shooting [1], then I think making a shooting board with an adjustable fence should be possible and relatively low-cost. As long as you have a good bevel square it should be doable. Of course, I don't know if you own such a plane.

[1] #5 and #5 1/2 Planes are quite popular for this purpose over here. It doesn't have to be a shooting plane. It just has to have square sides. And a bit of mass would be highly preferable as well.
 
I would forego the X at this point. The "original" likely had it made mortise/tenon/domino way when it was being assembled.

Try cutting a couple pieces of MDF for vertical "stiles" in the same place the X was - to gear how it would present.

You can fix vertical stiles there relatively easy by through-screws and visually it should work as well or an upside-down semi-open "V" "supporting" the bench etc. etc., does not have to be "X" to provide the function.

Example below - not a suggestion.
 

Attachments

  • upsideV.gif
    upsideV.gif
    7.6 KB · Views: 155
That still means Matt has to create cuts at the right angle and the right distance. And for 2 semi-diagonals on each side at that. More work and as far as I can see not much easier to do. Just one diagonal per side should be enough for stability. You'd loose symmetry, but it would mean less work.
 
hdv said:
That still means Matt has to create cuts at the right angle and the right distance. And for 2 semi-diagonals on each side at that. More work and as far as I can see not much easier to do. Just one diagonal per side should be enough for stability. You'd loose symmetry, but it would mean less work.
The difference is that your cuts do not have to be (absolutely) precise - you can put the piece in and then rotate half a degree etc. You cannot do that with an X part which is "fixed" in all axes except the one pushing it in. So a tracksaw bevel will do while for the X not so much..
 
Perhaps a contrasting material, i.e. steel or ??? Something where the joint isn't highlighted.

RMW
 
DynaGlide said:
hdv said:
In cases like these I like to choose a low-tech approach and make an oversize piece and then snug up to it with a plane. What helps is the Veritas Adjustable Shooting Board I have. I use a bevel square to get the precise angle and set the shooting board to just that angle. To get the angle I do as you did and just clamp the wood to the workpiece. Try to err on the cautious side and be patient while getting close to the size you need. Lots of fitting...
https://www.leevalley.com/en-us/shop/tools/jigs-guides-and-fixtures/110737-veritas-shooting-board

That certainly does seem to be the best way to do this. However it's also a $500 solution  [eek] I'm looking to get into hand tools more but I think a proper jointer plane is next on the list to go with my new planer.

Since you'd be making relative adjustments anyway, why not build a quick one out of MDF?  If you like it enough to want to keep it, then buy the Veritas once the MDF is worn out.

I'll give you my handplane advice- FWIW.  I ended up with a complete set, from 2 thru 8, before I discovered that all I really needed was the 5 1/2.  Furniture parts are short enough that you can joint and shoot with it.  And a power planer means your panels will be close enough to dead flat that you can smooth with it, too.  All the other sizes really only make sense if you're working with rough timber and entirely without power tools. 
 
I largely do agree with you. However, if you make things with wide boards in/on them, then I do believe a good #7 will get you to places where a powered planer can't. Most of those machines are in the 12-16" range. Boards for tables are wider than that. I like to use a jointer in such cases. Some might be able to get the same results with a #5 1/2 but I am not (yet) skilled enough for that, it seems.

But, as I told DynaGlide, I might not be the best person to give advice when it comes to planes, as for me the cool-aid is not only of the green kind, but of the sharp-bladed metal kind too. I have more planes than a sensible person would spend his money on. [embarassed]
 
hdv said:
I largely do agree with you. However, if you make things with wide boards in/on them, then I do believe a good #7 will get you to places where a powered planer can't. Most of those machines are in the 12-16" range. Boards for tables are wider than that. I like to use a jointer in such cases. Some might be able to get the same results with a #5 1/2 but I am not (yet) skilled enough for that, it seems.

But, as I told DynaGlide, I might not be the best person to give advice when it comes to planes, as for me the cool-aid is not only of the green kind, but of the sharp-bladed metal kind too. I have more planes than a sensible person would spend his money on. [embarassed]

Kind of like me with routers? I have had people ask me if I have a router for every bit? To which I respond by pulling the Systainer out and opening the lid. Not even close. Those are only the 1/4" and 1/2" shanks, the 8mm are in a drawer in the big tool box.
20, plus a Shaper Origin.  [huh]
 
Guilty as charged!  [scared] [wink]

I haven't counted them, but it is more than a sensible non-professional person would have. I really do like using them, but have to admit I could use some improving of my skills. I am getting better, but still have a lot to learn. It is just that I like using them. I find them beautiful, I like their noiselessness, and I like the feel of the wood after planing it. I don't even mind the sharpening (now you definitely know there's something wrong with me!  [big grin] ) . Although I am thinking of adding a Sorby ProEdge next to my collection of Shaptons to speed up the shaping. The honing/lapping I'll probably keep doing by hand.

P.S. As I wrote the previous post I actually was thinking of putting a reference to your router "habit" in it...  [tongue]
 
Prepare for a shameless self pat on the back in 1, 2, 3. .

After watching some videos, namely this one:


I decided to play around some more. I'll let the results speak for themselves. I didn't even break out the hand tools everything was done on the Kapex.

i-xswVkGx-XL.jpg


i-tx8f6CW-XL.jpg


Unfortunately I'm out of material and will need more to do the other side.

Matt
 
Looks good [member=65062]DynaGlide[/member] ,better get that wood quick before you forget how you did it. Oh wait that would probably be me.  [eek]  [tongue]

Ron
 
That is going to be a very good looking bench DynaGlide. Well done!

I’ve done a few shelves with that kind of X-support. Mostly with a hand saw. A good few on some decking fence too. These are not easy to get everything matching up - I know  [big grin].
I’ve never done a furniture with them, you’re brave! [wink]
 
Back
Top