Faux Craftsman Dresser

iamnothim

Member
Joined
Feb 5, 2014
Messages
1,436
Next up “The Faux Craftsman Dresser”.

My friend wants to build a dresser for his 12 year old daughter.  We are doing it in my shop.  I want Tim to do most of the work and I provide direction and some guidance on Festool and hand tools.

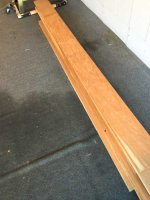
Originally it was going to be all plywood but I complicated that by an 8x factor.  Tim has a lot of gorgeous craftsman furniture in his home and I said a plywood dresser would be an eyesore. So we decided on cherry. But what to do about the joinery, complexity, and structural integrity of a large piece of furniture?  This is where the faux part comes in.

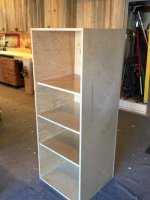
We built a plywood carcass and we are going to skin it with 4/4 cherry craftsman panels.  Three sides, drawer fronts and a top.  We have to get the side stiles, rails, and inset panels square and tight but not so much as to need structural integrity.

Let’s see if this turns out as envisioned.  I’ll document the build here.
(I'm not claiming to be the first to do this.  I just haven't seen it before)

Luke

[attachimg=1]

[attachimg=2]

[attachimg=3]
 

Attachments

  • cherry-3.jpg
    cherry-3.jpg
    68.8 KB · Views: 977
  • cherry-1.jpg
    cherry-1.jpg
    85.2 KB · Views: 971
  • cherry-2.jpg
    cherry-2.jpg
    71.3 KB · Views: 948
Staining the ply to match the cherry might be difficult . Maybe consider painting it (first). Might be a nice contrast. Use craftsmen color palette!
 
Luke, I've stained birch plywood to look like cherry with cherry analine dye.  I top coated with Minwax poly.  Looks great but a word of caution, it does fade over time, especially if left in the sun.  Maybe there's a top coat that had UV inhibitors?

Sent from my SM-N900V using Tapatalk

 
Here's the deal.  I'm not doing anything to the plywood.  It going to be covered up with cherry wood panels.  Like a big three panel door attach to two sides and a cherry frame for the front.  Then real cherry drawers.  It will be my first experience with dovetails. 

The plywood is just an internal skeleton.
 
>>>We are doing it in my shop.  I want Tim to do most of the work and I provide direction and some guidance on Festool and hand tools.
 
iamnothim said:
Here's the deal.  I'm not doing anything to the plywood.  It going to be covered up with cherry wood panels.  Like a big three panel door attach to two sides and a cherry frame for the front.  Then real cherry drawers.  It will be my first experience with dovetails. 

The plywood is just an internal skeleton.

Luke, I am not quite understanding.  Do you mean you will be gluing the cherry to the plywood pannels?

I know it is not quite the same, but a couple of years ago, I made a small lazy susan glueing 8 pie shaped pieces over 1/4" plywood to make it look like a pizza.  The whole thing came out great when finished.  It was meant to be a gift, but i was not sure if it might warp. The plywood base was 1/4" and the pie shaped pieces were 1/2" thick.  Once all glued together, i set it aside to be sure the whole thing was stable.  The next morning, I went down to the shop and the lazy susan was looking like i had build a birdbath. The whole thing was cupped wit maybe a 1/2" difference from rim to center. 

I set it aside (translated=buried it in a corner)  A month or so ago, as I was trying to develop some evidence of organization to my shop, i came across that "pizza".  I brought it out for observation.  After sitting for a couple of years sulking in the corner, the whole thing is dead on flat.  I cannot find one crack between pie shaped pieces and the solid wood has not separated from the plywood. 

It had been an experiment.  I probably did everthing wrong and so the disc warped disasterously.  It is now dusty, but perfectly flat.  I am going to leave it in the open for a while and move it around inside the house and out on the picnic table to see it it warps again.  Not trying to start a conversation to steal your project.  I just thought my experience might help in your decisions with your panels.

Tinker
 
Traditional way is far far lighter than your way.  One layer solid wood sides, framed open dust panels, yadda, yadda. 

You've every tool needed for the job.

But since you are committed to ply, consider going euro-cab and use only two stretchers, 4 inches deep from the front, Tandem w/ Blumotion slides, applied drawerfronts, and 2 mm margins for the whole front, not inset.

 
Why?
I didn't think I had the skills to make 3 side (back doesn't count) that are square, square to each other, have tight joints, and structural.  So I thought this method would remove structural and, with the help of a shooting board, planes, and a Domino DF500, I'd be able to make the sides tight and attach them to the carcass and put lipstick on the pig.  (Dear PETA, no pigs will be harmed in the construction of this dresser.)

[member=550]Tinker[/member]
Never a worry.  You are on topic and I always get a nice morsel or two from your posts.

[member=2952]Gene Davis[/member]
Brilliant.  You are Da Man.
We already have the Blumotion Slides and, using the LR32, are fitted to the sides.  BUT!  I hadn't considered Euro Overlay.  That would really make life easier.  No front frame and with the right proportions on the drawer front we can pull off the craftsman look.
I think if I make the side panels proud of the front drawer faces it'll look framed.

I knew it was going to be heavy, but you got me thinking about it again.  What if?  I fire up the Carvex and cut out strategic holes in the sides?    Got think on this....

Great Input!
 
Half my old pieces of ply look like they have propellers hiding inside them.
What causes them to warp?
Can those mechanisms be mitigated in the dresser?
 
Luke, The piece is for the 12 yr old daughter.  If it turns out nice, it will probably be moved many times before finding a permanent home where it will sit for more than a couple of years.  IMHO, I tend to think light weight should be a serious consideration.  When our daughter was headed for college, I made a bookcase for her.  It was collapsable made with sliding tapered DT's and only 6 screws stratigically located in the back. Within minutes, it could be disassembled and put into her car, either back seat or trunk. It was light weight enough that she could carry the enttire set of shelves very easilly.

That was over 30 years ago and it has survived many a move. Had it been heavy, I doubt it would have been a priority to have followed her around for so many moves.  I am sure that your attention to detail (I know, you are only going to supervise. HAHAHA) and with an overlay type of construction, it will be heavy and a very beautiful piece of furniture.  But I think very heavy in comparrison to other methods you might come up with.

Tinker
 
[member=550]Tinker[/member] you have a good point... The little one is now in grad school, and so now I am stuck into making her next project with the Lamello Campex, as well as veneered composite panels.
Those Clampex work great for sheet goods, but attaching them where a mortice and tenon would go is not their ideal. But I think a drawer would work, and I will be doing a test piece of a flatpack drawer.

Assuming that this is "bigger real wood" pieces, then those new domino-connectors may be just the ticket??

 
Tinker said:
Luke, The piece is for the 12 yr old daughter.  If it turns out nice, it will probably be moved many times before finding a permanent home where it will sit for more than a couple of years.  IMHO, I tend to think light weight should be a serious consideration.  When our daughter was headed for college, I made a bookcase for her.  It was collapsable made with sliding tapered DT's and only 6 screws stratigically located in the back. Within minutes, it could be disassembled and put into her car, either back seat or trunk. It was light weight enough that she could carry the enttire set of shelves very easilly.

That was over 30 years ago and it has survived many a move. Had it been heavy, I doubt it would have been a priority to have followed her around for so many moves.  I am sure that your attention to detail (I know, you are only going to supervise. HAHAHA) and with an overlay type of construction, it will be heavy and a very beautiful piece of furniture.  But I think very heavy in comparrison to other methods you might come up with.

Tinker

My daughter is 6' 3" and her boyfriend is 6' 6" and ripped. [smile]
 
Holmz said:
Half my old pieces of ply look like they have propellers hiding inside them.
What causes them to warp?
Can those mechanisms be mitigated in the dresser?

Ya [member=40772]Holmz[/member]  The damn plywood has a mind of it's own.  I'd never seen it happen but the seam of one of the divider shelves to the side popped.  There's a 1/4" gap.  No matter, I'll go midieval on it with screws and glues.  I think cutting portholes in the sides will help that.

The cherry stiles and rails panels will be registered to the box with dominos.  I can then pull the frame to the box using screws from the inside of the box to the frame.

Question....  [member=2952]Gene Davis[/member]
I plan on rabbeting the side frames and resawing the 4/4 stock for the inset panels.  Maybe book matched the pieces.  I seem to recall taking apart old furniture and seeing that the panels weren't glued to the frames.  They floated in the frame and were held in by small blocks.  Same thing with coffee table tops to the frame.  Only screws were used.

Do I glue?

Thanks everybody.
This build is an experiment as much as anything and Tim's ok with that.  Your comments really help.  I'm going to set up my Nikon on a tripod and takes lots of photos during the attempted build.  Yes [member=550]Tinker[/member], mistooks too.  [smile] 
 
iamnothim said:
Holmz said:
Half my old pieces of ply look like they have propellers hiding inside them.
What causes them to warp?
Can those mechanisms be mitigated in the dresser?

Ya [member=40772]Holmz[/member]  The darn plywood has a mind of it's own.  I'd never seen it happen but the seam of one of the divider shelves to the side popped.  There's a 1/4" gap.  No matter, I'll go midieval on it with screws and glues.  I think cutting portholes in the sides will help that.

The cherry stiles and rails panels will be registered to the box with dominos.  I can then pull the frame to the box using screws from the inside of the box to the frame.

Question....  [member=2952]Gene Davis[/member]
I plan on rabbeting the side frames and resawing the 4/4 stock for the inset panels.  Maybe book matched the pieces.  I seem to recall taking apart old furniture and seeing that the panels weren't glued to the frames.  They floated in the frame and were held in by small blocks.  Same thing with coffee table tops to the frame.  Only screws were used.

Do I glue?

Thanks everybody.
This build is an experiment as much as anything and Tim's ok with that.  Your comments really help.  I'm going to set up my Nikon on a tripod and takes lots of photos during the attempted build.  Yes [member=550]Tinker[/member], mistooks too.  [smile]

[member=28483]iamnothim[/member]  I've had not much luck using dominos to register the face frame to the carcass.  It's a real pain in the arse and has to be perfectly square.  My almost fool proof method is to use pocket screws.  I make the face frame a tad shy of an 1/8" taller and wider than the carcass, then let it hang over evenly all the way round and screw in the pocket screws.  Follow up with a flush trim bit with a router to even up the sides.  You can drill the pocket screws on the inside of the cabinet, when the drawers are installed, you'll never see them.
This way, if the carcass is slightly out of square, with the face frame hanging over the edges, you'll never notice and since the face frame is presumably square, you shan't have any trouble installing the drawers.
Easy-peezy.
 
Tell us details of frame and panel applied-panel sides, so we can suggest design.  If it's just a stile and rail thing like a cabinet door, details are common.  Look at panel buttons or balls for the grooves.
 
iamnothim said:
Tinker said:
Luke, The piece is for the 12 yr old daughter.  If it turns out nice, it will probably be moved many times before finding a permanent home where it will sit for more than a couple of years.  IMHO, I tend to think light weight should be a serious consideration.  When our daughter was headed for college, I made a bookcase for her.  It was collapsable made with sliding tapered DT's and only 6 screws stratigically located in the back. Within minutes, it could be disassembled and put into her car, either back seat or trunk. It was light weight enough that she could carry the enttire set of shelves very easilly.

That was over 30 years ago and it has survived many a move. Had it been heavy, I doubt it would have been a priority to have followed her around for so many moves.  I am sure that your attention to detail (I know, you are only going to supervise. HAHAHA) and with an overlay type of construction, it will be heavy and a very beautiful piece of furniture.  But I think very heavy in comparrison to other methods you might come up with.

Tinker

My daughter is 6' 3" and her boyfriend is 6' 6" and ripped. [smile]

Luke, I think we were talking about your friend's 12 year old daughter.  If we are alking about YOUR 12 year old daughter, and you say she is already 6'3", you better start trying to figure how to rase the doorway heights in your house.  If we were talking about my kids, altho they are both older than I, they can hardly reach the doorknobs in any house. As far as the 6'6" boyfriend, he needs to be thinking about his own future.  An example: I was 7 feet tall before i got into the masonry biz. By now, my head is barly above my knees and my knees barely clear my boot tops. 

I continue to maintain a look to the future is important in any endeavore.    [poke]
Tinker
 
Back
Top