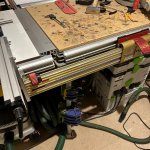
I posted before on my Dewalt 745 integration into a customized Festool CMS:
[attachimg=1]
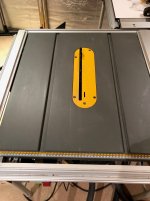
I've long wanted to make a nicer integration as the DW745 top is quite uneven, especially around the throat plate, and the mitre slots aren't great. I've done lots of work on the saw to file the mitre slot to get a smooth-running mitre gauge and made inserts to try and improve it. It's designed for site work, not a workshop. I fancy a Festool TKS80, but I don't have a room with all the attachments and begrudge the lack of a mitre slot.
The long-term idea was to create a new top out of solid phenolic and mount the DW745 innards. So, I got an Origin Gen2 just before Christmas; this was my first project. I use Fusion 360 for CAD. I have a Carbid 3d Nomad so I've done small scale CNC stuff before.
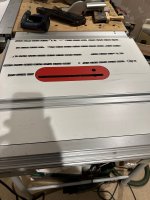
[attachimg=2]
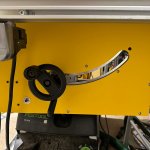
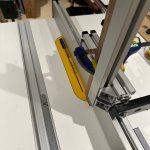
I cut the insert out of 6mm HPL. I bought extra to make multiple inserts without needing adjustment screws.
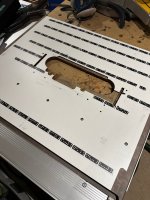
I first created the mitre slot and the throat plate on the top surface. I tweaked the depth and offset on the throat for a nice fit of the insert. I cut the phenolic with the 16mm bit for clearing and then an 8mm bit for finishing passes. I used auto-pass with a shallow depth of cut.
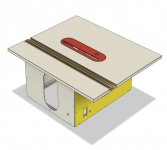
[attachimg=3]
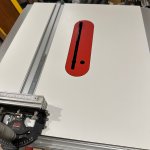
I taped the back of the piece and set the reference edge the same as I used for the top so everything would align. I then cut the slots and holes I needed for mounting and relief. This was a back-and-forth process between CAD and importing/cutting the new bits. I found the Origin was great for this workflow. I've even left the tape on the underside and saved the workspace so I can return to add anything else I may need.
[attachimg=4]
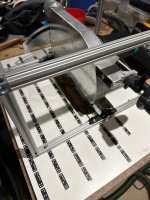
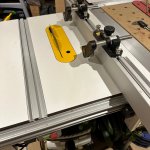
I mounted the saw and a frame made out of Bosch Rexroth. I drilled the holes in the aluminium profile using the Workstation and files saved from Fusion.
[attachimg=5]
I cut a new front panel out of 6mm HPL and used the original Dewalt metal plate mounted to it. For making parts, I just put them on my scanner (or drew around them on paper if they weren't flat) and then imported them into Fusion and created a sketch on top of them.
[attachimg=6]
I needed to cut some metal work on the old saw due to how it was affixed to the base and to the frame. But it's out of warranty, and I never envisage putting it back together.
[attachimg=7]
Job done. I've since made a zero-clearance insert and a couple of blanks.
[attachimg=1]
I've long wanted to make a nicer integration as the DW745 top is quite uneven, especially around the throat plate, and the mitre slots aren't great. I've done lots of work on the saw to file the mitre slot to get a smooth-running mitre gauge and made inserts to try and improve it. It's designed for site work, not a workshop. I fancy a Festool TKS80, but I don't have a room with all the attachments and begrudge the lack of a mitre slot.
The long-term idea was to create a new top out of solid phenolic and mount the DW745 innards. So, I got an Origin Gen2 just before Christmas; this was my first project. I use Fusion 360 for CAD. I have a Carbid 3d Nomad so I've done small scale CNC stuff before.
[attachimg=2]
I cut the insert out of 6mm HPL. I bought extra to make multiple inserts without needing adjustment screws.
I first created the mitre slot and the throat plate on the top surface. I tweaked the depth and offset on the throat for a nice fit of the insert. I cut the phenolic with the 16mm bit for clearing and then an 8mm bit for finishing passes. I used auto-pass with a shallow depth of cut.
[attachimg=3]
I taped the back of the piece and set the reference edge the same as I used for the top so everything would align. I then cut the slots and holes I needed for mounting and relief. This was a back-and-forth process between CAD and importing/cutting the new bits. I found the Origin was great for this workflow. I've even left the tape on the underside and saved the workspace so I can return to add anything else I may need.
[attachimg=4]
I mounted the saw and a frame made out of Bosch Rexroth. I drilled the holes in the aluminium profile using the Workstation and files saved from Fusion.
[attachimg=5]
I cut a new front panel out of 6mm HPL and used the original Dewalt metal plate mounted to it. For making parts, I just put them on my scanner (or drew around them on paper if they weren't flat) and then imported them into Fusion and created a sketch on top of them.
[attachimg=6]
I needed to cut some metal work on the old saw due to how it was affixed to the base and to the frame. But it's out of warranty, and I never envisage putting it back together.
[attachimg=7]
Job done. I've since made a zero-clearance insert and a couple of blanks.